Long time since my original intro posting but I have finished building my stand and thought I might share some lessons learned if anyone is interested.
On now to building baffles in the sump and doing the plumbing. Definitely hoping that doesn't take another year. Hoping to have water in the tank this Spring.
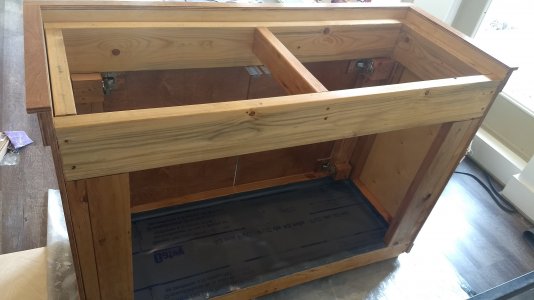
- Time - as evident by the timing of this vs my original post (1year) making my own custom stand took a long time. How much spare time you have obviously could be different but it took me a while. Getting the frame built was fairly quick. (I also sistered a joist under my floor before I even started the stand) Wrapping the stand and making it look as pretty as I could took a long while. If you haven't done this before don't underestimate the work. That said I'm still glad I did as I'm happy with the finished product and new alternatives apparently are multiple thousands of dollars.
- Use of framing 2x4s - I followed popular plans to build the frame out of 2x4's (also used some 2x6). But, the roughness of this lumber made the project much more difficult. I learned that Home Depot has much nicer grades of wood (or at least I saw a guy carrying some out after I already had the frame built) that are not all rough cut and rounded and would have made fitting together and skinning far easier as things would have aligned flush much more nicely. I believe I'm echoing what others have already said here but if using nicer lumber you can also make that part of the finished exposed product, not needing to 'skin' everything so potentially easier there as well. Only reason I'd use 2x4 again is if I really don't care about appearance, I'm really trying to save a few bucks, or maybe if I had copious framing lumber lying around already with no other use.
- A power miter saw sure would have been nice, I used a circular saw and it was not super easy to make perfectly straight and correct length cuts.
- Shoot board - definitely make a shoot board for cutting large pieces of ply straight, absolutely necessary, worked very well. I originally was frustrated that I couldn't get my hands on a table saw to use and instead had to muddle with clamping on and measuring the position of a shoot board over and over and over again, but after talking with others and looking into it some, a table saw is not a great tool for cutting 4x8 ply either, the wood is way to big to safely and effectively maneuver on the table saw. Also critical to this process was the combination square I got. How I ever got on without one on any project before I don't know.
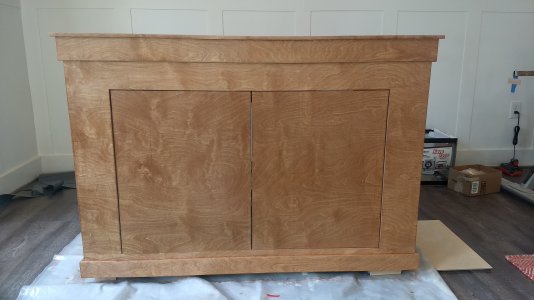
- Paint vs finished wood - a great deal of time spent on this project was spent trying to make it look good as finished wood. If the whole thing were painted many things would have been easier and faster. No edge banding on plywood, no staining, any mistakes would be easy to fill and paint over, any damage later down the road would be easy to repair. If you are neutral on the look, painted finish would be much easier.
- 1/2 vs 3/4 ply - To save weight and to some degree cost I used 1/2 inch ply to skin the frame (not load bearing) and to make the doors out of. Little did I know at the time that all door hardware is created for doors 3/4 in. thick. I had to find a 1/4" trim strip to adhere to the hinge mounting points on my doors to bring them up to the required thickness. Another step, maybe worth it as it saved cost and weight but was an added complication for sure. My doors came out slightly warped as well probably due to bad storage on my part, this may have been less likely with 3/4".
- Ply vs solid wood - I used ply for all paneling/skin and trim and finished with edge banding on all edges to make it look like solid wood. I hadn't used edge banding before, it's borderline magic and overall works very well, but a) it is an additional step that definitely takes time to apply, seems simple but there are lots of edges even in my fairly simple design, and b) it some times mars the surface of the ply when you are applying it, the trimming blade catches the veneer of the work piece when you are trimming the banding and screws it up. I dealt with this with wood filler to fairly good effect. Anyway, if I was using solid wood rather than ply for trim I could have saved a lot of time and ended with better finish. That was my original intent but my local lumber shop didn't have any solid birch to match the ply I was using for skin.
- Inset doors - a small note, I went with inset doors as my aesthetic preference, these style hinges require more frame on the inside/frame to mount to so I had to add more lumber there which takes up some sump space, only a couple inches at the door hinge points, in my case so far not an issue as the 20gL sump had room to spare in that dimension so no worries, but something to be aware of.
- Related to the above, I got soft close hinges, and also used the push to close magnetic latch things to open and close and then leave no external handle on the door. This 'works' but they compete a bit with each other as you have to wait for the soft close to do it's thing, then push to close, or just push through the soft close manually. Still works though, minor thing.
On now to building baffles in the sump and doing the plumbing. Definitely hoping that doesn't take another year. Hoping to have water in the tank this Spring.
Last edited:
")
