Diy aquarium stand mods

fishsauce1

New member
I need help with my DIY stand. I have a 60 gal. glass aquarium with plastic perimeter molding top and bottom. Dimensions are 48-3/8L X 12-7/8W X 25 H. I am planning to do the model by rocketengineer using all 2X4's until I came to this problem. I am planning to make the stand 48-1/2 L X 18-1/2 W X 30 H. The reason I want to make it wide is for room for my canister filter (I just got the odyssea cfs500, hopefully the fx5 in the near future) plus it will give the top heavy aquarium more stability. 18-1/2 W (-3) will give me 15-1/2 inside width. Anyways, the problem is that the base of the aquarium will only be supported by the two end 2X4's and not on the long sides. I will be putting plywood on top, back and sides, probably 1/2 plywood.
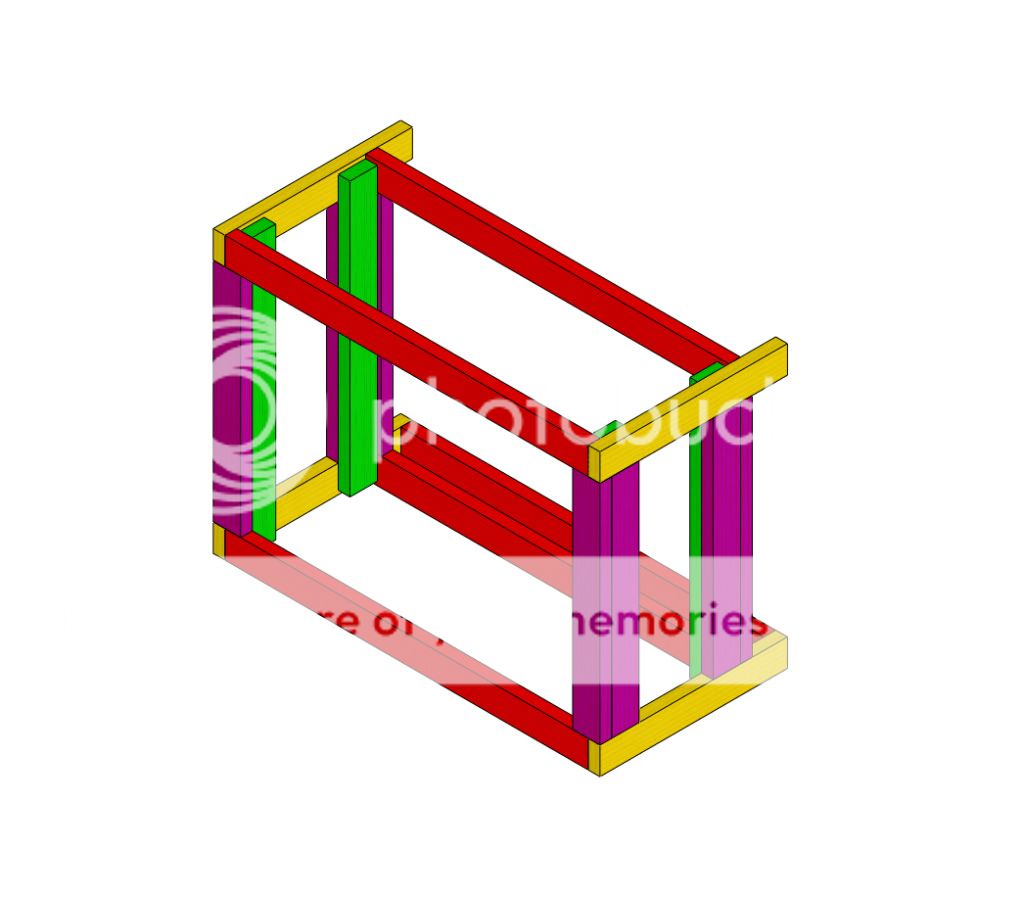
There are 3 ideas I came up with to resolve this issue, 1.) to put 3 or 4 cross-bars in the middle before topping it with the plywood. The question is, would the crossbars held by 2 screws in each side plus plywood be sufficient to support the weight of the aquarium. Idea 2.) to put 2 more long 2X4's inside (front and back) screwed to the (green wood) and support it with another 2X4 (like the main footing that supports all the weight to the bottom base) then mount the 1/2in plywood on top. Idea 3.) is to use about six 2X4's (18-1/2 long) put it on top of the stand, then mount my plywood on top, this will add 4 inch on the total height of my stand unless I use a 2X3's or lay the 2X4's sideways. Any suggestions or Ideas anyone would be greatly appreciated.
 
A better solution than the ones you mentioned:
StandWithbackgap90g.jpg

Same concept but pay attention to where the legs are located. They should be directly under the rails supporting the tank.

RocketEngineer

A little reworking of the original design and you can put as much space behind the tank as you want.
 
Wow, first of all thanks for responding (didn't expect it to come from you) so I'm so glad it actually came from you. I like the design you came up with, that being said, would I still have at least 15inch width room inside the cabinet once I skin it? And of course, the protruding 2X4's would be towards the back right, so I can put doors in the front? thanks again.
 
Why wouldn't I respond, no one else had provided an answer and it is a common question:spin3:. With no back on the stand, the inside of the sump is the full depth of the stand between the legs. If you extend the sides to have 5.5" behind the tank (the width of a 1X6 for filling the gap), you are looking at 18.375" inside the stand. If you make the stand slightly larger and have the tank sit more towards the center of the 2X4 instead of right on the edge, you can get even more space.

There is no reason the extra depth has to be at the back. There is one stand in my stand template thread where they put the extra space at the front and turned it into a shelf to place things while working on the tank. It is more typical to have space behind the tank for wires and plumbing but it isn't required to be that way especially for a reef-ready setup.

There are lots of different ways to cover the basic structure depending on the style of stand and the materials available. If doors match your decor, go for it. Access panels are another option and its what I used for my hood. Find a style that works for you and duplicate/modify as you see fit.

Good Luck,
 
I did something similar, extending the stand in the back to support plumbing, and a make it possible to move my sump further back.

The bottom frame is the full perimeter on the footprint, and the top is just the 2/4" plywood extended in the back. The tank has full support, and I gain the extra room to put a 40g breeder sump.

Skin isn't shown in these images, but the plan is to use oak sheets that will be removable panels, held on via magnets. This way I have full access if the need arises.

75gdone.jpg

dsc01785f.jpg
 
@ Rocketengineer, I love the plan and will definitely go with that style of stand. It will definitely give me more flexibility if I decide to go with wet/dry sump later on. For now I will stick to canister and fluidized filtration till I get a more workable budget.
@ Daimyo68, thanks for posting pics, it is worth a thousand words. Both of you have given me so much ideas how to go about my project for this renewed hobby of mine. This hobby is one that me and my father shared when he was still alive(so much memories), now I get to share it with my daughter. Thanks. Hope you don't mind me taking some of your designs. (I didn't say borrow because then I have to give it back, lol)
 
Back
Top