"Full Spektrum" LED color ratio

Zachts, is your aluminum c channel sufficient at keeping your vero 10 chips at an acceptable temp? Also what size is your fixture, and what size tank is it for? What amperage are you running your vero 10s? Sorry so many questions but i am not finding many threads to read with people using these stars and giving information on their setup. Thanks in advance.

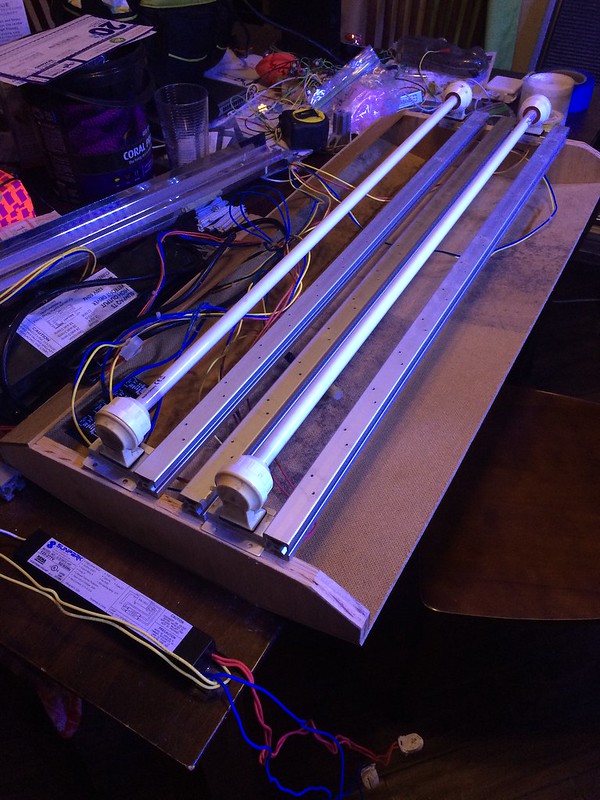
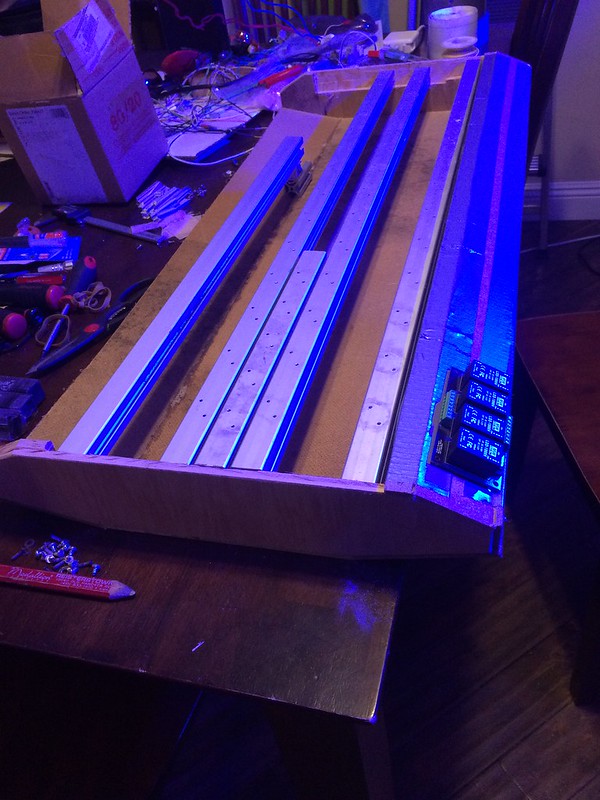
1" c channel they are around 16" long. fixture measures roughly 7"W x 20"L x 4"H. There's two fans in the center that vent out the top on the ends. Very good airflow in, around, and between each piece of C channel, but the fans don't have to work all that hard to keep things under 100 degrees.

The Vero's are only running something around 250-300mA when on at 100% duty cycle (I'd have to go check but if I recall right they are only running 50% duty cycle so not putting out much heat at all). I wired the two in parallel with a current mirror of the original white driver that had been running a pair of 3up white star chips in series. I don't have a temp sensor directly behind them but from other testing they should be fine. (I'm only monitoring temp on the "actinic" strips as they have the highest total heat load on them and are furthest from the fans and receive less air flow than the center clusters.)

I'ts over my frag tank, a standard 55 gallon, and lights one half, more than enough to grow SPS on the racks and softies on the bottom. Nothing is running over ~600mA so not even full power that it would be capable of. I't draws just under 90watts with everything on full power.

More pics on my profile and I have a build thread floating around here somewhere, but haven't updated it in a while with the changes pictured earlier.
 
700mA will be crazy bright from the vero10. you might just wan't to run 3 in parrelel of one driver. (they won't be spot on even without building mirror circuits but close enough I think, as each chip already contains two parrallel strings of 9 diodes. The one's I've played with have been very closely balanced in terms of forward voltage.) It's also a lot of heat in a single spot, equivalent to running 9 single diode LEDs in the foot print of one star chip, so lower current is a good thing.

As for sourcing the 2700k, looks like only place with any instock that will sell less than 40 at a time is Farnel, expensive though.

3000k will be very similar in color but does not contain quite as much of the red phosphors and emits slightly more blue light. A suitable substitute IMO if you don't wan't to wait.

I was planning on running 6 vero 10s in each 36" section, 3 5000k and 3 2700k (or 3000k), do you think running three from a LDD1500 would be a good idea? That should provide each star with 500ma? That would allow me to run one driver for the warm whites, and one for the cool whites. I am probably going to run them at a fairly low output via the pmw control but i will have more ability to tune my color and par.
 
Last edited:
I have a very 18 5600k 90+ cri. Definitely looks better than most Cree leds but at least the copy I have seems to run above the bb curve and suffers the same green ish look as all blue based yellow phosphor leds. Imo you still want to add cyan to crisp it up.
 
I have a very 18 5600k 90+ cri. Definitely looks better than most Cree leds but at least the copy I have seems to run above the bb curve and suffers the same green ish look as all blue based yellow phosphor leds. Imo you still want to add cyan to crisp it up.


If you take a look at my list of LEDs i posted, you might notice that i am including cyan. Do you think 6 Cyan are enough for a 36" area? I did order some extra of most leds so i could play with the ratio a little. Here is the list again since you missed it:

16 Luxeon ES Royal Blue
8 Luxeon ES Cool Blue
3 Bridgelux vero10 2700K or 3000K 95CRI
3 Bridgelux vero10 5000K 90CRI
6 Luxeon ES Lime
4 Luxeon ES Deep Red
4 SemiLED Hyper Violet
8 Exotic True Violet
6 Luxeon ES Cyan
 
Using the standard LDD you need around 30v available to operate them. I don't recall how the CAT4101 works though.

Cat4101s drop 0.5V max if i understand the datasheet. But they can only handle a max of 25V, which is the ultimate limiting factor on my setup currently.

Looking more into it i read up on some of the other CoB lights Bridgelux makes, like the BXRA-xxx0540 series. A BXRA-27G0540-A-03 should be 90+ CRI, ~18V typical 2700K light mounted on a star. Lumen per watt is slightly worse, at 75 instead of 86 on the vero 10 equivalent and there is no 90 CRI lights after 3000K. Problem with these seem to be stock status.

Another one i did find is the BXRE-XXX0800-B (the -A run at 35V+) series. Again they are only in 2700K and 3000K in 90 CRI, but also run at ~18V typical, at a even higher lm/W of 91. These don't come as stars though, they are square.
 
Last edited:
I was planning on running 6 vero 10s in each 36" section, 3 5000k and 3 2700k (or 3000k), do you think running three from a LDD1500 would be a good idea? That should provide each star with 500ma? That would allow me to run one driver for the warm whites, and one for the cool whites. I am probably going to run them at a fairly low output via the pmw control but i will have more ability to tune my color and par.

I'd suggest just starting out with one of your LDD-1000 since you already have them, at ~333mA that is still a TON of white light. Remember that without using a mirror circuit it's likely one will run a bit higher current than the rest, the closer to Max you are driving them the more of an issue this becomes.
 
Cat4101s drop 0.5V max if i understand the datasheet. But they can only handle a max of 25V, which is the ultimate limiting factor on my setup currently.

Looking more into it i read up on some of the other CoB lights Bridgelux makes, like the BXRA-xxx0540 series. A BXRA-27G0540-A-03 should be 90+ CRI, ~18V typical 2700K light mounted on a star. Lumen per watt is slightly worse, at 75 instead of 86 on the vero 10 equivalent and there is no 90 CRI lights after 3000K. Problem with these seem to be stock status.

Another one i did find is the BXRE-XXX0800-B (the -A run at 35V+) series. Again they are only in 2700K and 3000K in 90 CRI, but also run at ~18V typical, at a even higher lm/W of 91. These don't come as stars though, they are square.

Gorgok,

you might just try bypassing your driver for that string and hooking it up with a transistor direct off the PSU to provide pwm dimming to each Vero, that would likely get you plenty of light if dropping them in as replacements to singe chip whites. For kicks and giggles I just hooked one up to a 24v battery and it is impressively bright, drawing 197mA from a cold start.
 
Well I built a prototype of my fixture this weekend. Just a mock up using some scrap wood i had laying around to get an idea of what size and how things would fit etc. I am thinking of doing 5 rows of LEDs instead of 4. I need to go purchase some t5 reflectors tomorrow to really see if i can fit the 5th row or not. I found some that claim to be 2.25" wide so that should work perfect. I was hoping to make each fixture about 35.5" wide but after trying to fit the t5s realized it is going to be a full 36". Not the end of the world, but i was planing on a system to allow me to lift each light for cleaning and maintenance. Its gonna be a tight fit once the canopy gets built, but i am sure i can make it work.

Don't mind the duck tape and super glue, the end product will be an all aluminum housing.

Here it is with the t-slot and t5s trying to figure out how everything would fit.

16433136628_1f2700850a_c.jpg


And here it is with the t-slot only and the driver board for reference. The drivers should fit off to the side, does anyone know if the LDD drivers can be mounted upside down? Also there will be a fan on the top side of the fixture is it better to blow air down into the enclosure or pull hot air out the top? There will be vent hole cut into the enclosure along the front and back bottom.

16433136378_bc75b605bf_c.jpg
 
You can position the ldd's any way you like, it doesn't matter. Just make sure the solder joints on bottom of the board don't touch the aluminum housing.
 
I'm interested in seeing how this build will turn out. :D

Also, where do you get your T5 reflectors from?
 
I'm interested in seeing how this build will turn out. :D

Also, where do you get your T5 reflectors from?

Custom aquatic is located about a half mile from me, so I am going to drive over and see what they have for a "clip on bulb" t5 reflector.

And thanks for the other tips guys, I will make a mounting plate with standoffs for the driver boards, and blow air down into the enclosure.
 
After seeing how corroded the previous screws i used got, do you guys thing nylon screws will hold up to the heat generated by the led stars?
 
They should, yes. You'll be damaging the LEDs before getting hot enough to kill the screws. But you could always use a bit of silicon grease over the SS ones :)

Tim
 
They should, yes. You'll be damaging the LEDs before getting hot enough to kill the screws. But you could always use a bit of silicon grease over the SS ones :)

Tim

Thanks Tim, I went ahead and ordered 100 nylon screws to test with for the build. I also got my vero10s, a few hdmi connectors, and power connectors ordered, should all be here in the next couple days. I found a water jet fabrication company just down the street from me, so i am going to stop by on my way home to get an estimate to cut out my fan and vent holes for my enclosure. Hope it is a reasonable price because i am sure it will be way better than if i do it myself.
 
After seeing how corroded the previous screws i used got, do you guys thing nylon screws will hold up to the heat generated by the led stars?

Nylon should be fine, I always worry about stripping them or them not holding, but seems they should work.

I think your old screws were probably just zinc coated steel, rusts like crazy even with exposure to only fresh water over time.

I've always had great luck using the less expensive 18-8 stainless screws. (316 stainless would be ideal but way too expensive if you need a lot but can't order by the 1000's.

Keeping the splashing water off the screws would have made even your old ones last just fine I think.

The key is splash gaurd and pulling in cool dry air from above or on the ends of the fixture and exhausting the hot air. You want to avoid pulling in any warm humid salt laden air from near the water surface, etc.
 
Thanks Tim, I went ahead and ordered 100 nylon screws to test with for the build. I also got my vero10s, a few hdmi connectors, and power connectors ordered, should all be here in the next couple days. I found a water jet fabrication company just down the street from me, so i am going to stop by on my way home to get an estimate to cut out my fan and vent holes for my enclosure. Hope it is a reasonable price because i am sure it will be way better than if i do it myself.

What size screws do you guys use? The ones I use seem to have two small of a head.
 
The ones i used before were 4-40 thread 1/4" long. I got a bunch of hex head ones from the local hobby shop, those held up better than the flat head ones from home depot (Pictured in a previous post).

The nylon ones i ordered were also 4-40 thread, 1/4" long. I had to be very careful when mounting previously because it is easy for a screw to contact the solder pad on the led star. Figure the nylon screw would help prevent any shorts.
 
Any updates? Wilkerschnepf, how happy are you with the color you ended up with? How many channels are you running and what colors did you put on each? Same questions directed to jedimasterben. I have a 4x2x2 tank and will probably copy jedimasterben's colors.
 
Back
Top