120 gallon rimless with basement sump

I've been planning this build for nearly a year and finally have house updates out of the way to start. Here's the plan:

120 gallon glass rimless (48x24x24) display
75 gallon(ish) acrylic basement sump -- to be built

Lighting:
48" Aquatic Life T5HO Hybrid
Ecotech Radion xr15

Skimmer:
Vertex Omega 180i

Return Pump:
Reeflo Swordtail 1750

Powerheads:
Dual Maxpect Gyre XF230

Overflow:
Synergy Reef Systems 16" Shadow

Controller:
Reef Angel Star

A couple of thoughts on my approach:
  • Looking to run Triton to ease the number of water changes
  • Will have 29 gallon quarantine
  • Looking to build in redundancy to the system

Hoping to share with others my progress and elicit ideas from the community.

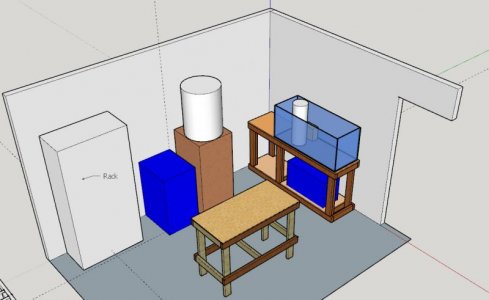
SketchUp file of fish room attached
  • The blue block is my sink
  • I'll have a 55 gallon drum for keeping salt water ready
  • Still figuring out a top off container
  • Stand will house quarantine below
The blue block is my sink

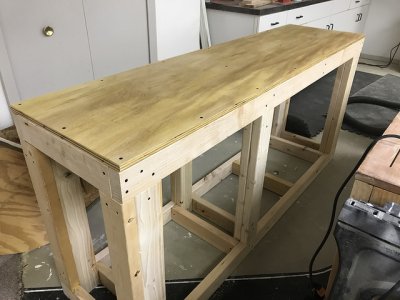
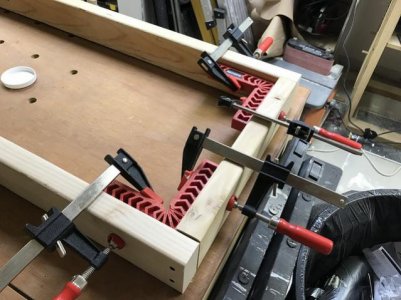
For now, I've started on the sump stand. Pretty standard design to hold a 48x18x20 acrylic tank that i'm building. I'll be picking up the cut sheets later this week. Debated on paint or sealer for the top of the stand but decided on using some leftover Waterlox, which should protect things nicely.


I'll continue to post as things progress
 

Attachments

  • Fish Room.jpg
    Fish Room.jpg
    38.5 KB · Views: 5
  • 43696358605_93ae1b8b37_z.jpg
    43696358605_93ae1b8b37_z.jpg
    100.4 KB · Views: 5
  • 43696359295_1d1c5311ac_z.jpg
    43696359295_1d1c5311ac_z.jpg
    52.7 KB · Views: 3
Good start- looking forward to how your fishroom ends up.

I chose to keep the water making equipment outside of the room, partially because I could use the slop sink for non-fish related basement stuff, but also because if I'd enclosed it all, I'd have blocked off the back half of my walkout basement and would have had to add egress points. Good compromise.

Take a look and feel free to help yourself to any ideas that take your fancy

https://www.*********.com/threads/neil’s-in-wall-180-with-basement-fishroom.390436/


Sent from my iPhone using Tapatalk


Nice thread. Looks like a much bigger space than I have to work with.
 
120 gallon rimless with basement sump

Picked up the acrylic for the sump. Started prepping the edges for welding. Never built a tank out of acrylic, but learning a lot online

Before...
73c3dae8989f0d55d622e3156652d613.jpg


After...
179d34cc8a43d71fa4deadb51b465660.jpg
 
120 gallon rimless with basement sump

Sump walls welded

286ae3762eebb0065ce340febd4b4d17.jpg


Dimensions- 48"x18"x20.5"

Welds not as clean as I'd like, but will do for a sump. Am considering some bracing on a bottom edge that has a fair number of bubbles.

What did I learn:
- route the edges! I should have taken the time to set up my router table to clean and square up edges. Instead, I hand scraped edges, which meant the edges weren't as clean as I'd hoped
- use pin method. I saw online that the king of diy said you can use capillary for 1/2". I found that the liquid didn't get all the way across the joint at times so I had to apply solvent on the other side
- I will say that my last two joints were much better than the first few

Left to do:
- flush route any overlap
- add top bracing
- add baffles
- drill for external return pump
- flame polish edges
 
Last edited:
Making progress

Drilling holes for drain lines into sump
464b425d06543ca8d5458b51c20f79c7.jpg


Decided to route out removable plate for drain section of the sump so I can clean it
c391d6f1f2b1d04d9632978188199d58.jpg


Cutting teeth for refugium overflow
2c93bdca39de85d67759e77364518014.jpg


47ee0d10b2cfc687fd8ff3c6bd8360fe.jpg


Started welding in baffles
e89d4156c13fe803b788c7683396f200.jpg
 
My display tank on the main floor will be running parallel to the floor joists. Not ideal, but it's the only direction I can run it. To compensate for the weight, I opened up the ceiling in the fish room below and will be reinforcing 2 of the beams to ensure no sagging over time.

In addition to sistering the joists, I'm going to add a support pole. This may be overkill, but cheap insurance.
388c1b0999dfaf38060400dfbe9ba258.jpg


Display tank build has started
b633a0151cd79b6a4ba96f9dedd0736a.jpg


Here's what the final outcome will be
2bbb88f4552d697d995fd24449ece1a5.png
 
120 gallon rimless with basement sump

Couple of updates


Frame completed and top painted

df9075705b5e13efa7ab1fd30819d874.jpg


Stand skinned. One thing I'm doing is building recessed section on the side to house the Gyre controller and reef link if I decide to get one. Also added a small drawer to house food and towels

44666b71479a52add888db952697bb24.jpg

823eb638f10362cbf97acc0d04f5e6f7.jpg


Got all the trim on and filling the brad nail holes in preparation for painting

5652f4105083d6fe55816b9b4e228239.jpg

cb4f769064f427cec9920ca65da514e7.jpg
 
Awesome following along !!

Building my 120 stand and doing a sump in the basement as well. This way easy Maintenance and access to everything.

Love the stand so far !


Sent from my iPhone using Tapatalk
 
Awesome following along !!

Building my 120 stand and doing a sump in the basement as well. This way easy Maintenance and access to everything.

Love the stand so far !


Sent from my iPhone using Tapatalk


Thanks. Having the stand built feels like a huge milestone. I'll start painting this week. Also, my new tank is scheduled for delivery later this week. I agree with the basement sump.
 
Holes drilled in floor for the 3 drain lines. Still have to drill for the return

03468d655c0eacc7814df1e48e3725cd.jpg


Having never drilled holes in glass, this was the step I was the most nervous about. 2 for the overflow and 1 for the return. Took about 30 minutes per hole. Turned out to be fairly easy.

Template for the holes
7dca37843718c883b1d66c9c5aaa0fbd.jpg


Drilled a 1/4" hole in an old bucket to create an easy way to supply cool water to the hole saw
a62d0d77d09d0745ff7b87d674e43261.jpg


408500f62409aa0406b844ca337a4bfb.jpg
 
Floor is reinforced. Sistered primary joist, added new blocks and floor jack post

74b1d8cd23eca238c007d4a499ba4087.jpg


Hoping to get the finished stand in place this weekend and put tank on it
 
Tank and stand together!

0080a713251f46f79bf86c2b839640d9.jpg


Next step is to finish the drawer front, build shelf, and paint the back black. Couldn't resist putting the overflow box and return bulkhead on to see what they look like

Right now it's sitting on furniture movers until I get all the work done and plumbed
 
Made some good progress over the past few days. For painting the back of the display I decided to try something other than rustoleum, Krylon ColorMaxx. I've never painted an aquarium so I have nothing to compare to, but overall seems to work well.

40554fec41278d64ab17c79c92558a3c.jpg


For the stand I wanted to not only recess a space for equipment so you don't see it, but have access to the inside of the stand for electrical wires. Added magnets to the cover for easy removal.

2a9e2a58aefae46bdf6add34a7b13f57.jpg


Also added the drawer front

56d02f41ba73a009ace9b5a85d040365.jpg


5717f4964037b1c58ba1795869bf0b66.jpg


For the sump I'm nearly done. After initially adding 1/8" baffles I realized that they were way too thin. I ended up getting 3/8" acrylic (1/4" probably would have been fine). I added braces around the top and decided to route out a lip for some lids to help with evaporation.

f15774d7af7853718baf18ff82e07100.jpg


Black lid is to help keep light out of the skimmer chamber from the refugium light. Will need to cut a hole in the lid for the skimmer.

Bulkhead is in along with dosing and ATO line holder

226723f5d8950756726dc8e7d60e1a38.jpg


5fa446a732d9f6fb5268eee85515090f.jpg
 
Started pricing out plumbing and things add up quickly. I love the look of BRS colored pipe and gray fittings but not the price. Anyone gone in a different direction?
 
Started pricing out plumbing and things add up quickly. I love the look of BRS colored pipe and gray fittings but not the price. Anyone gone in a different direction?


You can paint the schedule 40 fittings with krylon fusion spray paint. Also check out supplyhouse.com


Sent from my iPhone using Tapatalk
 
You can paint the schedule 40 fittings with krylon fusion spray paint. Also check out supplyhouse.com


Sent from my iPhone using Tapatalk


Thought about it and I've got a lot of pipe to run so I'll bite the bullet and buy the blue to save time. Black Friday deals will at least help ease some of the cost
 
For the build, finally decided on going with 80/20 for the light mount. It's in black and if I planned correctly should look pretty good.

For the stand, I have been working on the shelf. There are two layers to it. The underside is painted and should be ready to install tomorrow. The top is made and I've started staining. I tested out General Finishes Antique Walnut Gel Stain on maple, but it was too light so I picked up some Java to darken up the color. Will take some time as I need to do multiple coats on each side and add the topcoat

00d7acdacb4780cf7ae2a139c460ee47.jpg


1aa75f009a281cc809cbe55ef55d1d8c.jpg


Also got my QT take up and running. Cycled it with some rock from my current tank and MarinePure that was in a HOB filter.

4bc34c4d9462e276393bd1daa163a094.jpg


Been busy ordering from BRS and taking advantage of Black Friday sales. I'll post all the new goodies once they come in. Feels like early an Christmas!
 
Back
Top