Acrylic tank seam not looking good. Any advice would be appreciatted

12volt

New member
Hi Guys,

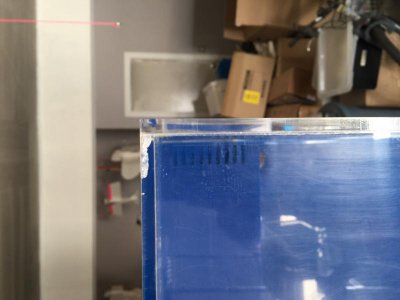
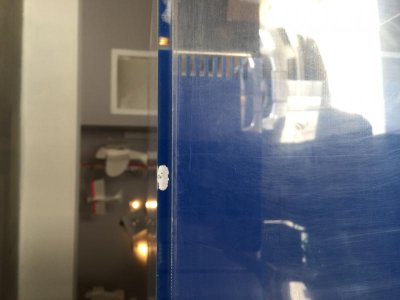
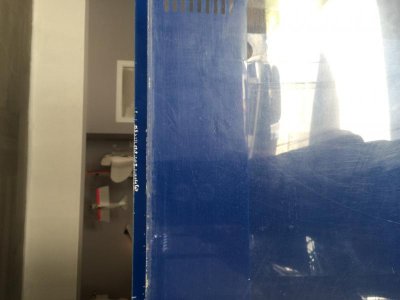
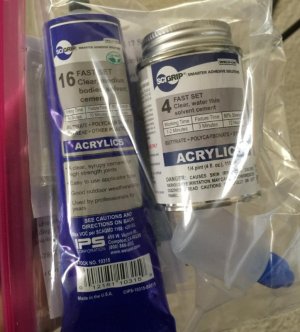
I picked up a lot of gear from a guy getting out of the hobby and I have an issue with 1 seam on the tank. The value of the deal wasn't in the 150 gallon tank, but I really would like to use it. It's 72 x 20 x 24. The idea was to restore the tank back to new condition and do FOWLR tank with it. I saw it setup full and there are no leaks. The first picture shows it full of water and you can clearly see the bad spots. The defects started from the outside of the seam and I guess are moving inwards. The tank looks like its going to polish up real nice, but I had a glass tank with a bad seam once and it wasn't a lot of fun. Safe to say I am worried a bit this time around. I show a picture with the adhesive I bought but after reading a bit I'm not sure if I'm going after this correctly. I thought with the needle applicator with the weldon 4, I could get some in there and put a small piece of wood on the spot and throw a clamp on it front to back and that would be that. I am now thinking that it won't work and I may have to run an acrylic 1/2" square rod down both front seams and just deal with the looks. Not really sure at this point. Please let me know what you think. All opinions are welcomed! The pictures are showing the bad seam which is the front left side. They are in order showing the top first and moving to the bottom of the seam. Thanks.
 

Attachments

  • Pic 1.jpg
    Pic 1.jpg
    72.4 KB · Views: 2
  • pic2.jpg
    pic2.jpg
    36.6 KB · Views: 2
  • pic3.jpg
    pic3.jpg
    35.3 KB · Views: 1
  • pic4.jpg
    pic4.jpg
    35.7 KB · Views: 2
  • pic6.jpg
    pic6.jpg
    75 KB · Views: 2
I'd personally be ok with this tank. The seam defects look original, and #4 isn't anything to worry about.

How comfortable you feel about it is of course another matter :)
 
I want to share your opinion of just leaving it, and I kinda do, but those 2 spots just make me want to do something. Plus I don't know how long they have been like that or if it has grown over the last year or what. I will wait to see if I can get some more opinions either way here. Thanks.
 
You might get away and possibly get the joint to wick the solvent, but I highly doubt it. Post it in the acrylic fabrication thread and Floyd should respond....
 
I am now thinking that it won't work and I may have to run an acrylic 1/2" square rod down both front seams and just deal with the looks.

I would try to use #4 liquid, but also install the internal pieces for the front seams... An acrylics place should be able to diagonally cut the square rod into a triangular piece, which will look fine in the corners

Definitely keep an eye out for future problems and empty the tank if any other seam problems appear
 
Hello Albano, thanks for the advice. I am leaning to your method but I am a bit worried about trying to put some # 4 in those 2 bad spots. I'm afraid it will leak into the seam on
either side of it and cause it to open since its a solvent and not a glue. I was thinking to try to clamp those 2 spots and try some #4. Then use the #16 for the triangle plexi rods to give me some peace of mind. I was thinking #16 on the triangle pieces because I doubt it will be completely flat and I have no way of clamping those pieces in place.
 
Hello Mcgyvr, thanks for the advice. I actually tried to see if #4 would wick into the one bubble looking spot and it would NOT. Not sure if it was an air bubble or what. You don't think I should do the triangle acrylic gusset idea either? Thanks again.
 
Trying to get solvent in there, if you can, is not going to help and adding gussets may cause crazing. IMO the choice is either to live with it or walk away from it. Considering there isn't much of a joint left in the lower defect, I'd *personally* walk. Sometimes acrylic tanks can last like this for many years, sometimes not. For me, if I have to keep an eye on it and prepare for the worst, then there's no point in using it and especially putting hours of work into it.
It's root cause was probably a bubble or void that simply degenerated over a few years.

James
 
Hello James, thanks for chiming in here. I don't quite feel comfortable just leaving it as is. I really wouldn't mind trying the gussets. Seems like at this point it is a lost cause anyway. Don't you think it could be worth a try? even if it caused a little crazing, unless it degraded the 2 seams. Wouldn't it just add to a seam that may hold anyway? or not. I know you would walk away. A little harder decision for me I guess, but do you not think it could be worth a try? If I was to try, can you tell me the best way to approach the gussets? Thanks.
 
Sure it's worth a try if you're figuring it a lost cause.. I figured you might sell it as a terrarium or the like. IMO you really need to get some material machined for you to put in as gussets. You can use sawcut pieces if you're not terrible concerned over aesthetics. The "stock" triangular or square rod is not square at all and no edges are flat so it can be problematic to glue.

First, make sure the "corner" that it's being glued into is clean and there's no "ooze" bubbles or anything restricting the gusset from actually getting fully into the corner.

To glue it, you're going to glue both plains at once; the vertical and horizontal. You'll want to place wire (I use .008" wire) under the bottom (horizontal) joint as well as the vertical joint and hold the piece in place while you apply solvent. Then, while still holding the gusset in place, pull the wires and hold the piece there for a moment.

The other option, which is a bit sloppier but much, much easier is to use the stock square or triangular rod and apply Weld-on 16 or 40 to 2 adjacent edges and just "mash" the gusset in place making sure the "glue" gets spread around. You'll only get one shot at doing it cleanly so make it count :)

It won't "degrade" the existing joints at all, but with the added stressor - you may get some crazing for which there's no repair.

HTH,
James
 
Thanks a lot James for the detailed instructions. I will definitely do 1 of your 2 methods. If it turns out good I will add a picture showing how it went. I haven't been able to find any picks of anyone adding gussets yet. If it turns out bad, I might still show a pic.
Reluctantly ;)
 
How is the bracing on top of the tank?

I've got a couple spots in my 375 like that. Reinforced the inside with 16 and an acrylic strip.

Also added top bracing with 40 and quality cast acrylic just to make sure. Water tested outside to make sure nothing was changing.
 
The seams all around the top bracing are perfect so that is a good thing. Could you send me a picture showing your reinforcements? I would really like to see how it turned out.
Thanks,
Duane.
 
Sure, Here's a few. The center brace is what I started with, added the two thin cross braces with weld on 40. The center brace has since shown less deflection with the load split on multiple braces. 8', acrylic 1/2", minimal bowing on the tank.
The last photo shows the center with some deflection. Which is ok. Frequently check all the seams, looking good. Only issue was my homemade overflow wasn't supported and that separated. Since reinforced. Anyway, bracing is huge.
a2513801ba11145836afa74bad517425.jpg
e21460f2f848140973a3a9d9914881cd.jpg
47049aac0d9f019bb6d7226f513d6dbd.jpg
05b77eb1ee9683f7d92cf64cd4143902.jpg


Sent from my SM-G935T using Tapatalk
 
Thanks for sharing. It looks fine and seems like it should be quite strong. I think I will try the gussets on the front 2 corners. Hopefully I don't make it look too bad. I will post when I'm done. Working on the sanding and polishing right now. Coming along pretty good so far.
 
Most people aren't going to stare at the corners, you'll be OK. One corner in my tank looks horrible, not one person ever noticed it. Prior owners repair was less than ideal.
 
Back
Top