BigDave
Premium Member
There's probably a bunch of these in DIY already, but I submit to you my entry in the DIY Doser category.
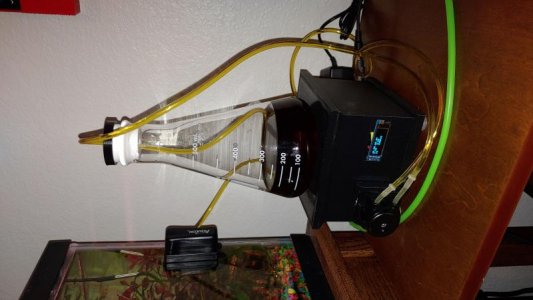
I don't have a reef tank anymore, but I'm still a regular in the lounge here. I thought I'd go ahead and show this design. I'm using this to dose fertilizer into a small planted tank.
I used an ESP8266 to run the doser. It has a built-in magnetic stirrer and a configurable timer. At the set run-time, the stirrer comes on for 30 seconds. Then it sleeps for 15 before running the dosing pump for the set run-length. Stirring the fertz help to make sure that the ferts in the tube going to the tank are well mixed. I don't bother emptying the tube after each run as the dosing pump seems to do a good job of keeping the fluid from back-flowing back into the container. I also didn't want to add the complexity of a bi-directional pump controller.
Right now I have it configured to run at a set time every day, but I'm considering making it more configurable.
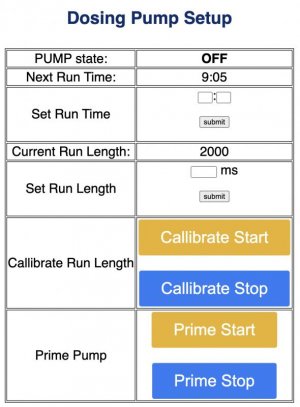
The ESP8266 is running micro-python and has a web interface for priming the tubing, configuring the run-length, and setting the run-time.
I managed to cram the controller, power supply, dosing pump, and mixer motor all into a fairly small 3d printed enclosure.
I used a simple, cheap 12V dosing pump. I also used the same pump with the motor removed for the stirrer bar.
The controller itself is just the ESP8266 and two reference designs using IRF520 mosfets. There is some simple circuitry to add Temperature reading and an output for an OLED. I added a capacitor and diode on the output of the IRF520 to reduce electrical noise from the motors. Without them, the back EMF was driving the output high on the ESP8266 and causing the controller to lock up.
The OLED shows the IP and current time of the device. It shows the next time it will run and the current temperature of the tank.
I plan on adding some MQTT logic to push the tank temperature up to my HomeAssistant that runs my home automation.
I'll get more pictures later today. I just printed a new base-plate for the enclosure that has an opening for the USB port so I can more easily push updates into it. I'll take some pictures of the inside of the box when I swap out the part.
I don't have a reef tank anymore, but I'm still a regular in the lounge here. I thought I'd go ahead and show this design. I'm using this to dose fertilizer into a small planted tank.
I used an ESP8266 to run the doser. It has a built-in magnetic stirrer and a configurable timer. At the set run-time, the stirrer comes on for 30 seconds. Then it sleeps for 15 before running the dosing pump for the set run-length. Stirring the fertz help to make sure that the ferts in the tube going to the tank are well mixed. I don't bother emptying the tube after each run as the dosing pump seems to do a good job of keeping the fluid from back-flowing back into the container. I also didn't want to add the complexity of a bi-directional pump controller.
Right now I have it configured to run at a set time every day, but I'm considering making it more configurable.
The ESP8266 is running micro-python and has a web interface for priming the tubing, configuring the run-length, and setting the run-time.
I managed to cram the controller, power supply, dosing pump, and mixer motor all into a fairly small 3d printed enclosure.
I used a simple, cheap 12V dosing pump. I also used the same pump with the motor removed for the stirrer bar.
The controller itself is just the ESP8266 and two reference designs using IRF520 mosfets. There is some simple circuitry to add Temperature reading and an output for an OLED. I added a capacitor and diode on the output of the IRF520 to reduce electrical noise from the motors. Without them, the back EMF was driving the output high on the ESP8266 and causing the controller to lock up.
The OLED shows the IP and current time of the device. It shows the next time it will run and the current temperature of the tank.
I plan on adding some MQTT logic to push the tank temperature up to my HomeAssistant that runs my home automation.
I'll get more pictures later today. I just printed a new base-plate for the enclosure that has an opening for the USB port so I can more easily push updates into it. I'll take some pictures of the inside of the box when I swap out the part.