Begining my 180 peninsula room divider

firewill65

New member
I don't have many pictures but I will start taking some... as I move forward.

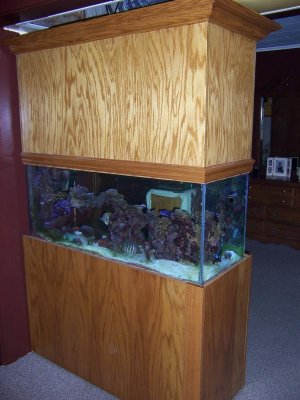
I knocked down a dividing wall which was about 6 inches wide and replaced it with a tank. The tank was custom built with low iron glass and
measures 76x18x30. The stand and canopy are just temp. so my girlfriend doesn't give me a hard time about having a construction project in the living room. I'm still undecided on what the finished product will be. I built the stand myself using 4x4 posts in all corners.and 2x4 center supports...topped with 3/4 in. plywood and 1/2 foam. Anyhow, here it is.


Last edited:
There is one overflow with 3, 1" drains. I plan on doing a beananimal setup and using all three drains. I will use schedule 26, 1.25" schedule 26 PVC as my standpipes. I just started working on the overflow and this is what I've come up with so far. Any tips or input is greatly appreciated. How high should the standpipes be in the overflow? The one in the middle will be a full siphon and the other two are there as emergencies.

 
Last edited:
looks cool as i have a 90gal pennsila cutting my 12'x20' bedroom in half . what type of finish are you doing ?heres a snap of mine . its a shot when it was a 75 gal but i upgraded to a 90 about three months ago and the tank to canopy size works better now as i had to cut 4"off the canopy .
 

Attachments

  • 100_0691.jpg
    100_0691.jpg
    67.3 KB · Views: 5
The return will be plumbed over the top. I have two pumps...a quiet ones 6000 which flows about 1500 gph and a Mag 9.5 which flows about 900 gph. I'm thinking the quiet one may be too much flow for my sump so I will try and see how the Mag 9.5 works.
I plan on using 1.25" pvc from the pump to the canopy and reducing it down to 3/4" pvc and may use lock lines for my return.

Additional flow in the tank will be 2 seio M2600 powerheads which claim to flow around 2600gph. These will sit on each side of the overflow box giving flow to the legnth of the tank. I will supplement with koralias if needed.
 
wrasseman,

Looks good! I will either continue with the current stand and canopy design, which I'll texture the canopy and paint it to match the walls in my house. Or I may skin it with hardy board and tile it. I've found some really cool tile that gives the 3-d riverrock look. I'm just afraid of the extra weight of tile on the canopy.
 
i use mag s myself but everything is plumbed into the basement so i dont hear the noise as that mag 9 may be a bit loud .i have a mag 24 in the sump and its real loud down there but it works great . as a matter of fact its so loud that i will be replacing it soon just to make it quieter even though it doesn't matter .
nice setup you have going there ,can't wait to see it up and running .
 
Lighting,

After reading RC for 5 years I was convinced that I needed all the light I could get! I purchased (3) 250 watt MH and planned to supplement with (2) 72" VHO actinics,

I didn't want to deal with the higher electric bill which the MH's, Chiller and additional pump would bring. I purchased a Nova extreme pro 72" T5's. I know my tank is 30" high and some would say I should use 400 watt MH... I'm only doing FOWLR and some softies so I'll roll the dice and see if the T'5 will work for my application. If not I have the other lights for the future. The best part is I don't plan on using a chiller with the T5's~!
 
use the t-5s for sure as i have switched all my tanks over to them and they are awesome .i have six bulb units and there is definatly enough light to grow anything IMO . they will save you money too. i like your idea of skinning it also but how much weight do you think you will add ? a couple of hundred pounds would be okay but more than that i would beging to worry a bit but i wish you the best either way .good start looks cool !
 
I can't wait to see this up and running either...I've been reading RC for 5 years and I'm not proud to say but have had my tank for a few years, but no water in it! :-( (too many other projects going on!)
 
Electrical,

I ran two independent 20 amp line which feed each of the two legs shown. Also, built in timers. For long term power outages, I have a transfer switch fed to my electric panel in which my Honda 3000 will supply power for my bedroom, portable AC, fridge, and all aquarium pumps. For short term power outages, I bought a 1000watt Xantrex Inverter/Charger which I will hook up to a sealed deep cell battery.

 
very well thought out and neatly done too ! i just read your first post and the lower stand pipe should be about 3/4 of the tank height then the third primary would be 2" above them IMO .looks like your set up close to that and there is no rocket science here so i would say your good there .
 
thanks,

I haven't glued anything so I will have to work all the bugs out when I do my freshwater test. Think I will have any issues with the tank since it's been sitting for a couple years? It's been in ac the whole time...I just don't want the tank to fall apart or something!
 
you should be okay as far as the tank is concerned but i would inspect it for anything obvious . your plumbing in the overflows shouldn't need to be glued as any slight leaks will only go to your sump as your doing anyway. if the power goes out and they seep you will only empty the overflows so all will be good there .if you need to get fish out of your overflow you can at least remove the piping to get at them which will probably happen . i would also suggest that you cut plexiglas and make lids for the overflows so fish cant get in them and also it stops algae fron growing in there and creating problems such as clogging .
have you decided on the covering of the stand and canopy yet ?
 
Finally put sand and base rock in....RO has been making water all day long! Getting close! The light is a 72" nova extreme pro. I have (3) 250watt MH but didnt want to have to deal with the added electricity and needed chiller... so I'll see how the T5's do. I'm not done aquascaping...but the 3 pillars are going to stay for the most part...just need to add live rock and move some things around. Here are some pics below!
 
The base rock in the pics is from Marco rocks as well as the sand. I've heard the sand tends to move around due to it being really fine but It's very nice sand! 160lbs of sand gave me about a 3-4 inche bed. I don't recall the amount of base rock I purchased but I'm sure it will do just fine! The three pillars are mounted on a 12x12" pice of .25 acrylic and on top of that I have a .50 inch 3x3" piece of acrylic to keep the rock sitting on its own base. I used fiberglass rods mounted to the acrylic and drilled all of the rock to keep it in place.
 
Back
Top