captbunzo
Premium Member
Ok. Maybe this is small news for the rest of the world. But for me, this is really exciting.
Since my 55G reef tank is now setup, I figured it was about time to upgrade my sump. I am currently using a 10G sump that I built for my old 29G reef tank. Now I have a lot more space under the tank and would like take advantage of the additional space for a larger refugium and sump chamber.
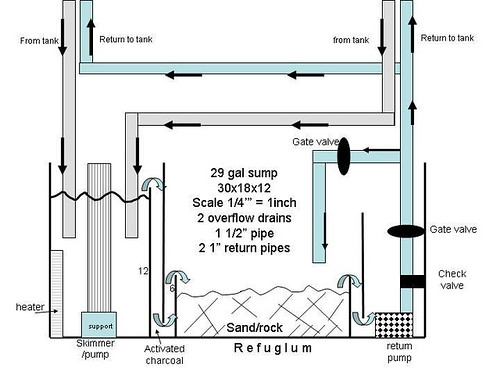
Here is a diagram from wetwebmedia that I used for the basic model for this sump.

In that picture, you can pretty much ignore the extra plumbing stuff. The important part is the sump chamber layout. I had been thinking for a while about a sump design that would combine the return chamber with another chamber (probably the refugium) so that the sump could handle more evaporation. By doing this, I can keep the return pump chamber pretty small and maximize the size of the refugium chamber. This diagram does so by allowing water to flow UNDER a wall from the refugium to the return pump chamber.
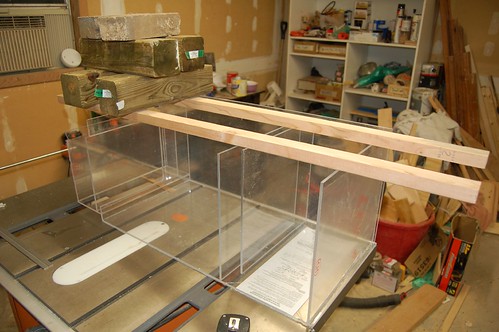
Here is a teaser picture of the sump at current status.

On Tuesday of this week, I laid out the pieces on my stock acrylic and rough cut them slightly oversized on my tablesaw. Wednesday, I clean cut them down to exact size on my router table. Last night I glued the base and outside walls (mostly) together and all but one of the inside partitions in place. Tonight, I should be able to finish it up.
A day or two to let the glue cure and then I will either route or file over the edges to make sure nothing is too sharp. And then, woohoo! Time for a water test. If all goes well, I might actually be setting this up by early to mid next week.
Anyone know how long I should let the acrylic & glue cure before I put water in the sump?
(And for anyone who wants to see more pics, click on the picture above)
Since my 55G reef tank is now setup, I figured it was about time to upgrade my sump. I am currently using a 10G sump that I built for my old 29G reef tank. Now I have a lot more space under the tank and would like take advantage of the additional space for a larger refugium and sump chamber.
Here is a diagram from wetwebmedia that I used for the basic model for this sump.

In that picture, you can pretty much ignore the extra plumbing stuff. The important part is the sump chamber layout. I had been thinking for a while about a sump design that would combine the return chamber with another chamber (probably the refugium) so that the sump could handle more evaporation. By doing this, I can keep the return pump chamber pretty small and maximize the size of the refugium chamber. This diagram does so by allowing water to flow UNDER a wall from the refugium to the return pump chamber.
Here is a teaser picture of the sump at current status.

On Tuesday of this week, I laid out the pieces on my stock acrylic and rough cut them slightly oversized on my tablesaw. Wednesday, I clean cut them down to exact size on my router table. Last night I glued the base and outside walls (mostly) together and all but one of the inside partitions in place. Tonight, I should be able to finish it up.
A day or two to let the glue cure and then I will either route or file over the edges to make sure nothing is too sharp. And then, woohoo! Time for a water test. If all goes well, I might actually be setting this up by early to mid next week.
Anyone know how long I should let the acrylic & glue cure before I put water in the sump?
(And for anyone who wants to see more pics, click on the picture above)


