InevitableCrash's Nuvo-EXT 100 Build

InevitableCrash

New member
I have done a lot of taking from this community ever since I started reefing over 10 years ago. Always gathering information and using the experience of others to my advantage. Well a community of takers is no community at all, and so I find myself wanting to contribute my experience along with those who unknowingly helped me along the way. So here we go.

The announcement of the EXT line ignited my interest in the wake of a move that has left me tankless the last two years. I found myself longing to pick reefing back up, but I really wanted my next tank to have all the aspects I really wanted, notably an external overflow and bean animal drain with low iron glass. The EXT offered me the typically custom features I want, but in a standard offering from a reputable manufacturer. So I did what I always do when I'm pondering a reefing decision-I looked to the reefing community of course! But little information was available to a lurker looking to grab and go. This fantastic glass box is relatively new to the market and there simply haven't been many people talking about it....What to do?

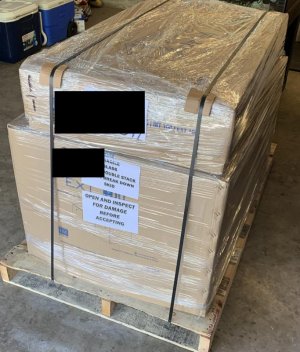
As my poorly chosen title already spoiled, I just bought it anyway! Furthermore , I have retired my long time lurker status to share my experiences with the EXT 100 here.

I have a lot going on with the tank setup over the coming weeks and months, so I'll be updating regularly. Equipment list to follow....
 

Attachments

  • 6B190B74-5AC1-4DD6-B1F0-68D477027AA9.jpg
    6B190B74-5AC1-4DD6-B1F0-68D477027AA9.jpg
    96.8 KB · Views: 1
Assembling the APS stand was very simple and the end result is what feels like a sturdy, yet lightweight package. I got pretty anal about cross members being perfectly aligned and level, so it took me over an hour to completely assemble. I think it's pretty sharp, but I'm most excited about the long term durability that the aluminum should provide in the corrosive saltwater environment.

As a slight nit pick, the instructions didn't perfectly match the provided hardware, but it was simple enough that it didn't make much difference.

A more substantial dock against the stand is that the provided foam board along the bottom is flimsy. The provided trio of aluminum cross braces paired with this foam on top does not provide a surface I personally feel confident in having a sump rest on. Additionally, the bottom isn't sealed, which allows moisture to easily get under the stand. The aluminum itself will hold up, but if you have carpet like me, it will soak up that moisture making for a nasty and costly problem. I will make a more rigid surface of ply and seal the edges to prevent this.

c7264d9d42c96dc8f1819c97aecf74bd.jpg


83d262aec286fa080f136e722e836da0.jpg
 
Making progress on the build having nearly finished my water changing station. The tank is located a floor below my water access in the garage so a big consideration in setting this up was simplifying maintenance. Using similar designs I've seen here, I'll be able to easily pump fresh or saltwater without lugging buckets up and down stairs.

To meet current and future needs, I got this Triton34 V2 sump. I'm planning for water changes, but this will give me the option to convert to the intriguing Triton method in the future. I will also be getting a DC pump that can support the higher flow rate if I chose to go Triton later. I'll be shooting fo a 3-4X turnover for now, with the margin to go to 10X if needed.

View attachment 399332
 
I had a decent amount of pukani from my last tank that had some crud left on it. I went ahead and started a bleach brew with my rocks and had them sit in it with a power head for a week. I followed with two dechlorination soaks and now the rock is sitting out to dry with no scent of bleach.

I'm really glad I kept the pukani now that it's so hard to come by. The stuff I have is extremely porous after I gave it an acid bath when setting up my previous tank. Compared to the Marco Shelf I got to supplement, it's light as a feather. Hopefully bleach is enough as another acid bath might leave me with a pile of dust in a Brute can. I'll test for phosphates when I get it in the tank and treat if necessary.

c97d4d6a81c0c24d78eb4e5f4298751b.jpg


75ba86a56824f837a0681733971bd166.jpg
 
Before I bleached the rock, I flowed some creative juice into potential aquascapes. Not sure if I will keep to this general layout, but I really dig the extra space afforded by the external overflow. It allows me to work with depth in a way I haven't been able to before.

6abb5415764c5c1e59444eed1630fd94.jpg


1ff04e9478625c2ca1461957a671738d.jpg
 
Received all of my plumbing earlier this week and started piecing it together tonight. I'll be hard plumbing the returns and a combination of rigid and flex PVC for the three drains. Hoping to finish up by the end of the weekend.

Before I could begin plumbing, I had to add a floor to the inside of the stand. Whether this is necessary or not, I don't know. I don't trust the stand's three cross members with a flimsy foam pad to evenly distribute the load of a sump long term. Ever skeptical, I cut some 3/4 ply and primed with a couple coats of Killz. I screwed it to the cross members and laid the foam pad over top. Additionally, I'll seal the edges of the foam to prevent water intrusion under the stand. Warning to anyone with wood or carpet considering this stand - you will need to take extra precautions to protect your floors.

Floor installed:
ef62e22a7dbef2c3c2dca74c63067f19.jpg


Foam added over top:
4feadd76879fd78e96425d8b0a859605.jpg
 
Looking good ! Also looking forward to the updates, Will be following along !

Sent from my SM-G903W using Tapatalk
 
It has been a very productive weekend and I can nearly smell the salt water!

Plumbing the tank was a task made immeasurably better with beer. Not sure what is going on with all the plumbing how-to videos, but this ingredient was suspiciously missing in all of them. Fortunately, I discovered the errors and the job went went swimmingly.

287b915f1c907f4068fb772501562279.jpg


9e98ffe6fe33713aa630e5b41f15fb09.jpg


If you noticed the sizable hole behind the sump, you spied the construction of the superhighway for all of my cabling and feed lines for the ATO and dosing fluids. The area behind that wall is not of sufficient size to call a fish room, so I'll be aptly referring to it as my fish closet. I'll update on that as I make more progress
 
Looks awesome man ! Beer always helps haha. I love the design tho nice and clean looking and with a designated area for all your wiring to run down is also a great idea because cords all over the place is a pain in the *** and not visual appealing in my opinion. Are you planning for Fish Only off the go or are you going all out ?

Sent from my SM-G903W using Tapatalk


Thanks! Clean and tidy is what I'm going for, which directly opposes my eagerness to get water in the tank. I just continue to remind myself that the patience will pay off.

And like previous tanks before this, I will be creating a mixed reef. But unlike my previous tanks, I'll be stocking predominantly SPS for the challenge they present.
 
Awesome ! Looking forward to this builds progress ! And yes patience is a virtue. Any particular fish in mind ?

Sent from my SM-G903W using Tapatalk
 
Awesome ! Looking forward to this builds progress ! And yes patience is a virtue. Any particular fish in mind ?

Sent from my SM-G903W using Tapatalk


My goal is to have fish that fill a particular role. I know I want to get a trio of Lyretail Anthias as the open water swimmers that add that color and movement. Possibly a green chromis to supplement that "œschool" and color contrast. I'm reading up on how to get them to take dry foods, so I'm hopeful I can make it work.

Next, I have a special soft spot for utility fish. A fish with a job makes the reef economy strong lol. Ive had a Melanarus and Yellow Corris Wrasse before and they are worth their weight in Unobtanium. My Melanarus went beast mode on my clean up crew though. Hermit legs strewn all across the battlefield. The nightmares still haunt me. Utility wise, I would also love a Foxface, but those suckers can get immense - so I may go with a Tomini Tang for some algae grazing, considering I've got a 4 foot tank.

So far that's all I know I want in the tank. I've never had a tank without clowns, so I will likely keep to that tradition. Really, fish are the hardest for me to pick. Creating a balanced reef that's interesting to look at, doesn't assault my bank account, and provides a harmonized community is a challenge in a box this size.
 
Geez, The wording through out that sucked me in like it was coming out of a Reef Book ! Haha You sound like you got it all figured out and I must say, It is a solid plan !

Sent from my SM-G903W using Tapatalk
 
Prior to plumbing the tank, I plumbed the water mixing station, which is exciting to exactly one person. Now I get to explain all these levers to every visitor while they politely smile and look at me like I'm crazy for doing this. Ill notice, but continue to try and win them over with sound reefing logic.

Lessons learned:

1. Home Depot sells wood as straight as Quasimodo's spine.
2. Dry fitting is useful for radial marking, but not so great for length measurement. I had better results measuring the hard stop points in the PVC fittings and adding that value to exposed pipe lengths.
3) Unions are life savers and worth every cent

42bf8fc4922324dd7c8c04b69466a80c.jpg
 
Crash any updates on this build? I have the same tank, hoping to get my plumbing done tonight & water in this weekend so I'm curious how yours is progressing. Wish I had done the same to the bottom.
 
Crash any updates on this build? I have the same tank, hoping to get my plumbing done tonight & water in this weekend so I'm curious how yours is progressing. Wish I had done the same to the bottom.


It's awesome to see a fellow EXT owner! I have a bunch of updates, but I've been slacking on my journal here. I got myself some goodies I'll post some details about tonight
 
I'm going to go back in time over five weeks to when I had finished the tank plumbing and completed my water manufacturing factory....

While water production was at full steam, I took to toiling away with the aquascape. E-Marco-400 takes a little practice to get right, but once you get a feel for it, you can become the creator of fantastical marine worlds. Drawing inspiration from other reefs and throwing in a little of my own blend of secret sauce, I put together what I hope will turn out to be an interesting slice of reef to view as it grows.

After letting the mortar cure, I was able to get the tank wet. Let the fun begin

81746841cd219c49311d976d47e58b2c.jpg
5c44ee72644f2ee5da046021657d3eb3.jpg
ed84bcdbf7737e915a2d3556cf38a91e.jpg
 
Laziness is a great trait for creating solutions, and that was my motivation when cleaning the reef flakes. A hole in a can plugged with a piece of filter media worked nicely. Turned on the hose and let sit until it ran clear. Followed with a RO/DI flush and done.

4dd2425acaf07c8d71542c0f4c3cf4e7.jpg
 
Back
Top