150Gal reef build

hub81

New member
The start of a beautiful thing.
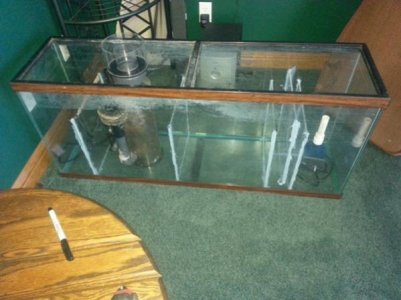
The basic sump has been completed. I just used a standard 55 gal with 1/4" plastic sheets cut. You can see 5 total baffles, refuge will be in the middle just before the return. I made the skimmer side a bit bigger so that if I needed or wanted to up grade my skimmer to a bigger one, there would be room. I built the return to hold a little over 7 gal of water. My thinking is that the show tank will hold 15 before over flowing so should the overflow clog it will not over fill the show tank. And should the return stop or a power outage occur the sump should be able to hold enough water without flooding.

I have completed my behind the scenes room, which will contain all the filters, sump, lighting etc. As you can see I have added a vent at the bottom which will have two fans blowing in cool air. Then at the top there is a ventilation tube I made from a dryer tube. It also has a fan on it to extinguish hot air. My thoughts were since hot air rises, why not put that ventilation on the ceiling.
At the time of this design I had planned on using a MH 715watt lighting system which as you know produces nuclear heat along with sizable electric bills. Currently I am leaning towards a LED IT2080 but still researching.

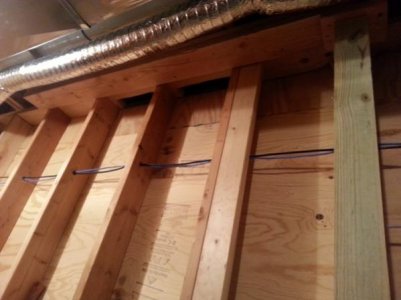
I was unsure if this wall was a support wall so instead of finding out the hard way or spending a bunch of Hobby funds finding out I just decided to brace the 4 foot section to be cut out with 4X4's and 2X6's. Never practice safety by accident.
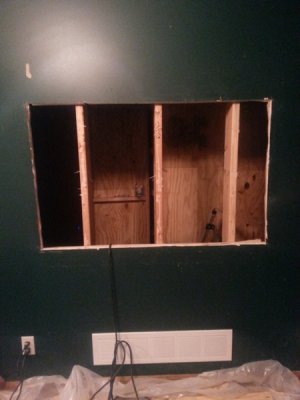
Next I have cut the hole for the tank. I am adding a 150Gal Tall which measures 48"LX24"WX30"deep. I cut the hole roughly 1/4 in bigger all the way around. It will be trimmed but will need room to maneuver the tank during installation.
Now I will be cutting out the 2X6's you see in the middle and building a base for the stand supporting the tank. Stay tuned for progress reports and will post more pictures showing progress.
 

Attachments

  • Sump55G.jpg
    Sump55G.jpg
    40 KB · Views: 8
  • Tank Room#2.jpg
    Tank Room#2.jpg
    31.2 KB · Views: 4
  • tank spot.jpg
    tank spot.jpg
    94.7 KB · Views: 7
Nice. I am starting a 150G Build myself too lol. What overflow are you going to use? I am going with a Bean Animal. Also nice sump. I am upgrading from a 55 so if yours works I might steal your design.
 
Honestly I am not sure the brand but I think it is a corner marineland. I haven't gotten that far yet. Still working on the stand design. I almost went with a 75G sump but I already had the baffles cut and didn't want them to go to waste. I might set the 75 up as fish only or use it for another reef. It isn't pre drilled just a basic tank.
I will keep you posted on the sump. I also have a design I am working on that will create a storm/ rain effect to replenish my evap. Not every time of course but thought it would be a neat life like effect with the lights.
 
Okay so I had stated that I was using 2X6's for the stand however because of the lack of room, and the distance from the ground that I wanted for viewing the tank I was unable to use 2X6's. So I framed with 2X4's instead and used 4X4's for leg supports. I do not see why this set up would not hold 200lbs of sand, 130lbs of live rock and roughly 1200 lbs of water. I mean they use 2X4's to hold up houses. LOL That and the actual stand I seen built for this tank uses 1X's for tanks support.
After the stand was completed I purchased an oil based primer by Killz to protect the stand and all the wood work in hopes to protect it from mold, salt creep and dry rot. And let me tell you they call it Killz because if you don't air out your house it will kill you. Worst smell ever.
I picked up the tank and now as you can see it is installed.
I purchased two 50 Gal food grade barrels for water storage and installed them last night, I also ran all the lines from the RO DI 6 Stage filter system. The only thing left is to hook it to the main water source and start the water making process. I am in hopes that the water softener plumbed before the RO will help make the filters last longer.
I have placed an order for Sand which (for some reason that makes me hungry) should arrive tomorrow. I went with the indigo black/ white mix. I have always liked the black sand. As soon as I have 100 Gal of water I will add the sand and start filling the tank. Then the live rock. I am still working on the trim for the outside, can't decide which to go with. Once everything is plumbed and up and running I will post the finalized pics.
 
I have finished the plumbing, I hooked a 1/2 valve to the main water line incase I ever needed to work on the system. Then I used a 1/2 to 1/4 adapter which you see in the pic. I also added another valve on the 1/4 line for easy access to shut off for filter replacement etc. I had to run the drain line over 30 feet away to a drain in another room, it runs through the ceiling out of sight. Thought at first it would be to long but it is draining just fine. Later I might run it out the side of the house into the garden. haven't decided yet. As you can see in the pics I have two 50 Gal barrels for water storage. The one under the RO DI is for evap replacement. The one on the other side is for water changes. The total volume between sump and show tank is 205 so a 20% water change will be about 44 Gal. So I figure one barrel full will work.
I am toying with the idea of using a float valve for evap replenishment but we shall see. Last thing I want is a indoor pool. RODI inlet.jpg

RODI system.jpg

Secondary barrel.jpg
 
I trimmed round the edges. I think it turned out really nice. I filled the bottom of the tank about 30 gallons or so, should cushion the bottom when I dump in the sand tonight. Got the salt mixing in one barrel and fresh is full in the other. Sump is about half full of fresh water. Getting closer to starting cycle.
tank front trim.jpg
 
I added the sand last night, 220lbs roughly a 4 inch bed. Also added an additional 20lbs to the sump creating a 1 3/4in bed. I also filled the tank the rest of the way and confirmed all plumbing is functioning properly with no leaks. Tonight I will install the skimmer and live rock. As soon as the IT2080 arrives I will install the light. Because of adding the sand and salt the water is very cloudy, as soon as it clears I will post more pics of this adventure.
 
Also nice sump. I am upgrading from a 55 so if yours works I might steal your design.[/QUOTE]
Sump is up and running and works flawlessly, I made the baffles before the return just big enough to hold a couple filter sponges and it works great.
 
So the live rock and sand are in and the tank is full of water. Has been for the last three days. Still waiting on the IT2080 LED to arrive. Got the black backing on last night.
As for the first water test the parameters are.
Salt 1.25
PH 8.2
Ammonia .025
Nitrate 5
Nitrite 0
Finished with rock.jpg
 
Thanks, it has been in the works for a while now and it turned out really well. The back room is awesome for the set up. Now the dreaded watching of an empty tank for weeks has commenced.
 
Okay, so have now been going for over ten days, water perameters are at: Ammonia = 0.25, Nitrite = 0 Nitrate = 10, Phosphate = 0, Iodine .006, Calcium 450, Mag = 1400, Copper = 0, PH = 8.2, Alk = 1.7 to 2.8, Currently only thing in tank is 220lbs live sand and 135lbs live rock. Running the power heads and lights, no skimmer running currently. I have added to the sump Cheato. Other than that nothing else added. As you can tell by all the testing I am extremely bord waiting for the cycle to complete. I have also rearranged the aqua scape like four times. I haven't taken a picture of the newest look, which I think I will be keeping. This pic attached is the first arrangement, the new one is much better. I have started cleaning my Qt tank, it is 29 Gallons and I got a carbon filter for it. Will set it up this evening to give me something to do. After that I might have to build a controller or house to keep my mind off it for a while. LOL
Tank Front wl.jpg

Tank back WL.jpg
 
Aqua scape

Aqua scape

Here is the final pic of the aqua scape. Still cycling and almost done with the home made Calcium reactor. Still nothing in the tank other than rock and sand.

Tank finished.jpg
 
Okay so now we are reefing. I have finished the calcium reactor although I have no use for it yet. Will post pics soon, and I have also finished installing the ATO. I used a JPJ system with a small Tom pump does like 3.5 GPH.
The pump info says it is only good for 30inches so I plumbed mine using a 1/4 tubing at 48 inches.
It works great, reason I did this was for fail safe, incase something happens and the pump doesn't shut off it will take roughly 10 hours or longer for my tank to over flow at 3.5 GAL per hour. But because that is based off 30 inches or less I know it is doing more like 2 GPH. The other reason is that it takes so long to fill it will also act as a drip acclimation for your live stock. In hopes that your salinity will lower at such a small increase it will be a less likely chance of killing everything.
So far both sensors are working just fine, I here most folks are using a trash can of 5 Gal bucket for the top off water.
I just drilled a 1/4 hole in my 50Gallon water storage barrel and ran the hose just under the 2nd sensor.
So this system has 3 fail safes. One is the first sensor that kicks on the pump when the evap hits a certain point the sensor should shut off. The 2nd is the second sensor in the water storage barrel that kicks off the pump when it drains approx. 10 gallons and the 3rd is: should both sensors fail the hose will be exposed after another 5 gallons drains, so it will only be pulling air at that point.
Might ruin my 15 dollar pump but better that than my carpet. Now using this method you will need to place a small hole in the unsumurged 1/4 tubing from the water storage, this will break the syphon when the sensors kick the pump off. Careful not to make the hole to big as it will take in to much air and your pump will run all day to fill a Gallon.
I will post some picks of my set up soon.
 
So the hole in the air tube was terrible idea, lucky for me I had the fails safe in place cause the hole was not big enough and even though the pump shut off it still created a syphon and filled up to five gallons before stopping. So I made the hole bigger and then it was just pumping air in there no water.

So I took a two prong air valve same as the one I use for drip acclimation and a Y separator added a separate hose to it. One with the air valve and the other to the hose pumping the water. Took a few minutes to get the valve just right but it has been running now successfully for a week with no issues. Will post some picks soon.
 
This tank is one year old now. Since starting I have added the following fish. McCosker's Flasher Wrasse, yellow wrasse, Green mandarin, Fire fish, blue hippo tang, sail fin tang, two clowns (mated pair), fox face, Bali Lunate Anthias, inverts cleaner shrimp, 5 peppermint shrimp, clean up crew, Derasa Clam, and Maxima Clam. Corals: Wall Hammer, branching hammer, red Montipora Capricornis, green Montipora Capricornis, red birds nest, Branching Acropora Coral, green/ red/ orange zoes, a lobo brain coral, and a red flower pot coral.
So far everything is growing and doing well. I have had to hook up the calcium reactor and have been dosing baking Soda in my evap replacement water.
Water test
Nitrates: 0, Nitrites: 0, Amm: 0, Copper: 0, Phosphate: 0 to 0.3, Calcium: 420, Alk: 9 to 10, Mag: 1340, salinity: 1.24.5 to 1.25, and PH: 8.1 to 8.3 depending on dosing.
I would post some pics but wife and I went on a diving trip in Aruba and she dropped my underwater camera on the pavement of doom and boom, no more underwater pictures.
 
Back
Top