180 Gallon Plumbing & Filtration

bradjc

New member
I'm slowly setting up my 180 Gallon Aquarium. Here are some pics of the plumbing and filtration. It is a Marineland Model 4 sump (left side) and a 20XH gallon refugium (on the right side). I still have a few more things to get. I'm leaving room under there for a caclium reactor in the future. I currently have a 65 gallon reef tank setup with mostly soft and LPS corals. Everything from that tank will be going into this tank. Enjoy the pics.
 

Attachments

  • angled full view under tank.jpg
    angled full view under tank.jpg
    72.5 KB · Views: 16
  • aquacontrollerbrain.jpg
    aquacontrollerbrain.jpg
    68.1 KB · Views: 15
  • drain and return .jpg
    drain and return .jpg
    77 KB · Views: 21
  • aquacontrollerdisplay.jpg
    aquacontrollerdisplay.jpg
    68.2 KB · Views: 14
  • emergency drain.jpg
    emergency drain.jpg
    76.4 KB · Views: 16
Here are some more pictures. Both the sump and the refugium have an emergency drain which means if the water gets up too high it goes down the drain directly into the drain of my house. I am also likely to use this when I do water changes. I also have a return 1/2" return line from the barrel outside where I make my saltwater. I will just put a pump on this to pump it into the tank when I do my water changes.
 

Attachments

  • full view under tank.jpg
    full view under tank.jpg
    70.4 KB · Views: 13
  • refugium plumbing.jpg
    refugium plumbing.jpg
    41.2 KB · Views: 12
  • refugium to sump connection.jpg
    refugium to sump connection.jpg
    62.6 KB · Views: 12
  • refugiumside.jpg
    refugiumside.jpg
    65.4 KB · Views: 13
  • sump2.jpg
    sump2.jpg
    80.2 KB · Views: 17
Here are the last 2 pictures. I have tried to plumb this to make it as reliable as possible.
 

Attachments

  • sump.jpg
    sump.jpg
    87.1 KB · Views: 15
  • UV hookup.jpg
    UV hookup.jpg
    86.2 KB · Views: 18
Here are some key elements I have and will be incorporating into my plumbing to help make this system reliable.

1.) 2 pumps - if one fails the other one hopefully will work
2.) 2 heaters - same idea but these will also be connected to a controller
3.) 2 emergency drains, 1 on the sump and one on the refugium
4.) I split the aquarium drains so that they can run into the refugium and the uv, this eliminates the use of additional pumps.
5.) Everthing has a shut off valve - this allows adjustment on everything
6.) I made a pan in the bottom of the stand about 3" high that can hold water. This way if anything leaks I have a 3" x 72" cushion before it hits the floor.
7.) I haven't finished installing the float switches yet but I am going to have three of them. 1 to tell me the sump is way too low, 1 tells me that the water level is not where it should be and the 3rd will tell me that the level is way too high. These will be connected to my Controller.
8.) The controll will turn on the top off pump which is a low flow peristaltic pump that will take water from a barrel outside.
9.) I will have a in the sump protein skimmer so that if it overflows it just goes back into the tank instead of on the floor.
 
I will be posting some new pictures soon. I had to tear apart this plumbing after testing.

The following problems were encountered:
1.) Did not tighten the connection to the bulkhead enough. I had a small drip.
2.) One section was not glued good enough and leaked really bad
3.) The red faucet valves I got at ACE hardware are really made for pressure and do not work good at all in this setup.

Because this plumbing was all glued except for a few spots (including bulkheads) where they are screwed in, I had to take it all apart and start over. This will set me back about $90. Live and learn I guess. Here are things I have changed when doing it over.

1.) Make sure all pvc connections have enough pipe to fit in securly.
2.) Use heavy duty clear pvc cement
3.) Add (3) double union 3/4" ball valves, this gets rid of (2) faucet valves made for pressure and (1) 3/4" ball valve + union
4.) Tighten all connections to bulkheads better

I am waiting for (2) 1" WYE's to come in. I cannot find those at any store and had to buy them.

Once I get those in I will have this back together in a few hours and ready to test again.
 
New 180g reef tank

New 180g reef tank

Hi bradjc,

Thank you so very much for all of the info and pics. I'm setting up a new 180g reef tank too (72"x24"x24"). I'm a bit behind you in timing. Received the stand 3 weeks ago. The new tank is in my LFS. I'm keeping it there until March or April. I need to apply some oil-based exterior Polyurethane to the stand. Tried to do this recently, but the fumes were too powerful - I even used a very powerful fan with the windows open. It's too cold to open all the windows in my house this time of year (I live in Philadelphia, Pa). This is ok with me. I have to install some new wiring, etc. As you know, there is a lot of work to do for a project like this.

Sometimes I get the feeling that my job (where I am employed) is getting in the way of my Reefkeeping hobby..... ;)

I'm with you 100% regarding using 2 return pumps!!!! I'm going to try running 2 Eheim 1262s from my sump.

Yes, I like the Marineland sump too. Almost bought it.

It was very kind of you to post the problems you had with the plumbing.

If I have any info that may help you, I'll send it. I'm a Newbie with the hobby. Have been reading and studying about Reefkeeping for the past year.

I wish you well on your build.
 
Michael,

I plan to post more pictures soon. The plumbing seems to be the worst part and I am almost finished. I've changed my mind a lot on a few things so that is why. I'm pretty behind on this tank. I got it last May and I'm still setting it up. LOL. I played outside too much this summer. :). So far the best thing I got for it was the Aquacontroller Apex lite. I highly recommend it. I will have it controlling my heaters, my top off system, lights, Koralia pumps and more. It will email me and sound an alert if anything goes wrong (depening on how I program it). Anyways after this plumbing is done the only thing left is the lights. I still haven't gotten those yet. I really want LED's and will wait a little longer if I have to, to save up more money.
 
Here are some pictures from when I got my tank.

1.) Custom Build (Marineland) 180 gallon aquarium. 72"x24"x24". Starfire front and starfire right side glass.
2.) Custom Build Stand and Canopy. Built by a local builder in Atlanta, GA. approx 5 hours from me.
3.) The overflow is in the back center of the tank. This is to keep it away from the sides. I didn't want anything to block the right side.
 

Attachments

  • IMG_0001.JPG
    IMG_0001.JPG
    86.6 KB · Views: 18
  • IMG_0002.JPG
    IMG_0002.JPG
    88.2 KB · Views: 17
  • IMG_0004.JPG
    IMG_0004.JPG
    77.6 KB · Views: 14
  • IMG_0001_1.JPG
    IMG_0001_1.JPG
    88.5 KB · Views: 16
Looks Really nice. I just set up a 180 myself. First aquarium. My wife tells me I love it more than her.... Your tank looks great. I really like the fuge setup..Keep us posted.
 
More Info on my 180 Gallon Tank

More Info on my 180 Gallon Tank

I'm going to try to keep this thread updated as I go along. However there may be long gaps between projects. Here are the projects I have had to do along the way.

Step 1: Set up Ro/Di outside and have 3 barrels, One holds Ro/di water, 2nd holds kalkwater(top off), 3rd holds mixed saltwater. - Completed

Step 2: Plumb from saltwater barrel to where tank will be, also plumb from where tank will be to the drain. - Completed

Step 3: Run airline tubing to be used for top off pump - Completed

Step 4: Reinforce underneath the tank just in case - Completed

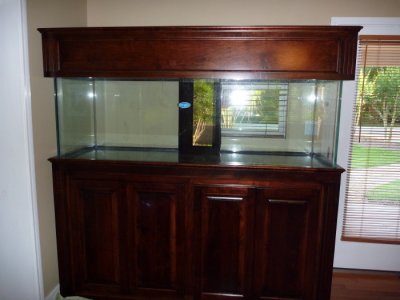
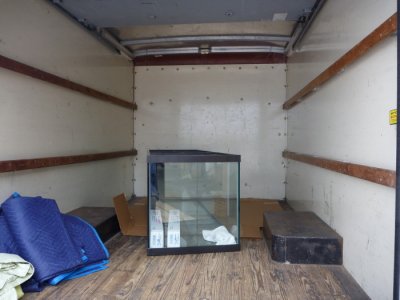
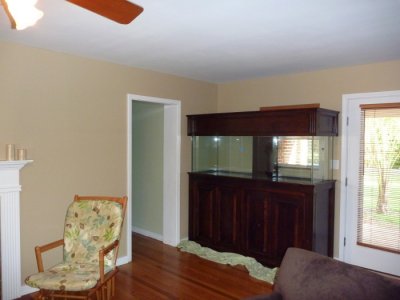
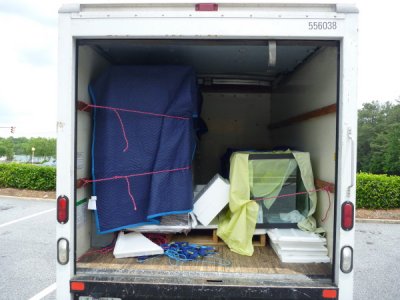
Step 5: Get the tank, stand and canopy in Atlanta, GA - Completed

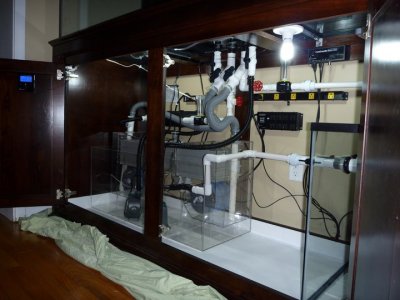
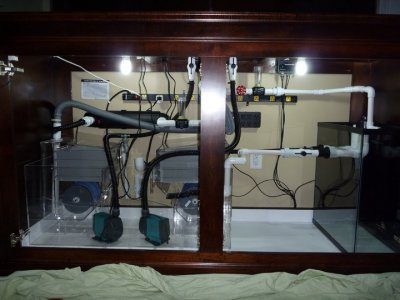
Step 6: Setup up sump - Completed

Step 7: Put down pond liner on bottom of tank and add background - Completed

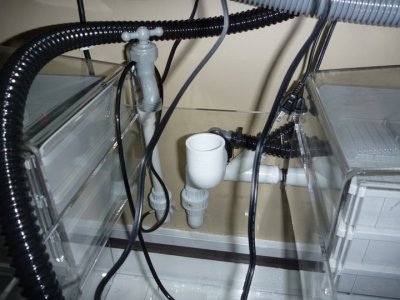
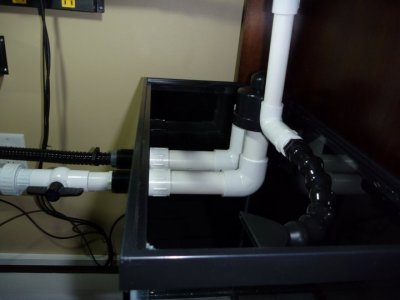
Step 8: Complete plumbing in the actual tank and fix overflow box - Completed

Step 9: Get 20 gallon xtra high tank for refugium and drill 2 holes in side - Completed

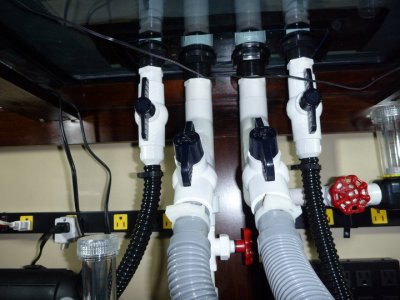
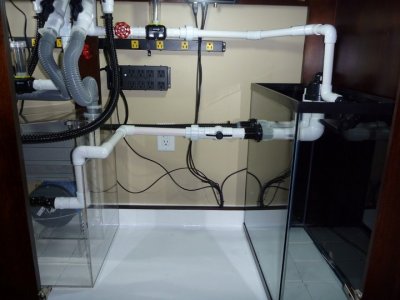
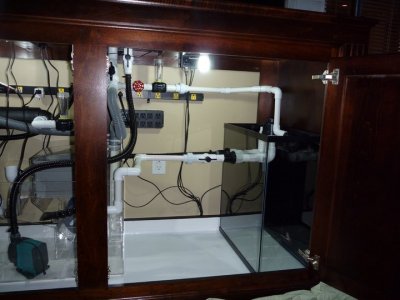
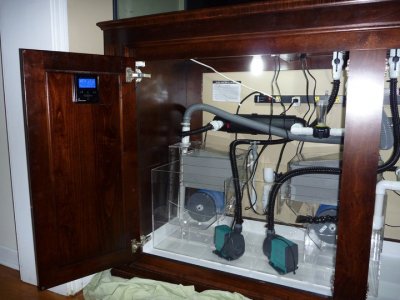
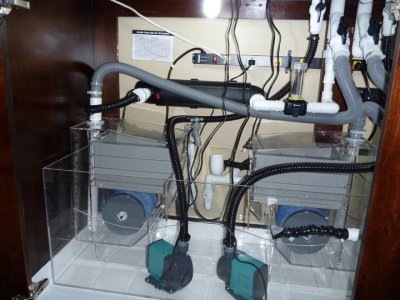
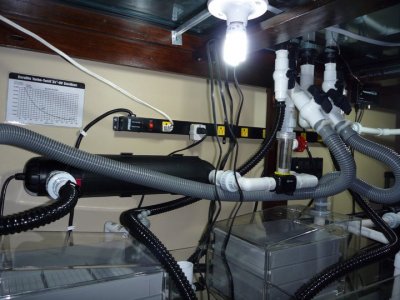
Step 10: Complete plumbing in the stand - Almost completed

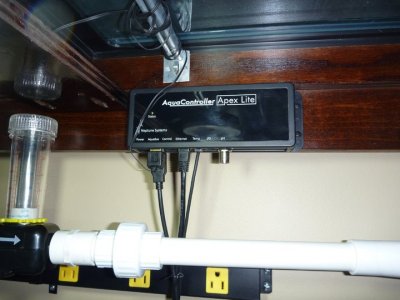
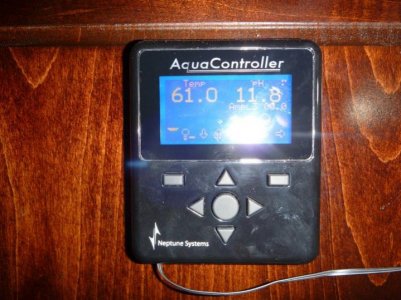
Step 11: Configure float switches and setup Aquacontroller - Started

Step 12: Order Protein Skimmer - Soon

Step 13: Do a test run for a week or so - Not Started

Step 14: Empty tank and start setting up rock and add sand - Not Started

Step 15: Order lights - Not Started

Step 16: Setup lights - Not Started

Step 17: Add Corals and Fish - Not Started

Step 18: Tear down old tank and sell it - Not Started
 
Here is a picture of my current 65 gallon fish tank. Everything in this tank will be moved over to my 180 Gallon tank once it is setup.

<a href="http://s831.photobucket.com/albums/zz233/firebirdbandit/?action=view&current=currenttank.jpg" target="_blank"><img src="http://i831.photobucket.com/albums/zz233/firebirdbandit/currenttank.jpg" border="0" alt="Photobucket"></a>
 
Here are pictures of the plumbing from the outside barrels to the where the tank will be inside the house. I live in Tallahassee, FL and I rarely have to worry about this freezing.
<a href="http://s831.photobucket.com/albums/zz233/firebirdbandit/?action=view&current=IMG_0001_6.jpg" target="_blank"><img src="http://i831.photobucket.com/albums/zz233/firebirdbandit/IMG_0001_6.jpg" border="0" alt="Photobucket"></a>
<a href="http://s831.photobucket.com/albums/zz233/firebirdbandit/?action=view&current=IMG_0004_3.jpg" target="_blank"><img src="http://i831.photobucket.com/albums/zz233/firebirdbandit/IMG_0004_3.jpg" border="0" alt="Photobucket"></a>
<a href="http://s831.photobucket.com/albums/zz233/firebirdbandit/?action=view&current=IMG_0003_4.jpg" target="_blank"><img src="http://i831.photobucket.com/albums/zz233/firebirdbandit/IMG_0003_4.jpg" border="0" alt="Photobucket"></a>
<a href="http://s831.photobucket.com/albums/zz233/firebirdbandit/?action=view&current=IMG_0002_4.jpg" target="_blank"><img src="http://i831.photobucket.com/albums/zz233/firebirdbandit/IMG_0002_4.jpg" border="0" alt="Photobucket"></a>
<a href="http://s831.photobucket.com/albums/zz233/firebirdbandit/?action=view&current=pipe0003.jpg" target="_blank"><img src="http://i831.photobucket.com/albums/zz233/firebirdbandit/pipe0003.jpg" border="0" alt="Photobucket"></a>
<a href="http://s831.photobucket.com/albums/zz233/firebirdbandit/?action=view&current=pipe0002.jpg" target="_blank"><img src="http://i831.photobucket.com/albums/zz233/firebirdbandit/pipe0002.jpg" border="0" alt="Photobucket"></a>
<a href="http://s831.photobucket.com/albums/zz233/firebirdbandit/?action=view&current=pipe0001.jpg" target="_blank"><img src="http://i831.photobucket.com/albums/zz233/firebirdbandit/pipe0001.jpg" border="0" alt="Photobucket"></a>
 
Here are pictures when I picked up my tank in Atlanta, GA and brought it back to Tallahasse, FL. Its about a 5 hour drive.

<br>

<a href="http://s831.photobucket.com/albums/zz233/firebirdbandit/?action=view&current=IMG_0001_2.jpg" target="_blank"><img src="http://i831.photobucket.com/albums/zz233/firebirdbandit/IMG_0001_2.jpg" border="0" alt="Photobucket"></a>
<a href="http://s831.photobucket.com/albums/zz233/firebirdbandit/?action=view&current=IMG_0002_1.jpg" target="_blank"><img src="http://i831.photobucket.com/albums/zz233/firebirdbandit/IMG_0002_1.jpg" border="0" alt="Photobucket"></a>
<a href="http://s831.photobucket.com/albums/zz233/firebirdbandit/?action=view&current=IMG_0004.jpg" target="_blank"><img src="http://i831.photobucket.com/albums/zz233/firebirdbandit/IMG_0004.jpg" border="0" alt="Photobucket"></a>
<a href="http://s831.photobucket.com/albums/zz233/firebirdbandit/?action=view&current=IMG_0003_1.jpg" target="_blank"><img src="http://i831.photobucket.com/albums/zz233/firebirdbandit/IMG_0003_1.jpg" border="0" alt="Photobucket"></a>
<a href="http://s831.photobucket.com/albums/zz233/firebirdbandit/?action=view&current=IMG_0002.jpg" target="_blank"><img src="http://i831.photobucket.com/albums/zz233/firebirdbandit/IMG_0002.jpg" border="0" alt="Photobucket"></a>
<a href="http://s831.photobucket.com/albums/zz233/firebirdbandit/?action=view&current=IMG_0006.jpg" target="_blank"><img src="http://i831.photobucket.com/albums/zz233/firebirdbandit/IMG_0006.jpg" border="0" alt="Photobucket"></a>
<a href="http://s831.photobucket.com/albums/zz233/firebirdbandit/?action=view&current=IMG_0001_1.jpg" target="_blank"><img src="http://i831.photobucket.com/albums/zz233/firebirdbandit/IMG_0001_1.jpg" border="0" alt="Photobucket"></a>
<a href="http://s831.photobucket.com/albums/zz233/firebirdbandit/?action=view&current=IMG_0005.jpg" target="_blank"><img src="http://i831.photobucket.com/albums/zz233/firebirdbandit/IMG_0005.jpg" border="0" alt="Photobucket"></a>
<a href="http://s831.photobucket.com/albums/zz233/firebirdbandit/?action=view&current=IMG_0003.jpg" target="_blank"><img src="http://i831.photobucket.com/albums/zz233/firebirdbandit/IMG_0003.jpg" border="0" alt="Photobucket"></a>
 
Here are pictures of my plumbing under my tank. As noted in a previous post. I have had to take much of this apart and redo the plumbing. I'm waiting on (2) 1" WYE's I had to order and once those come in I should have this done. I expect to be finished this weekend. I will post new pics of the plumbing when that is completed.

<br>
<a href="http://s831.photobucket.com/albums/zz233/firebirdbandit/?action=view&current=IMG_0001_4.jpg" target="_blank"><img src="http://i831.photobucket.com/albums/zz233/firebirdbandit/IMG_0001_4.jpg" border="0" alt="Photobucket"></a>
<a href="http://s831.photobucket.com/albums/zz233/firebirdbandit/?action=view&current=IMG_0017.jpg" target="_blank"><img src="http://i831.photobucket.com/albums/zz233/firebirdbandit/IMG_0017.jpg" border="0" alt="Photobucket"></a>
<a href="http://s831.photobucket.com/albums/zz233/firebirdbandit/?action=view&current=IMG_0016.jpg" target="_blank"><img src="http://i831.photobucket.com/albums/zz233/firebirdbandit/IMG_0016.jpg" border="0" alt="Photobucket"></a>
<a href="http://s831.photobucket.com/albums/zz233/firebirdbandit/?action=view&current=IMG_0015.jpg" target="_blank"><img src="http://i831.photobucket.com/albums/zz233/firebirdbandit/IMG_0015.jpg" border="0" alt="Photobucket"></a>
<a href="http://s831.photobucket.com/albums/zz233/firebirdbandit/?action=view&current=IMG_0001.jpg" target="_blank"><img src="http://i831.photobucket.com/albums/zz233/firebirdbandit/IMG_0001.jpg" border="0" alt="Photobucket"></a>
<a href="http://s831.photobucket.com/albums/zz233/firebirdbandit/?action=view&current=IMG_0012.jpg" target="_blank"><img src="http://i831.photobucket.com/albums/zz233/firebirdbandit/IMG_0012.jpg" border="0" alt="Photobucket"></a>
<a href="http://s831.photobucket.com/albums/zz233/firebirdbandit/?action=view&current=IMG_0011.jpg" target="_blank"><img src="http://i831.photobucket.com/albums/zz233/firebirdbandit/IMG_0011.jpg" border="0" alt="Photobucket"></a>
<a href="http://s831.photobucket.com/albums/zz233/firebirdbandit/?action=view&current=IMG_0010.jpg" target="_blank"><img src="http://i831.photobucket.com/albums/zz233/firebirdbandit/IMG_0010.jpg" border="0" alt="Photobucket"></a>
<a href="http://s831.photobucket.com/albums/zz233/firebirdbandit/?action=view&current=IMG_0009.jpg" target="_blank"><img src="http://i831.photobucket.com/albums/zz233/firebirdbandit/IMG_0009.jpg" border="0" alt="Photobucket"></a>
<a href="http://s831.photobucket.com/albums/zz233/firebirdbandit/?action=view&current=IMG_0008.jpg" target="_blank"><img src="http://i831.photobucket.com/albums/zz233/firebirdbandit/IMG_0008.jpg" border="0" alt="Photobucket"></a>
<a href="http://s831.photobucket.com/albums/zz233/firebirdbandit/?action=view&current=IMG_0007.jpg" target="_blank"><img src="http://i831.photobucket.com/albums/zz233/firebirdbandit/IMG_0007.jpg" border="0" alt="Photobucket"></a>
<a href="http://s831.photobucket.com/albums/zz233/firebirdbandit/?action=view&current=IMG_0006_1.jpg" target="_blank"><img src="http://i831.photobucket.com/albums/zz233/firebirdbandit/IMG_0006_1.jpg" border="0" alt="Photobucket"></a>
<a href="http://s831.photobucket.com/albums/zz233/firebirdbandit/?action=view&current=IMG_0005_2.jpg" target="_blank"><img src="http://i831.photobucket.com/albums/zz233/firebirdbandit/IMG_0005_2.jpg" border="0" alt="Photobucket"></a>
<a href="http://s831.photobucket.com/albums/zz233/firebirdbandit/?action=view&current=IMG_0005_1.jpg" target="_blank"><img src="http://i831.photobucket.com/albums/zz233/firebirdbandit/IMG_0005_1.jpg" border="0" alt="Photobucket"></a>
<a href="http://s831.photobucket.com/albums/zz233/firebirdbandit/?action=view&current=IMG_0004_2.jpg" target="_blank"><img src="http://i831.photobucket.com/albums/zz233/firebirdbandit/IMG_0004_2.jpg" border="0" alt="Photobucket"></a>
<a href="http://s831.photobucket.com/albums/zz233/firebirdbandit/?action=view&current=IMG_0004_1.jpg" target="_blank"><img src="http://i831.photobucket.com/albums/zz233/firebirdbandit/IMG_0004_1.jpg" border="0" alt="Photobucket"></a>
<a href="http://s831.photobucket.com/albums/zz233/firebirdbandit/?action=view&current=IMG_0001_5.jpg" target="_blank"><img src="http://i831.photobucket.com/albums/zz233/firebirdbandit/IMG_0001_5.jpg" border="0" alt="Photobucket"></a>
<a href="http://s831.photobucket.com/albums/zz233/firebirdbandit/?action=view&current=IMG_0001_3.jpg" target="_blank"><img src="http://i831.photobucket.com/albums/zz233/firebirdbandit/IMG_0001_3.jpg" border="0" alt="Photobucket"></a>
 
Here are pictures of my aquacontroller apex lite unit.

<br>
<a href="http://s831.photobucket.com/albums/zz233/firebirdbandit/?action=view&current=IMG_0013.jpg" target="_blank"><img src="http://i831.photobucket.com/albums/zz233/firebirdbandit/IMG_0013.jpg" border="0" alt="Photobucket"></a>
<a href="http://s831.photobucket.com/albums/zz233/firebirdbandit/?action=view&current=IMG_0014.jpg" target="_blank"><img src="http://i831.photobucket.com/albums/zz233/firebirdbandit/IMG_0014.jpg" border="0" alt="Photobucket"></a>
<a href="http://s831.photobucket.com/albums/zz233/firebirdbandit/?action=view&current=desktopbackground.jpg" target="_blank"><img src="http://i831.photobucket.com/albums/zz233/firebirdbandit/desktopbackground.jpg" border="0" alt="Photobucket"></a>
 
Super nice stand, what type would did you use for the skin? The little tubes a top the lines I your sump... Are those the float valves you are using? How do they work? Sorry never seen them in a system. It looks really sleek, I am very impressed with your build and the style of tank and stand. Tagging along.
 
wicked fish, I did not build the stand so I'm not sure what you mean by skin? I also am not sure what little tubs you are talking about. I did not take a picture of my float valve setup yet so those are not them. You might be talking about the flow meters. I have 2 of them. One going to the protein skimmer and the other one going to the refugium so I can tell what the flow rate is. I did add 2 lights that I built right into the stand and they come on automatically when one of the doors is open. There is some pictures of them above.
 
Ok I finished the plumbing finally. I just have to tweak a few things. The return lines need to be tightened but that is easy to adjust. Everything else with the plumbing is great. I am testing out the tank right now by running it with water for a week. Then I will test it with everything off for a week just to make sure the sump does overflow or anything. After that I am draining it and the rock will go in and so will the sand. Here are the latest pictures of the plumbing.
 
Back
Top