186G Cylinder Reef Build

BigAirHarper

New member
RC!

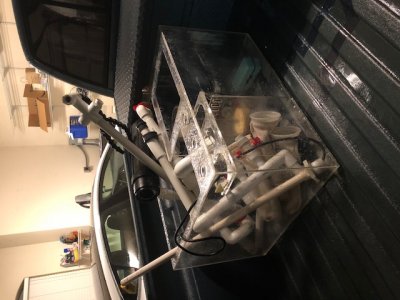
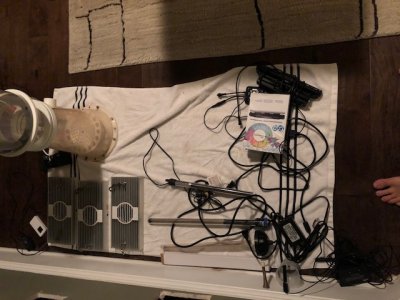
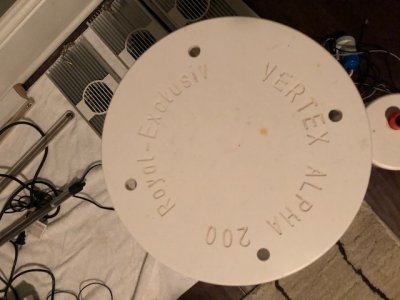
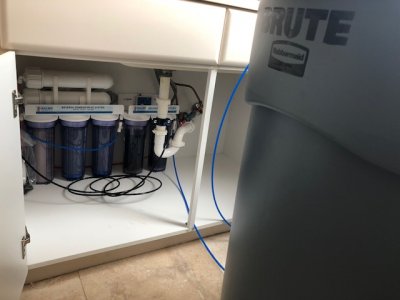
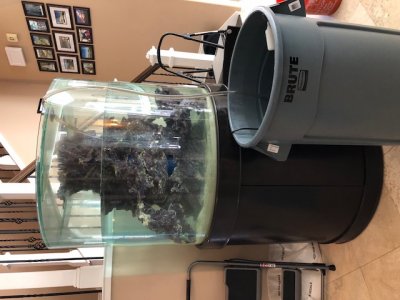
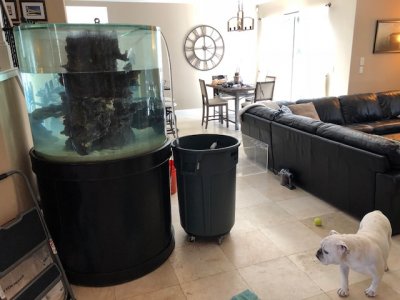
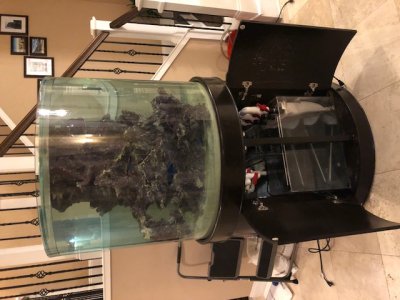
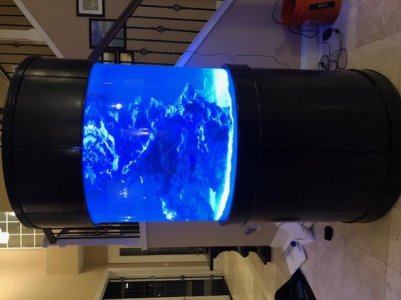
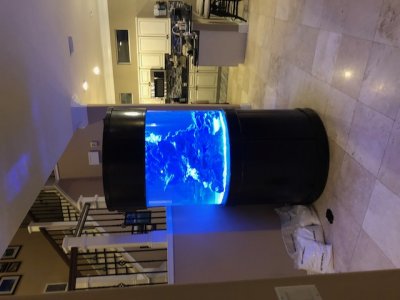
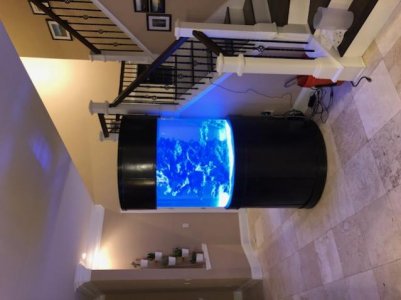
I've always wanted to do a build thread and with this cylinder tank being unique, I figured this would be a great way to get started. Some background:

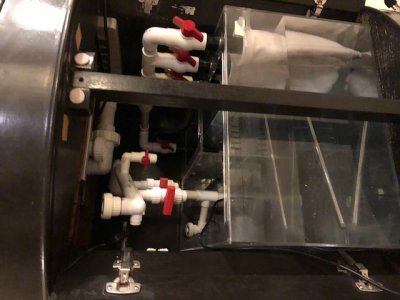
I've been out of reef keeping for 4 years however I had tank for 6 years prior to that. I started thinking about getting back in the hobby and found a killer deal locally on this very unique tank and setup with great equipment. I'm modifying the setup like most of us do and wanted to share my thoughts/strategy.

That said, I'm also doing this for ADVICE! This forum has a wealth of knowledge that I've researched up and down, however everyone always has great ideas on how to make things better. So feel free to chime in if you see a better solution to one of my problems!

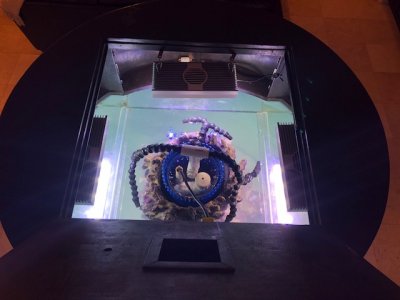
On to the build! My goal is to focus on the fish, I want to keep some fish I've always wanted and I've been working on a stocking list with my wife. I want to add some simple softies/LPS in the future that I know I can keep alive easily! No more stress of SPS for me. Let the games begin.
 
Getting the tank to this point was much more of a challenge than it seems. I didn't take pics of the ordeal as I was having to lift, but wow what a challenge. This is a 186 gallon cylinder from aquavim out of NY. It's 39" in diameter. So the narrow side is it's height at 36". Well none of my doors were that wide, and removing door from off front door was out of the question as I have side panes of glass. So we had to lug it around the entire house (challenge because there isn't a ton of space between houses where I live) to get it to my back sliding glass door.

We used some of those moving straps made out of seat belt material and laid it in its side with a moving blanket around glass. Using 5 guys and 2 people to direct, we navigated through the bushes and through my pool gate, which I had I remove to barely have room for tank. Finally, we got it in place and on the leveling pad...


PICS, they are failing to upload every time, someone know of easier way to do this?
 
Here is the tank after we got it on the stand....
 

Attachments

  • IMG_2276.jpg
    IMG_2276.jpg
    93.8 KB · Views: 0
So here is most of the equipment all laid out that came with the tank. Some of the nicest equipment I have ever owned, even though some of it is a few years old at this point. I'm learning about these new Gyre pumps (always have been a Vortech guy. Also I've gotta learn the setup for a Reef Keeper Lite and the AI Vega programming. All things I've never had in a build, but I'll get them online one system at a time. Next step, rocks and getting this tank wet!
 

Attachments

  • IMG_2197.jpg
    IMG_2197.jpg
    93.9 KB · Views: 0
  • IMG_2199.jpg
    IMG_2199.jpg
    94.3 KB · Views: 0
  • IMG_2201.jpg
    IMG_2201.jpg
    68.1 KB · Views: 0
Definitely going to be a unique build.

The gyre pumps would work best given the curvature of the glass since the magnets are quite slim when mounted vertically. They also move a ton of water.
 
Houston we have water! I received my BRS 6 Stage RO/DI. If you don't have one of these you should, they are the best units out there. I got the 150G/day model to try and conserve water. I installed a float valve on a 44G Brute on wheels. Makes it easy to transfer water from my laundry room where to RO setup is to the tank in the living room.

Also, you may notice the rocks in the tank! So, the previous owner had a custom fabricated ceramic rock work center piece fabricated. This is my first time with such a structure and it is very cool, however it is very different than what I am used to. The rocks were a pain to position as they do not fit together exactly as they had been taken apart, leaving holes in the rock work that will need to be covered up later with smaller rocks/coral. They actually look like some nice rocks, however they are very fragile/brittle. We will see how they do in the tank....
 

Attachments

  • IMG_2326.jpg
    IMG_2326.jpg
    57.5 KB · Views: 0
  • IMG_2330.jpg
    IMG_2330.jpg
    86.7 KB · Views: 0
  • IMG_2331.jpg
    IMG_2331.jpg
    80.1 KB · Views: 0
I worked on one of those with 2 dragon eels & some other large fish.
A narrow magnet like a Magnavore IV is good for cleaning a round cylinder in the vertical position. GL
 
I worked on one of those with 2 dragon eels & some other large fish.
A narrow magnet like a Magnavore IV is good for cleaning a round cylinder in the vertical position. GL

Thanks for the tip. It came with a large blue mag float, but I'm noticing that it will definitely require some more strength with the stronger stuff.
 
Tank is full, plumbing is complete, sump in place. And we have leaks.....

This is the bane of my existence with reef tanks is getting everything setup and finally leak free. Even after setting up 5+ tanks there always seems to be something that will not cooperate.

In this case, the tank had 3 leaks: between 2 90 degree joints on welded PVC on return pump (my guess is it got disturbed during move), the main drain where the threaded PVC goes into the bulkhead, and finally the threaded PVC joint where return line goes into bulkhead.

Another layer of plumbers tape fixed the return bulkhead leak. I tried drying, and adding a layer of PVC glue around the leaking 90 joint, however it was unsuccessful. The faulty joint was cut out, I bought new 90's and fixed it properly.

Finally, the main drain was pain. I applied layers of teflon tape, and still couldn't get a good seal. Finally went to Lowes and got some plumbers sealer that doesn't set up completely. I applied it over multiple fresh layers of plumber's tape and VIOLA, problem solved finally.

Now that the tank is leak free time to add some salt!
 

Attachments

  • IMG_2332.jpg
    IMG_2332.jpg
    92.8 KB · Views: 0
  • IMG_2333.jpg
    IMG_2333.jpg
    73.1 KB · Views: 0
  • IMG_2339.jpg
    IMG_2339.jpg
    34 KB · Views: 0
  • IMG_2340.jpg
    IMG_2340.jpg
    98.4 KB · Views: 0
  • IMG_2341.jpg
    IMG_2341.jpg
    34.7 KB · Views: 0
Pics below of the leak spots and a view of plumbing from the top...
 

Attachments

  • IMG_2342.jpg
    IMG_2342.jpg
    64.8 KB · Views: 0
  • RenderedImage.jpg
    RenderedImage.jpg
    44.1 KB · Views: 0
Back
Top