75g Wall Cabinet Build

Triggerfish

Active member
Broke down my 125g about a year ago was running for 12 years. Didnt think i'd miss it as much as i do so have decided to scale down and go with a 75g.
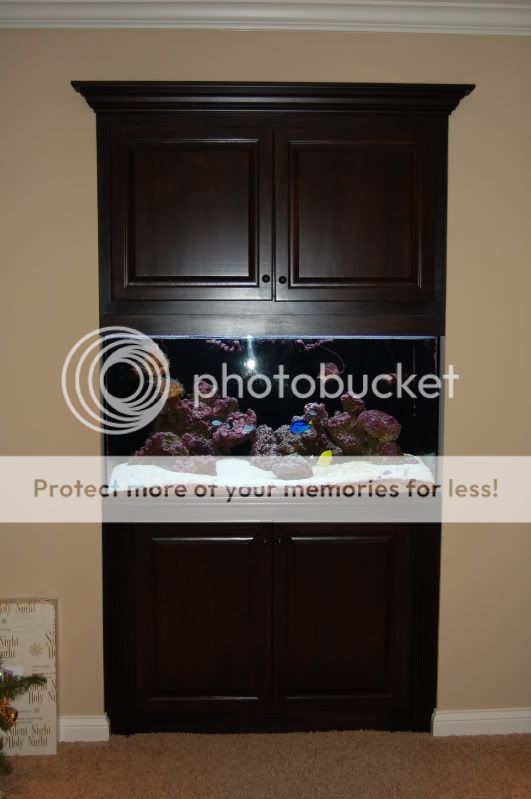
old tank was sitting on a regular oak stand with canopy..nice but plain.
decided to make it as a combination of 2x and 3/4 ply. which is how my other stand was made.

after searching through pics decided to build the wall unit that RedEDGE2k1 built but will be staining and not painting. also no false draw fronts just trim and doors. decided to make it as a combination of 2x and 3/4 ply. which is how my other stand was made.
cabinet.jpg


Using 3/4 maple ply from Lowes at $45 sheet.
100_0016.jpg


I wanted to make the frames instead of cutting out the door holes so grain will run the same as the door grain. Couple issues. 1. i was going to make it about
39" high but realized when viewing tank while sitting its looks too high. it will be another 3/4" higher than pic.
2. The openning looks too high at 30 1/2". so the doors will be kind of giant looking.
framewall.jpg


it was kind of a pain to build the frame so since i have to redo it i was thinking of making it as a solid front and just cut out the door hole. im just wondering how this is going to look with the grain running up/down on the top bottom rails. what do you think on this? just realized since the stand is 48 1/2" long so i would have to make it 48" to use on solid frame cutout with grain running top/bottom.
 
Last edited:
I have grains going both ways on the front of mine and with the red mohagony stain you really can't tell at all. I was a lil worried about that as well. Im throwin a pic of it up on my thread this morning so check it out and see if ya can tell.
 
i think the height is going to be ok at 38" and a 3/4" top. if its lowered it will be to low when viewing while standing. ill just make the frame wider so doors will be smaller.
 
Built in.

Built in.

I dont think you will have much issue if you use what you have or if you plunge cut to create your openings. Its going to be what you like.

I plunge cut my 4 door openings. Always makes me nervous because one little slip and its start over time. I added two pics, one before and one after.

On the after pic you can see a similar "frame" around the tank like you have in your pic. The stain is a mahogany like color with conversion varnish. The grain rolls nicely and as long as your joints are clean and tight, no problem.

I have Maple plywood and all the trim is Cherry. When stained they look very similar.

Three things I will recommend if you havent thought of them yet.

1. On the "after" pic look at the top right of the cabinet. I installed hardwood floor vents to allow a little air flow. I strongly recommend doing this. They are tongue and groove but just shave off the bottom of the tongue and they slide right in to another plunge cut.

2. Conversion varnish is king! While we stained and sealed, my stain guy emptied his varnish sprayer on the inside of the stand, total of 4 times. I think this has helped prevent any water/moisture issues with wood on the inside of the cabinet.

3. If you can add access to the tank from the rear or side I strongly recommend doing so. It is a pain in the $&# to get to the back of my tank. Its like the abyss.

Builtin1.jpg


Builtin2.jpg
 
thanks for the pics and tips. i like the vent idea.
making progress on bottom stand. have frame cutout and reinforced insides with 2x. just add few pieces to bottom to attach floor then just about done.
couple pics.
botcabinet.jpg


100_0027.jpg
 
I think if you are worried about the doors looking too big, you can break them up visually. On my stand build (haven't got to the doors yet, but when I do) I'm going to make them with faux drawer fronts on the top. That way, they "door" part won't look so tall and I won't lose any workspace in the sump area with fixed drawer panels. I also think that the look of drawers makes it look less like a fish tank stand and more like furniture. Just some food for thought.

I'm following along. I'm so burned out on all of the DIY LED threads, it's nice to see a stand build. I'm way better with wood than electronics, haha.
 
when i did the frame over i made the top rail 6" so the doors will only be about 28" tall.
ill either leave a larger space over the doors or use some type of molding. i think ill be figuring this out more or less as i progress forward.
 
got bottom put in place today..this took way longer than i would have figured. ended up using 1/2" so added few 2x on bottom for support.have some gaps to fill in and then will seel it up to make water tight.
attached a 1x in back to prevent spill over if need be.

bottomfloor.jpg
 
hey Shane.. yeah coming along slowly kind of figureing things out as i move along with it.
thanks again for the tank..amazing it actually fit in the car. your tank was looking sweet. might have to hit ya up for a frag or two once i get going again.


Indymann..nice looking cabinet.. i'm thinking ill be making my doors pretty much just like that. iv'e got a wall in my basement room that may eventully be home to an 8 footer in wall some day..
 
wall is 78 3/4" figured i would leave a 4" space on sides of cabinet so total length will be 70 3/4". top cut. side cabinets will be recessed in 5".

100_0029.jpg
 
Be sure to check that new Lowes Maple ply real close. Im doing a veneer press job for a local cab shop that got into a bind and ran to lowes for maple ply to finish up a job. All the end panels are face de-laminating. Im having to sand off the faces and repress new veneer.

Don
 
thx for the heads up.. not sure what to look for in regards to the veneer peeling off..other than a visual look at all the edges. and i dont see anything that would indicate an issue as of yet..
 
made an error when i cut the top as i wanted a 5" recess for the side cabinet but forgot to add the 3/4" for the frame so it will now be 4 1/4". didnt realize until i had the bottom in place. stupid oversight. maybe it will look better..not sure.

pic stand upside down.

100_0030.jpg
 
ive decided to take the end apart and cut it down to what i wanted it to be.. it's bothering me too much. don't you love doing things twice.
what a pita this is, damaged the side taking it off..gotta cut new side and bottom.
 
Last edited:
Back
Top