AZRippster
Diver & Reef Aquarium Nut
So as the battle rages on between LED’ers, Halide’ers, T5’ers, and Hybrid’ers, I found myself also seeking the best solution for my tank. After almost 5 years of being on LED exclusively, I found after migrating to a 450G 8’ long tank, the LEDs were not cutting it. This past November ’15, my wife and I decided to pull the LEDs and go back to something I’ve used since the ‘80s, Halide. To say the very least , the change has been dramatic for the good. I firmly believe coverage is a crucial component to successful LED implementations and even more so on larger tanks. Looking at old pictures, our 180G had much better coverage due to LED spacing and density likely leading to that tank’s success. Although the MH/T5 solution we implemented in Nov ’15 has been fantastic, admittedly it’s HOT and uses a significant amount of juice. This, compounded by Arizona summer weather, got me to thinking that a T5/LED solution may be a good option for at least our hot months.
So I was staring at a box of dual Rapid LED Aurora pucks thinking, “Why don’t I just build one based off of these and the successful ATI Sunpower series”? Then the next thought was, “The tank is 8’ long and it would be nice to have everything controlled as one unit”.
So here it is, an 8’ ATI Dimmable Sunpower Aurora Puck Hybrid. I learned quite a bit by working my way through this, so if anyone has questions, fire away. There are many ways to do things, some better than others, this just happens to be the way I decided to eat this elephant.
To begin with, I purchased a 48” 8 Lamp ATI Dimmable Sunpower and a Non-Dimmable Sunpower. At the same time I ordered 2 additional Dimmable HEP ballasts. I’m not fond of rapid or instant start ballasts, so I figured I would pull the Programmed Start ones from the Non-Dimmable Sunpower, migrate those to our MH/T5 fixture (uses rapid start), pull 1 ballast from the Dimmable Sunpower and migrate it along with the 2 I purchased to the Non-Dimmable outfitting it with all dimmable ballast. Remember, 2 lamps will be sacrificed in each fixture to accommodate the LED heat sinks. This facilitated this shell game to be possible.
Here were a few of the requirements I placed upon myself in the design:
1. Retain full native ATI controller functionality to include temperature sensing for T5 lamps
2. Retain original ATI fixture dimensions, no external components
3. Utilize a single power cable/cord on each fixture
4. Operate both fixtures as a single unit
5. Capability to break fixtures apart and at least operate the master as an autonomous unit
6. Fully dimmable from zero to full on both T5 and LED without Apex controlled power outlet
7. PWM dimming for LEDs to include Fan control
8. Lunar cycle moonlights
9. Have this done before it starts warming up, which this year is early, meaning now!
So after these considerations, I decided to go with a full BlueFish controller for the LEDs due to a limitation on LDD drivers with the Mini. As far as the T5 and ATI fan control, I was only concerned about ensuring enough juice to an additional 3 fans and getting the power and control signals to the slave fixture. To do this I kicked up the power supply ATI provides to a Mean Well APV-25-12.
So without being any more verbose (my apologies), I’ll just stick up some pics instead of a thousand words.
Both component trays with everything installed and wired up:

Shots during functionality testing:


This is the main LED control layout. The slave side is identical minus the BlueFish controller. Power for the BlueFish is tapped off of a 48V line coming in from one of the Mean Well power supplies for the Mean Well LDD drivers. This power is stepped down to 12.5V and provided to the BlueFish controller and MOSFET switches that drive the heat sink fans and moonlights.

In order to get the control signals and ATI fan power from the master to the slave unit I decided to go with good ol’ DB25 jacks. The master and slave are connected by a short DB25 M/M patch cable.
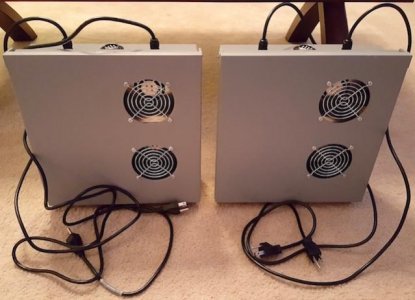
Another challenge was cooling. With the addition of the LEDs, I knew I would likely need additional fans for the heat sinks. Utilization of vents other than what were designed into the ATI fixture could improperly redirect airflow degrading the cooling performance of the design. Secondly, I wanted to stick with a fan that was close to the original CFM specs provided by Rapid LED for the Aurora Pucks which were way too thick to work within the fixture. The solution was the Scythe KAZE JYU Slim 100mm SY1012SL12M 2000RPM fans. These are only 12mm thick, essentially the same as the Delta EFB0612MA fans used by ATI. They are extremely quiet and readily available.

As a comparison:

Another consideration was how to hang these now that there is additional weight from the added heat sinks. My solution was to add in a 1/2” x 1/8” flat steel bar to the end caps. These would be #10 tapped in the same locations the OEM hanging kit attach but will now be capable of having a #10 eye bolts installed.

So I was staring at a box of dual Rapid LED Aurora pucks thinking, “Why don’t I just build one based off of these and the successful ATI Sunpower series”? Then the next thought was, “The tank is 8’ long and it would be nice to have everything controlled as one unit”.
So here it is, an 8’ ATI Dimmable Sunpower Aurora Puck Hybrid. I learned quite a bit by working my way through this, so if anyone has questions, fire away. There are many ways to do things, some better than others, this just happens to be the way I decided to eat this elephant.
To begin with, I purchased a 48” 8 Lamp ATI Dimmable Sunpower and a Non-Dimmable Sunpower. At the same time I ordered 2 additional Dimmable HEP ballasts. I’m not fond of rapid or instant start ballasts, so I figured I would pull the Programmed Start ones from the Non-Dimmable Sunpower, migrate those to our MH/T5 fixture (uses rapid start), pull 1 ballast from the Dimmable Sunpower and migrate it along with the 2 I purchased to the Non-Dimmable outfitting it with all dimmable ballast. Remember, 2 lamps will be sacrificed in each fixture to accommodate the LED heat sinks. This facilitated this shell game to be possible.
Here were a few of the requirements I placed upon myself in the design:
1. Retain full native ATI controller functionality to include temperature sensing for T5 lamps
2. Retain original ATI fixture dimensions, no external components
3. Utilize a single power cable/cord on each fixture
4. Operate both fixtures as a single unit
5. Capability to break fixtures apart and at least operate the master as an autonomous unit
6. Fully dimmable from zero to full on both T5 and LED without Apex controlled power outlet
7. PWM dimming for LEDs to include Fan control
8. Lunar cycle moonlights
9. Have this done before it starts warming up, which this year is early, meaning now!
So after these considerations, I decided to go with a full BlueFish controller for the LEDs due to a limitation on LDD drivers with the Mini. As far as the T5 and ATI fan control, I was only concerned about ensuring enough juice to an additional 3 fans and getting the power and control signals to the slave fixture. To do this I kicked up the power supply ATI provides to a Mean Well APV-25-12.
So without being any more verbose (my apologies), I’ll just stick up some pics instead of a thousand words.
Both component trays with everything installed and wired up:
Shots during functionality testing:
This is the main LED control layout. The slave side is identical minus the BlueFish controller. Power for the BlueFish is tapped off of a 48V line coming in from one of the Mean Well power supplies for the Mean Well LDD drivers. This power is stepped down to 12.5V and provided to the BlueFish controller and MOSFET switches that drive the heat sink fans and moonlights.
In order to get the control signals and ATI fan power from the master to the slave unit I decided to go with good ol’ DB25 jacks. The master and slave are connected by a short DB25 M/M patch cable.
Another challenge was cooling. With the addition of the LEDs, I knew I would likely need additional fans for the heat sinks. Utilization of vents other than what were designed into the ATI fixture could improperly redirect airflow degrading the cooling performance of the design. Secondly, I wanted to stick with a fan that was close to the original CFM specs provided by Rapid LED for the Aurora Pucks which were way too thick to work within the fixture. The solution was the Scythe KAZE JYU Slim 100mm SY1012SL12M 2000RPM fans. These are only 12mm thick, essentially the same as the Delta EFB0612MA fans used by ATI. They are extremely quiet and readily available.
As a comparison:
Another consideration was how to hang these now that there is additional weight from the added heat sinks. My solution was to add in a 1/2” x 1/8” flat steel bar to the end caps. These would be #10 tapped in the same locations the OEM hanging kit attach but will now be capable of having a #10 eye bolts installed.
Last edited:


")