Acrylic fabrication questions? I can help!

Gotta define "will it work?" yes, it will hold. Yes it will bow more than I personally wanna see. Starts to noticeably bow at about 15" IME on a 48" span.

James

Thanks James, I always appreciate your expert opinion.
I might have to re-think my plan on wanting a rimless acrylic.
Here's another dimension I want.
96"L x 24"W x 20"H @ 1/2" thick
1. Is 1/2" thick sufficient for this size of tank?
2. How wide should the euro brace be?
3. How many cross brace will I need?

Thanks.
acrylic is very durable, but is softer.. as such; will bow more than glass will, so rimless acrylic tanks can be a trick and expensive.

for the 96 x 24 x 20": - 1/2" will be fine. 3" euro + 3 x 6" cross-braces is ideal. Yielding 4 top openings measuring 18 x 18. Or you use 4" euro and 2 x 8" cross-braces, yielding 3 top openings measuring 16 x 24. These are about ideal to me.. :)

James
 
Hi James,

I'm looking at a tank that is 96x40x24 with two external overflows - the tank is made out of 3/4" acrylic and has a 5" euro-braced perimeter and one 10" cross brace in the center. Is that adequate to prevent crazy bowing?
 
Hi James,

I'm looking at a tank that is 96x40x24 with two external overflows - the tank is made out of 3/4" acrylic and has a 5" euro-braced perimeter and one 10" cross brace in the center. Is that adequate to prevent crazy bowing?
Provided the external boxes are made and glued on well - should be fine. The tank might bow a li'l bit, but nothing to worry about IMO. <1/8" or so total deflection is about it :)

James
 
Hi James,

Currently I'm building a plywood tank. Dimensions of the tank are 68"L x 48"W x 27"H. The tank is built with no cross bracing, but incorporates 5" euro bracing all the way around the tank, and also has 2" angle embedded in epoxy around the entire perimeter of the tank. The tank is then skin over in wood. I went with the 2" angle to try to eliminate the need for cross bracing.

I'm trying to figure out the thickness of acrylic that I can use on the viewing panels. Another thing I'm trying to accomplish with using acrylic for the viewing panels is to actual route the acrylic roughly 1/4", so that the viewing panels aren't set back inside the tank, but rather overlap the wood framing a bit. I had been contemplating using 1 1/2" acrylic routing out a bit more than 1/4" of material. Is 1 1/2" overkill for this purpose and what would you recommend?

Thanks......
 
Chris, 1.5" is way overkill, but I like that :D
The problem is the rabbet cut leaves a sharp inside corner, if you leave a radius in there - would be better :)
That said; 3/4" or 1" should suffice just fine, and *may* eliminate the need for the rabbet? :)
Almost all fiberglass tanks in public aquariums are built this way, with 2-3" over overlap and use Dow Corning 795 as a pressure gasket between the tank and acrylic panel.

HTH,
James
 
Thanks James!!!! I wanted to go extra thick due to rabbeting the panel about 1/4"-3/8", so you wouldn't see any epoxy buildup. I had thought about using a radius in the corners. We had talked awhile ago about the Dow 795.

Would it alter the panel structurally if I used 1" and rabbetted 3/8" out?
 
Thanks James!!!! I wanted to go extra thick due to rabbeting the panel about 1/4"-3/8", so you wouldn't see any epoxy buildup. I had thought about using a radius in the corners. We had talked awhile ago about the Dow 795.

Would it alter the panel structurally if I used 1" and rabbetted 3/8" out?
 
Hey james, can you recomend some books on acrylic fabrication? Id like to learn more about it, without having to be hired and work in the field for years and years to learn. Info on the moe advanced topics like annealing, different bonding techniqus and strengths of these methods annealed and unnanealed.

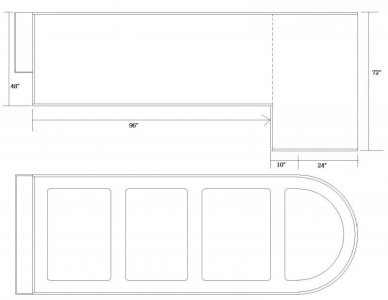
I also have a few other questions, ive bee planning a stepped down bullnose build, i have read pretty in depth on these and it seems many of these stepped tanks will crack right at the inside corner of the step, is there any way to get around this? the tank is going to have a rediculously deep step at 72" deep and the rest of the tank 48, with a material thickness of 1.5". Will the 1.5" material be ok? I was considering thicker but the cost jumps dramatically to 2" , if it were a flat panel at 72" deep the 1.5" would probably not work, but as a radius i know it can be thinner due to the strength of a radius.
 
Last edited:
Ryan,

For the most part, using WO40 because it is "stronger" is waaaay past the point of diminishing returns. Even WO4 is good to something like 2500psi which is far greater than we will ever see in these tanks.
I don't go into placing the slight chamfer here (or 40 for that matter) because A) *very* few are going to do it and B) for most practical purposes it's not the normal method that most would use to build tanks, sumps, etc. it requires more tooling than most hobbyists are going to use so teach the simplest method that most would be comfortable with.

FWIW, a WO40 "joint" is strong, no doubt, but that does not translate into "bite" into acrylic. Put it this way, you can make a beautiful WO 40 "joint" between 2 pieces of steel, you can pull the pieces apart very easily since the 40 doesn't actually bite into the steel yet the joint itself may be very strong, get my meaning?

There are other reasons and esp why mfrs recommend 40 which is another story but hopefully this is a start :)

James

is an unanealed weld on #40 joint as strong or stronger than a weld on #4 joint?
 
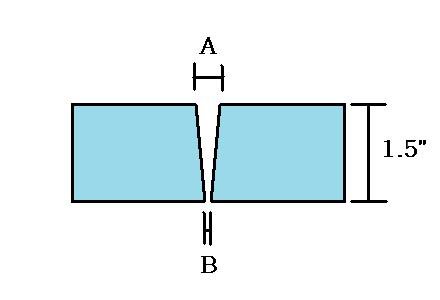
and another question.... bonding 2 sheets together with a butt joint, this will be a weld on 40 casted seam, what would be dimensions for "A" and "B" in my attatched diagram? Also what would be a good backer to use on the bottom side of the seam when casting?
 

Attachments

  • JOINT.jpg
    JOINT.jpg
    8.6 KB · Views: 6
is an unanealed weld on #40 joint as strong or stronger than a weld on #4 joint?
about equal, provided you do your part correctly. The reality is that it's pretty irrelevant as we'll never see those pressure in our tanks.

and another question.... bonding 2 sheets together with a butt joint, this will be a weld on 40 casted seam, what would be dimensions for "A" and "B" in my attatched diagram? Also what would be a good backer to use on the bottom side of the seam when casting?
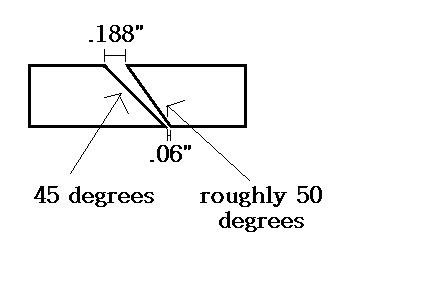
I wouldn't recommend butt joining sheets in this manner, though it can be done. A mating 45 bevel is far less visible and provides more bonding area. Usually, folks leave a ~.156-.188" gap at the top and .060" or so at the bottom.

As a backer, believe it or not - a piece of acrylic with good paper masking - like Polycast masking. For some reason WO 40 doesn't stick to it at all, peals right off IME. But there are many many plastics that 40 won't stick to.

James
 
Hey james, can you recomend some books on acrylic fabrication? Id like to learn more about it, without having to be hired and work in the field for years and years to learn. Info on the moe advanced topics like annealing, different bonding techniqus and strengths of these methods annealed and unnanealed.
Unfortunately, no. Never seen a good book that is practical.

I also have a few other questions, ive bee planning a stepped down bullnose build, i have read pretty in depth on these and it seems many of these stepped tanks will crack right at the inside corner of the step, is there any way to get around this? the tank is going to have a rediculously deep step at 72" deep and the rest of the tank 48, with a material thickness of 1.5". Will the 1.5" material be ok? I was considering thicker but the cost jumps dramatically to 2" , if it were a flat panel at 72" deep the 1.5" would probably not work, but as a radius i know it can be thinner due to the strength of a radius.
Need to know span before I could say anything. Got a rough drawing?

James
 
Thanks James!!!! I wanted to go extra thick due to rabbeting the panel about 1/4"-3/8", so you wouldn't see any epoxy buildup. I had thought about using a radius in the corners. We had talked awhile ago about the Dow 795.

Would it alter the panel structurally if I used 1" and rabbetted 3/8" out?
How much of an overlap are you planning? The rabbet shouldn't affect it much at all, just makes a stress point from which cracking *can* occur. Not necessarily that it will, but whenever you have a sharp inside corner - increases the odds considerably.

James
 
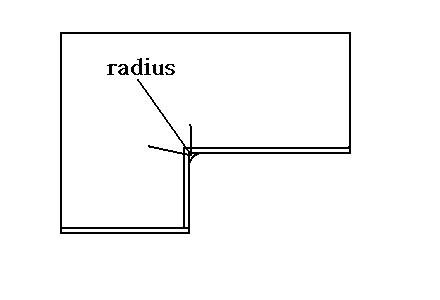
what if i did it like this james, instead of the sides sitting on top of the bottom panel, put the bottom panel between the side panels and then radius the inside corner instead of the 90 degree, wouldnt this prevent cracking? What ould be the donside of putting the bottom panel on the inside?
 

Attachments

  • radius.jpg
    radius.jpg
    6.8 KB · Views: 7
the reason for joining 2 sheets is because of the bullnose, i cant source a 24' long continous sheet, i plan on forming the bullnose and then seaming the sides to the bullnose.

How does this joint diagram look?

When using a backer for the joint when casting, after the wledon 40 has cured will there be shrinkage? I dont want to pull the backer off and there be a 1/16" or greater divet where the seam is and have to remove that much material around the seam, also on the top side when casting, how much should it be overfilled? Do you think the weldon 42 gun is worth the cost? I have used epoxies that use a gun similar to that, would one of these guns work or is the weldon 42 tubes?
 

Attachments

  • bevel.jpg
    bevel.jpg
    11.1 KB · Views: 8
Last edited:
Back
Top