bambam918
New member
Hello every one my name is Ben and I will be upgrading from my 90/20 gallon DT/sump to 180/55 gallon DT/sump. I started into this hobby just under a year ago and never thought I would enjoy it SO MUCH! I hope to have the new tank up and running by the end of July so bare with me for updates and photos until that time arrives.
To start things off I will list my equipment:
- 180 gallon acrylic display tank (standard 6x2x2)
- 3 Radions
- 1 MP60
- 1 MP40 (both will be on one side)
- 55 gallon glass sunmp (not sure on dimensions but 4 feet long)
- Aquamaxx 2 cone in sump skimmer (rated for 375 gallons)
- Three chamber sump (basic set up)
- Sump lighting will be Ecoxotic 12.5 Inch Stunner 6W 8000K LED Strip and will mounted to the roof of the sump cabinet. Will run opposite from DT lighting
- Mag 5 return pump
- ATO from Autotopoff.com double switch (my reservoir holds 13 gallons)
- I am going to drill my tank towards the top (bought kit from Glass holes)
- 65 gallon trash can to mix water (Mag 3 to pump water for WC's)
I believe this is all the equipment as I do not need any reactors at this point.
I listed my current live stock and plan on keeping a mixed reef and of course adding more FISH!!!! I currently have a DSB in the DT and will add another DSB in the new tank. I will purchase all new substrate as I have read this is the safest practice :bum: I know for a 90 gallon thank my Bio load is small but I have stopped buying animals for the past 3 months to save for all the expensive equipment
- Fish
- Coral Beauty
- Green Mandarin
- Chromis (8)
- Mocha Clown (2)
- Randall's Goby
- Invertebrates
- Nassarius Snails (3)
- Red Banded Trochus Snail (5)
- Nerite Snail (2)
- Skunk Shrimp
- Peppermint Shrimp (2)
- Tiger Shrimp
- Brittle Star
- Coral
- Cynarina, Button Coral
- Green Slimer
- Branched Montipora
- Plated Montipora
- Pocillopora Coral
- Hyacinth Birdsnest - ORA
- Hawkins Echinata
- Polyps
- Star Polyps
- Green Zoa's
- Rusted Zoa's
- Red and purple Mushrooms
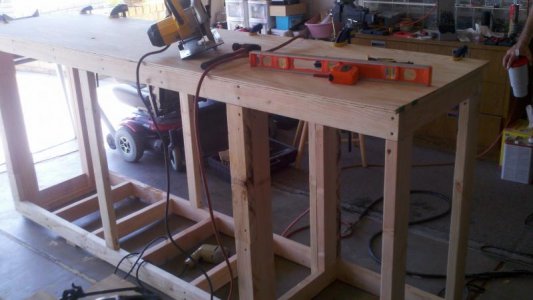
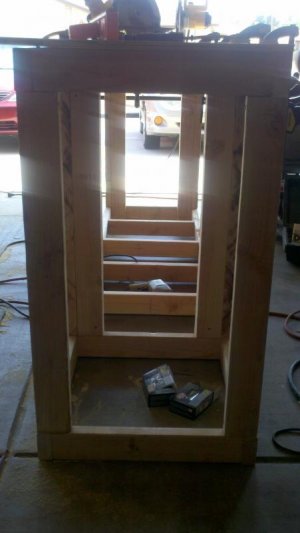
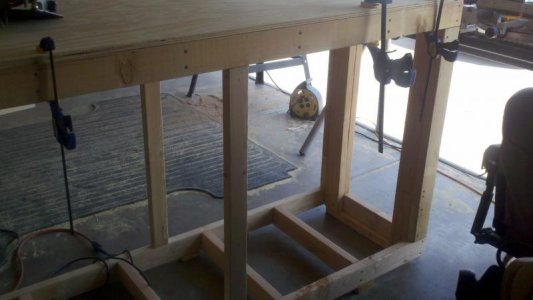
As for the stand, I will be building it myself, with the help of my handy uncle, and I cant wait to start this portion of the project. Today I purchased all the wood to build the frame and base for the stand. Since I did not want the plumbing to show and wanted the stand to look like a piece of furniture, the stand will be 8 feet long with a 2 foot cabinet on the wall end.
The 2 foot cabinet will be from the floor (obvious) to the height of the tank. If I remember correctly, the top tank will be 58 inches off the ground, giving me 31 inches of vertical space under the tank.
I will put a "wall"/divider to separate the cabinet from the sump cabinet area. I plan on using the lower portion of the cabinet to store a hospital tank and the upper level to store supplies and other junk as us reef keepers need.
My overflow will be on the wall side and I will run the plumbing through the upper cabinet, then down though the lower cabinet and then I will drill through the "wall"/divider where the sump will be located. For the return, I will run the tubing the same way it came in however, I will run the tubing under the top piece of acrylic and to the far end of the tank (furthest from the wall and overflow)
I am looking even more forward on mounting my Radions then building my tank!!! I am going to suspend the lights with a shadow box like frame that I will be able to adjust the height!!! It will have the same dimensions of the stand, 8 feet by 2 feet. By building a shadow box frame above the tank, I will be able to keep the cords and the power bricks hidden. To achieve this I am having the help of an other uncle to add an outlet in the ceiling.
Like I mentioned above, my sump will be basic, 3 chambers. The first chamber will be the skimmer. The second chamber will be the refugium. I will have a DSB with some LR and a special chamber to contain my chaeto in one portion of the refugium. The third chamber will be the return pump.
Well folks I believe this is all I have for the time being, I may have forgotten a few things I plan on doing, set up wise, but I believe I included everything. Stay tuned for follow up on the tank build. I will post pictures of the tank (my wife says an empty box) and the equipment I have purchased thus far.
Let me know if you have any questions on anything I did not post or to clarify
To start things off I will list my equipment:
- 180 gallon acrylic display tank (standard 6x2x2)
- 3 Radions
- 1 MP60
- 1 MP40 (both will be on one side)
- 55 gallon glass sunmp (not sure on dimensions but 4 feet long)
- Aquamaxx 2 cone in sump skimmer (rated for 375 gallons)
- Three chamber sump (basic set up)
- Sump lighting will be Ecoxotic 12.5 Inch Stunner 6W 8000K LED Strip and will mounted to the roof of the sump cabinet. Will run opposite from DT lighting
- Mag 5 return pump
- ATO from Autotopoff.com double switch (my reservoir holds 13 gallons)
- I am going to drill my tank towards the top (bought kit from Glass holes)
- 65 gallon trash can to mix water (Mag 3 to pump water for WC's)
I believe this is all the equipment as I do not need any reactors at this point.
I listed my current live stock and plan on keeping a mixed reef and of course adding more FISH!!!! I currently have a DSB in the DT and will add another DSB in the new tank. I will purchase all new substrate as I have read this is the safest practice :bum: I know for a 90 gallon thank my Bio load is small but I have stopped buying animals for the past 3 months to save for all the expensive equipment
- Fish
- Coral Beauty
- Green Mandarin
- Chromis (8)
- Mocha Clown (2)
- Randall's Goby
- Invertebrates
- Nassarius Snails (3)
- Red Banded Trochus Snail (5)
- Nerite Snail (2)
- Skunk Shrimp
- Peppermint Shrimp (2)
- Tiger Shrimp
- Brittle Star
- Coral
- Cynarina, Button Coral
- Green Slimer
- Branched Montipora
- Plated Montipora
- Pocillopora Coral
- Hyacinth Birdsnest - ORA
- Hawkins Echinata
- Polyps
- Star Polyps
- Green Zoa's
- Rusted Zoa's
- Red and purple Mushrooms
As for the stand, I will be building it myself, with the help of my handy uncle, and I cant wait to start this portion of the project. Today I purchased all the wood to build the frame and base for the stand. Since I did not want the plumbing to show and wanted the stand to look like a piece of furniture, the stand will be 8 feet long with a 2 foot cabinet on the wall end.
The 2 foot cabinet will be from the floor (obvious) to the height of the tank. If I remember correctly, the top tank will be 58 inches off the ground, giving me 31 inches of vertical space under the tank.
I will put a "wall"/divider to separate the cabinet from the sump cabinet area. I plan on using the lower portion of the cabinet to store a hospital tank and the upper level to store supplies and other junk as us reef keepers need.
My overflow will be on the wall side and I will run the plumbing through the upper cabinet, then down though the lower cabinet and then I will drill through the "wall"/divider where the sump will be located. For the return, I will run the tubing the same way it came in however, I will run the tubing under the top piece of acrylic and to the far end of the tank (furthest from the wall and overflow)
I am looking even more forward on mounting my Radions then building my tank!!! I am going to suspend the lights with a shadow box like frame that I will be able to adjust the height!!! It will have the same dimensions of the stand, 8 feet by 2 feet. By building a shadow box frame above the tank, I will be able to keep the cords and the power bricks hidden. To achieve this I am having the help of an other uncle to add an outlet in the ceiling.
Like I mentioned above, my sump will be basic, 3 chambers. The first chamber will be the skimmer. The second chamber will be the refugium. I will have a DSB with some LR and a special chamber to contain my chaeto in one portion of the refugium. The third chamber will be the return pump.
Well folks I believe this is all I have for the time being, I may have forgotten a few things I plan on doing, set up wise, but I believe I included everything. Stay tuned for follow up on the tank build. I will post pictures of the tank (my wife says an empty box) and the equipment I have purchased thus far.
Let me know if you have any questions on anything I did not post or to clarify
") Sounds like it is gonna be awesome.
Sounds like it is gonna be awesome.