seapug
Premium Member
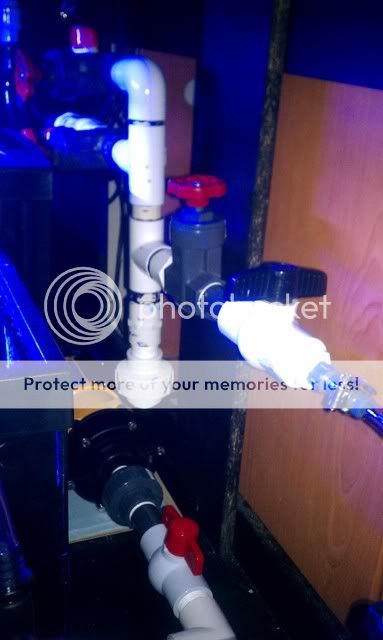
Next step was completing the plumbing. I decided to build a "mainfold" off the return pump to split the output into two lines to the returns with individual ball and gate valves so flow could be individually adjusted or shut off completely to each one if needed. I also added a T that splits off to the carbon reactor with it's own ball and gate valve Here's what it looked like when complete and installed:


I also installed the LED lighting for the refugium by using screws and industrial strength velcro to attach the strips to the ceiling of the stand:

With the plumbing complete, it was time to fill the tank and prepare for the livestock transfer from the 90 gallon. I had the LFS deliver 100 gallons of new water and made 50 gallons of my own. The remaining water was siphoned from the existing 90 gallon once the livestock was transferred over.
Trashbag and bowl placed in the bottom to prevent a sandstorm during filling (works very well):

Water added:

I added a power head, heater and a couple rocks from the existing tank and let it run for a couple of days to do some initial seeding, then the time came for the final filling and livestock transfer. All the corals and rocks were removed and most of the water was siphoned out so the fish could easily be netted and transferred:


Now it came time to dial in the plumbing.
It's often said that "reef ready" tanks aren't truly reef ready. I can confirm that. Every pump and plumbing system has it's own problems and effects on the circulation of the tank.
The first problem I encountered was a couple inevitable drip leaks in the return plumbing. One required complete replacement of the union on the pump and most of the others were solved with some epoxy on a couple PVC joints. There is still one VERY slow, yet persistent drip located in a section of the return plumbing I haven't been able to access, but a washcloth wrapped around the problem area is working for now :lolspin:.
The next problem was surging overflows that caused noise like a flushing toilet and splashing in the sump. This is caused by inadequate air entering the standpipe via the siphon break airhole one the top of the standpipe cap. This is solved by drilling out those holes in small increments until the flushing stops. Once I drilled them out to 5/8 inch and added a short piece of airline tubing, the flushing stopped.
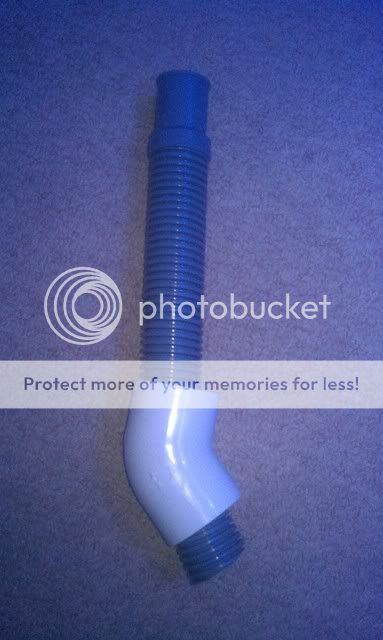
Once that problem was solved, I had an issue with "burping" coming from the outlets on the drainpipes in the sump. Apart from the noise, it was causing splashing that was causing major salt creep issues all over the sump and surrounding plumbing. It's often advised to not let the drains extend too far under the surface of the water in the sump to prevent this, but it was still happening to me with the drains less than 1" sumberged. After much, I found this to be a problem with drains that are straight vertical drops. Due to the location of the overflows and space constraints in the stand, my drains made a straight vertical drop directly from the bulkhead to the sump. I solved that problem by inserting the ends of the drain hoses into 1 1/2 threaded pvc elbows and situating the outlet just below the surface of the water in the sump. This prevents the cycle of air pressure buildup and release that was causing the burping in the direct vertical drop arrangement.
Looks a bit rinky-dink but worked perfect for me. The fans in the lights are louder than the drains now. I ended up using 90 degree elbows but here's an example using a 45 elbow:
I also installed the LED lighting for the refugium by using screws and industrial strength velcro to attach the strips to the ceiling of the stand:
With the plumbing complete, it was time to fill the tank and prepare for the livestock transfer from the 90 gallon. I had the LFS deliver 100 gallons of new water and made 50 gallons of my own. The remaining water was siphoned from the existing 90 gallon once the livestock was transferred over.
Trashbag and bowl placed in the bottom to prevent a sandstorm during filling (works very well):
Water added:
I added a power head, heater and a couple rocks from the existing tank and let it run for a couple of days to do some initial seeding, then the time came for the final filling and livestock transfer. All the corals and rocks were removed and most of the water was siphoned out so the fish could easily be netted and transferred:
Now it came time to dial in the plumbing.
It's often said that "reef ready" tanks aren't truly reef ready. I can confirm that. Every pump and plumbing system has it's own problems and effects on the circulation of the tank.
The first problem I encountered was a couple inevitable drip leaks in the return plumbing. One required complete replacement of the union on the pump and most of the others were solved with some epoxy on a couple PVC joints. There is still one VERY slow, yet persistent drip located in a section of the return plumbing I haven't been able to access, but a washcloth wrapped around the problem area is working for now :lolspin:.
The next problem was surging overflows that caused noise like a flushing toilet and splashing in the sump. This is caused by inadequate air entering the standpipe via the siphon break airhole one the top of the standpipe cap. This is solved by drilling out those holes in small increments until the flushing stops. Once I drilled them out to 5/8 inch and added a short piece of airline tubing, the flushing stopped.
Once that problem was solved, I had an issue with "burping" coming from the outlets on the drainpipes in the sump. Apart from the noise, it was causing splashing that was causing major salt creep issues all over the sump and surrounding plumbing. It's often advised to not let the drains extend too far under the surface of the water in the sump to prevent this, but it was still happening to me with the drains less than 1" sumberged. After much, I found this to be a problem with drains that are straight vertical drops. Due to the location of the overflows and space constraints in the stand, my drains made a straight vertical drop directly from the bulkhead to the sump. I solved that problem by inserting the ends of the drain hoses into 1 1/2 threaded pvc elbows and situating the outlet just below the surface of the water in the sump. This prevents the cycle of air pressure buildup and release that was causing the burping in the direct vertical drop arrangement.
Looks a bit rinky-dink but worked perfect for me. The fans in the lights are louder than the drains now. I ended up using 90 degree elbows but here's an example using a 45 elbow: