discotu
Discotu
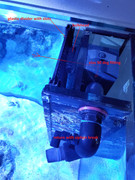
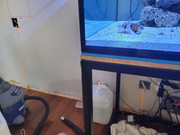
After almost 6 years"¦I'm back! Found a deal here on RC and it was the prefect excuse to get started again. Definitely not plug n play so the write up is a bit long. Anyway, this great deal came with some caveats. First and foremost, the silicone seals at the front top corners had separated from the side panels. Right side the silicone had separated about 8" long from the top and the left side about 4". This was going to be a project.
After identifying the issue a quick search online netted some similar examples with older Elos tanks. Seams separating"¦scary. Good news is it appeared to be repairable so I took a chance. I also reached out to Elos America and asked why these older tanks were having issues. Their response was due to poor cabinet/stand design. Apparently they were sagging/warping so there was a lot of stress on the glass. In this case, the silicone cleanly separated from the glass so I suspect something else, maybe contamination on the glass during assembly? Anyway, their recommend repair was to remove all of the offending silicone 1" down past the bottom of the separation, then fill back up with new silicone. Apparently Elos has a proprietary silicone and after some back and forth gave up trying to get it from Elos. However, based on my research most 100% acetoxy based silicones would be suitable.
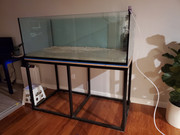
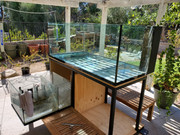
Once I got the tank home I cleaned and prepped the tank for repair. These larger Elos tanks have double pane bottoms which is great but the outer panels do not sit flush with the bottom panel and extends a bit. This means all the weight is on the outer panel edges. I wonder if this contributed to some of these earlier failures. Anyway, nothing a quick trip to Walmart couldn't fix. I used two Ozark foam camping pads to help even out the load between the bottom of the tank and the stand. Fingers crossed.
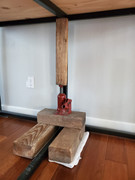
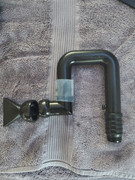
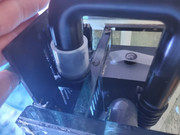
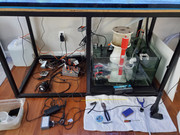
It took a couple days of pondering how i was going to approach the repair. Once i had a plan i gathered all my supplies and tools. I forgot to take a picture but I could clearly see the air gap where the silicone had separated from the glass. First I flushed the gap with IPA using a syringe. Luckily, the tiny corner bead of silicone on the inside of the tank was intact so water/salt/debris didn't actually contaminate the gap. I flushed both side several times then used a thin flat tool to carefully wipe the gap with lint free polishing cloth to ensure it was clean and dry. At the same time I was looking at all sorts of silicone. Without going into details, I ended up picking Gorilla glue 100% silicone. Of course my primary concern was how well this silicone would seal the gap and bond to the old silicone and glass. Coincidentally, the bottom of the tank had some original silicone residue that I was able to scrape off. I used this chunk of this silicone to test the bonding properties with the new silicone. I placed a dab of the Gorilla glue on the old silicone and let it cure. At the same time I also placed a dab on the tank glass. After a few days of curing I was surprised to see the new silicone had bonded well to the old. I cut the sample in half to see a cross section of the bond area and it appeared to be fused, although I know it was just a surface bond. Bond to the glass was also strong. With this increased level of confidence I thought"¦maybe I can just "œsquirt" the new silicone into the gap without having to completely remove the old silicone. Okay change of plan. I filled a syringe with a little bit of clear gorilla glue trying to keep the blob of silicone as solid as possible to avoid any excess air bubbles. I don't remember what size applicator tip I used, but I gently squeezed the tip with pliers to ovalize it so it was easier to insert into the gap. I also used my aforementioned flat tool as a "œtongue depressor" to help open the gap. Starting from the bottom, I filled the gap being careful not to introduce any bubbles. If there was a bubble, I just kept squeezing until the bubble was pushed out. FYI, trying to push silicone out of a syringe through a tiny applicator tip is very hard! Once I got to the top I wiped the outside with my finger like you would caulk to smooth out the glue. Hard part done! I debated stripped the inside bead of silicone and re-sealing but it looked intact so decided against it lest I make it worse.
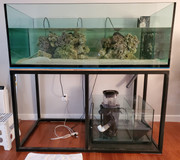
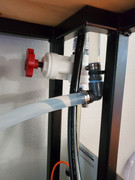
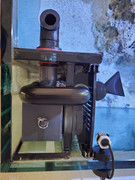
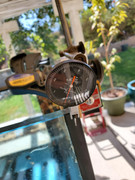
Moment of truth! After letting the silicone cure for around a week I filled with water. Out of curiosity I wanted to check the displacement of the front panel once filled with water. Using a dial indicator attached to the side panel, the front panel moved about 0.001" with water. I'm good with that. I could actually move the panel a lot more with just my hand so that tells me there's not a lot of pressure on the seam up top. I let it sit for a few more days then moved on to the next step.
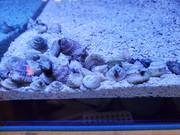
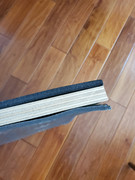
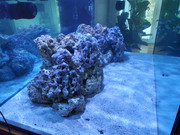
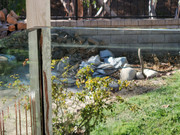
After confirming no leaks I drained and worked on polishing out the etched waterline. I used a Dremel with felt buffing wheel and some cerium oxide paste. This actually wasn't has hard as I thought it would be. I used the lowest speed and polished back and forth in 4-6 inch sections. here you can see the difference after polishing the left panel and the water etching on the back panel.
Out of curiosity I tried it on some small scratches but didn't make a dent. I imagine if you started with coarser git and spent A LOT of time it would make a difference but not worth my time.
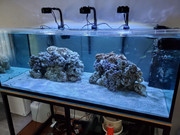
I refilled again to rinse the paste and the final leak test.
To be continued...
After identifying the issue a quick search online netted some similar examples with older Elos tanks. Seams separating"¦scary. Good news is it appeared to be repairable so I took a chance. I also reached out to Elos America and asked why these older tanks were having issues. Their response was due to poor cabinet/stand design. Apparently they were sagging/warping so there was a lot of stress on the glass. In this case, the silicone cleanly separated from the glass so I suspect something else, maybe contamination on the glass during assembly? Anyway, their recommend repair was to remove all of the offending silicone 1" down past the bottom of the separation, then fill back up with new silicone. Apparently Elos has a proprietary silicone and after some back and forth gave up trying to get it from Elos. However, based on my research most 100% acetoxy based silicones would be suitable.
Once I got the tank home I cleaned and prepped the tank for repair. These larger Elos tanks have double pane bottoms which is great but the outer panels do not sit flush with the bottom panel and extends a bit. This means all the weight is on the outer panel edges. I wonder if this contributed to some of these earlier failures. Anyway, nothing a quick trip to Walmart couldn't fix. I used two Ozark foam camping pads to help even out the load between the bottom of the tank and the stand. Fingers crossed.
It took a couple days of pondering how i was going to approach the repair. Once i had a plan i gathered all my supplies and tools. I forgot to take a picture but I could clearly see the air gap where the silicone had separated from the glass. First I flushed the gap with IPA using a syringe. Luckily, the tiny corner bead of silicone on the inside of the tank was intact so water/salt/debris didn't actually contaminate the gap. I flushed both side several times then used a thin flat tool to carefully wipe the gap with lint free polishing cloth to ensure it was clean and dry. At the same time I was looking at all sorts of silicone. Without going into details, I ended up picking Gorilla glue 100% silicone. Of course my primary concern was how well this silicone would seal the gap and bond to the old silicone and glass. Coincidentally, the bottom of the tank had some original silicone residue that I was able to scrape off. I used this chunk of this silicone to test the bonding properties with the new silicone. I placed a dab of the Gorilla glue on the old silicone and let it cure. At the same time I also placed a dab on the tank glass. After a few days of curing I was surprised to see the new silicone had bonded well to the old. I cut the sample in half to see a cross section of the bond area and it appeared to be fused, although I know it was just a surface bond. Bond to the glass was also strong. With this increased level of confidence I thought"¦maybe I can just "œsquirt" the new silicone into the gap without having to completely remove the old silicone. Okay change of plan. I filled a syringe with a little bit of clear gorilla glue trying to keep the blob of silicone as solid as possible to avoid any excess air bubbles. I don't remember what size applicator tip I used, but I gently squeezed the tip with pliers to ovalize it so it was easier to insert into the gap. I also used my aforementioned flat tool as a "œtongue depressor" to help open the gap. Starting from the bottom, I filled the gap being careful not to introduce any bubbles. If there was a bubble, I just kept squeezing until the bubble was pushed out. FYI, trying to push silicone out of a syringe through a tiny applicator tip is very hard! Once I got to the top I wiped the outside with my finger like you would caulk to smooth out the glue. Hard part done! I debated stripped the inside bead of silicone and re-sealing but it looked intact so decided against it lest I make it worse.
Moment of truth! After letting the silicone cure for around a week I filled with water. Out of curiosity I wanted to check the displacement of the front panel once filled with water. Using a dial indicator attached to the side panel, the front panel moved about 0.001" with water. I'm good with that. I could actually move the panel a lot more with just my hand so that tells me there's not a lot of pressure on the seam up top. I let it sit for a few more days then moved on to the next step.
After confirming no leaks I drained and worked on polishing out the etched waterline. I used a Dremel with felt buffing wheel and some cerium oxide paste. This actually wasn't has hard as I thought it would be. I used the lowest speed and polished back and forth in 4-6 inch sections. here you can see the difference after polishing the left panel and the water etching on the back panel.
Out of curiosity I tried it on some small scratches but didn't make a dent. I imagine if you started with coarser git and spent A LOT of time it would make a difference but not worth my time.
I refilled again to rinse the paste and the final leak test.
To be continued...