FLSharkvictims Saltwater Mixing station build!

FLSharkvictim

New member
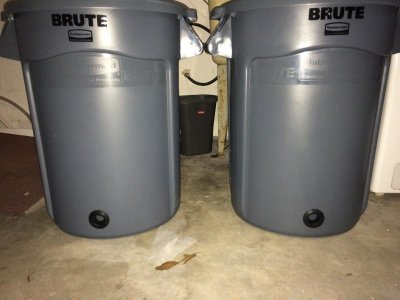
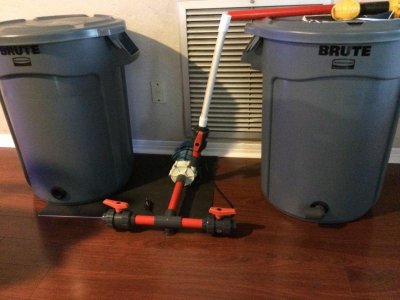
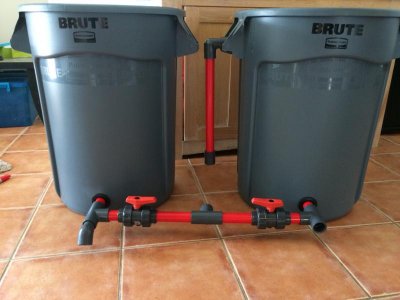
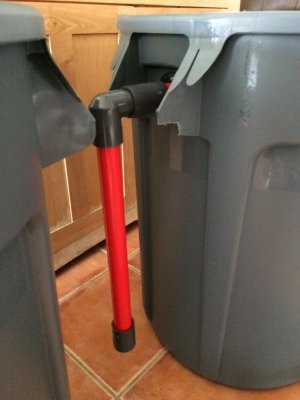
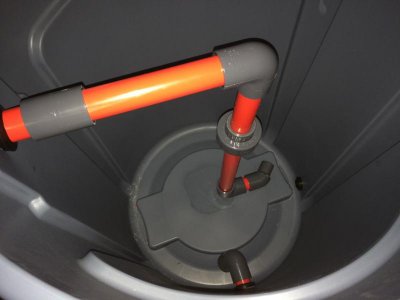
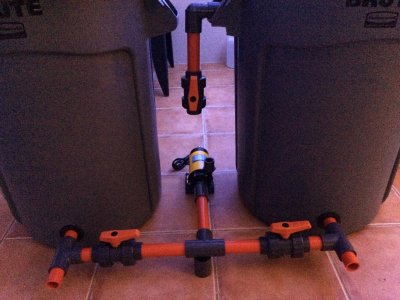
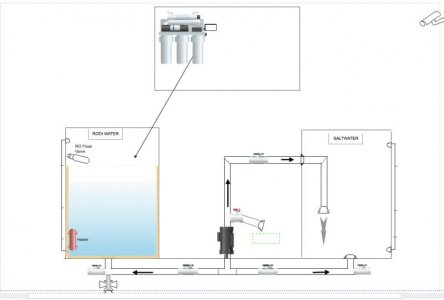
Here is my list of my Equipment and my materials for my set up.. I just need to order a few more items and then i will start my journal. The main idea of doing all this is to mix and move water from barrels to barrels and then put on my 25ft braided tubing to fill up my display with Fresh saltwater after mixing it. Also, I am going want to add two extra Cepex ball valves at the end of the each pipe that runs across the bottom of the barrels just in case of prolonged power outage. Your rodi will fill up the Brute container to the left which we will call it barrel A. Turning of a few BALL valves and the pump will transfer the fresh RODI water into barrel B which will hold the saltwater. I will have a Heater, the Eshoops Float valve kit and Inbird heating Digital Temperature Controller Control Model #ITC-306T w/ large probe with 3M heat shrink around the wires since they are not waterproof. The Last thing is a TDS DIGITAL meter that will all go inside of barrel A. MORE TO COME!

2 44 gallon Brute Cans
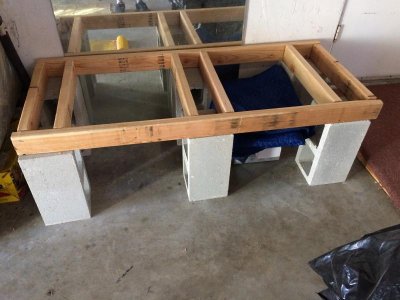
10 Cinder Blocks
1'' pcs of plywood for stand
1 Pan World PX-40
1 RODI 4 stage system
1 Nest webcam
1 Eshoops Float Valve kit
1 Heater
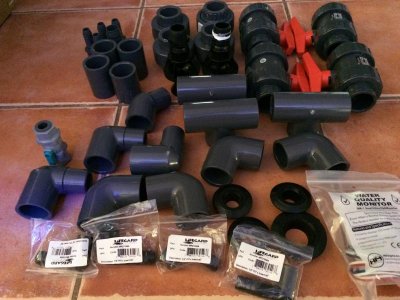
6 Cepex Ball Valves - 1''
1 Spears Gate Valve - 1''
3 Uniseals - 1''
3 1'' Unions
4 Uniseals - 1/2''
4 TEES slip x slip - 1''
3 90's slip x slip - 1''
2 58'' length RED PIPE Sch 40
3 1'' 90° Elbow Barb x Spigot (Street)
4 1/2" 90° Elbow Barb x Spigot (Street)
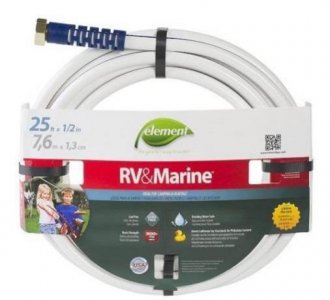
8ft Braided tubing 1/2''
25 ft Braided tubing 1''
Inbird heating Digital Temperature Controller Control Model #ITC-306T
PC-4 Dj 4 outlet surge protector
 

Attachments

  • Screen Shot 2017-01-26 at 6.29.00 PM.jpg
    Screen Shot 2017-01-26 at 6.29.00 PM.jpg
    29.8 KB · Views: 0
Last edited:
Something like this would actually motivate me to do water changes on a regular basis lol nice build !


Sent from my iPhone using Tapatalk
 
Step 1

Step 1

Drilled my two holes for my BRS Uniseals, so I can add a pair of 90's Elbow Slip x Spigot (Street) fittings.
 

Attachments

  • IMG_3111.jpg
    IMG_3111.jpg
    45.6 KB · Views: 0
Almost ready to start my build!

Almost ready to start my build!

Finally all my gear has showed up for my saltwater mixing station. All of my pvc fittings, Cepex ball Valves, Uniseals 1'' & 1/2'' to be able to tell the water level in each brute container, Cinder blocks for my stand and more. Now i am just waiting on my new Pan World 40px pump and my 6 stage BRS RODI system and then i can start this build. I freaking can't wait to be able to dump in a bag of salt turn a few ball valves and turn on a pump and BOOM, Freshly mixed saltwater will be available to pump in my display. No more lugging around 5 gallon jugs, no more buying mixing saltwater and no more breaking my back pouring the jugs in my tank!
 

Attachments

  • IMG_3122.jpg
    IMG_3122.jpg
    55.8 KB · Views: 0
Most of my parts came in for my Mixing station.

Most of my parts came in for my Mixing station.

I am working on my Saltwater mixing station so it so it will be fully Automated and connected to my Apex controller! I want to be able to drain it and I will be running my plumbing from my garage into my Fl Room ALONG THE WALL BACK UP INTO MY DISPLAY. Also, I have decided to run 1 1'' ECPR Aquatic Threaded Eductor to mix my water in the saltwater Brute can. I will run that for 3 hrs 3 times a day so the salt does not sit at the bottom of the can. Just waiting on my 40 PX -Pan World pump, Aqua FX FLOAT Valves and my BRS 6 stage RODI! This build should BE interesting ONES IT'S TOTALLY COMPLETED.
 

Attachments

  • IMG_3128.jpg
    IMG_3128.jpg
    70.3 KB · Views: 0
Last edited:
Started the build!

Started the build!

Started on my plumbing on my mixing station! Next will be adding my 1/2'' unseals on each side of my Brute cans so I will be able to tell the water levels in each of them. Also, my Pan World pump arrives on Monday and my 2 1'' Spears Gate Valves that I am installing on each side just so I have access to fresh RODI and fresh saltwater at any giving time that will come out the 45 that's on there now. Then the last thing will be adding is a 1'' CPR Aquatic Threaded Eductor to mix up my saltwater so it does not settle at the bottom. The pump will be hooked up to my Apex controller so I will have the pump come on 3 times a day for 30 minutes for the mix.
 

Attachments

  • IMG_3129.jpg
    IMG_3129.jpg
    47.9 KB · Views: 0
  • IMG_3131.jpg
    IMG_3131.jpg
    45.1 KB · Views: 0
Added my side markers!

Added my side markers!

This will tell me how much water is in each Brute container at any given time. They will be marked every 5 gallons up to 30 gallons! I used 2 1/2'' uniseals and 2 Lifegard 1/2'' 90 Elbows Barb x Spigot (Street) and 3/4 clear tubing for the install.
 
Quick adjustment!

Quick adjustment!

Made a quick adjustment for mixing the salt @ the bottom of my saltwater Bute container! Instead of going with a CPR Aquatic Threaded Eductor - I have decided to go a different route. I am going to install 1 TEE, a Union and two 45 Elbow's - Slip x Spigot (Street) that will sit on the bottom of the container so there will be absolutely no chance of saltwater settling at the bottom.
 

Attachments

  • IMG_3138.jpg
    IMG_3138.jpg
    30.4 KB · Views: 0
Last edited:
Here's my Revised list of material that I needed to complete my Saltwater Mixing Station:
The total cost so far is right around $1200.00 bucks but I went with all top of the line ball valves and Gate Valves and some other gear!

---------------------------------------------------------------
35 gallon Brute Cans - qty 2
Cinder Blocks - qty 10
1'' pcs of plywood for stand
PanWorld PX-50
BRS - RODI 5 stage system:
FM-2 Filter Monitor & Volumizer:
Eshoops Float Valve kit:
Cepex Ball Valves - 1'' qty 5
Spears Gate Valve -3/4'' qty 2
Spears Gate Valve - 1/2'' qty 1
Uniseals - 1'' qty 3
Uniseals - 1/2'' for side marker - qty 4
Pipe adapters Slip x Slip 1'' qty 3
Pipe adapters Slip x Female Thread 1'' - qty 2
TEES slip x slip 1'' - qty 5
90's slip x slip 1'' - qty 3
90° Elbow Barb x Spigot (Street) 1'' - qty 3
Lifegard 90° Elbow Barb x Spigot (Street) 1/2" - qty 4
RED PIPE Sch 40 58'' length 1'' qty 2
Vinyl Clear Tubing 1/2'' 6ft
Swan model # MRV12025 1/2'' Marine & Rv Water hose
PC-4 Dj 4 outlet surge protector
Pinpoint Salinity Monitor
Save a Watt Digital Timer
 
Minor Adjustment

Minor Adjustment

Made an adjustment in the Saltwater Mixing container. I think that I will have better results plumbing it this way instead of adding 1 CPR Aquatic Eductor.
This is what it will look like until my Sch 80 TEE AND MY 45 Elbow Slip x Spigot (Street) comes in from BRS as well as my other gear!
 
Connecting my PanWorld Pump

Connecting my PanWorld Pump

It looks like it's about 1'' from not lining but ones I glue and push my fitting together it should be a perfect fit. This job is almost completed. I just need to order 3 Spears Gate valves for install on each side of the Brute containers and 1 PVC WYE's SCH80 1"x1"x1" where I will connect my Marine and RV hose that will fill up my tank. Also, one extra 45 Elbow Slip x Spigot (Street) that will go inside of the saltwater brute container where it will mix my salt.
 

Attachments

  • IMG_3144.jpg
    IMG_3144.jpg
    68.4 KB · Views: 0
Last edited:
All most completed!

All most completed!

Finally, almost everything has come in and has been assembled except for my two 1'' Spears Gate Vales which will be on each side between the 1'' pipe and the spigot x street 90's. That's where my gate valves will be installed so at any giving point I will be able to grab some fresh RODI water or saltwater from each Brute container. Also, instead of having the Cepex ball Valve where I am going to be connecting my Marine & RV 1/2'' 25ft hose, I will be using a 1/2'' Spears Gate valve with the Cam Lever Quick to Connect my 1/2'' in size hose. Order 1 more spigot to street 45 to put inside my Brute salt container to there is one on each side. Next, I have to Glue everything together. I am going to be using a product called WELD -ON! 1ST I will use there Weld On - Plumbing Primer - then finish up with the Weld -On Heavy Duty PVC Cement Gray to match up with my fittings. Then my last step will be building my stand. I bought 6 cinder blocks and 5 two by 4's for my frame. After I get the frame completed I will just be screwing down a pcs of 1'' thick pcs of plywood and then this operation Saltwater mixing station will be completed. Here a few pixs to show you how it turned out before I start gluing everything together. My total cost ending up being around $1250.00 for my Mixing station! Please feel free to let me know your thoughts?
Many thanks,
FLSharkvictim
 
Last edited:
My Water hose and my Pipe hose holder

My Water hose and my Pipe hose holder

Here is my water hose that i am using. It's the Swan RS44606 25' x 1/2" RV & Marine Water Hose w/ Brass Connectors! It's USDA-approved tube materials for food contact use. The Dimensions are the following: 1/2" I.D. x 25' length. Color: White with blue stripe AND MY Blue Aquarium Filtration Water Pipe Filter Hose Holder For Mounting my Tubing which works absolutely awesome.
 

Attachments

  • Screen Shot 2017-02-08 at 8.47.04 PM.jpg
    Screen Shot 2017-02-08 at 8.47.04 PM.jpg
    25.5 KB · Views: 0
  • Screen Shot 2017-02-08 at 8.49.38 PM.jpg
    Screen Shot 2017-02-08 at 8.49.38 PM.jpg
    30.3 KB · Views: 0
  • Screen Shot 2017-02-08 at 8.49.23 PM.jpg
    Screen Shot 2017-02-08 at 8.49.23 PM.jpg
    18.1 KB · Views: 0
Time to start on the stand!

Time to start on the stand!

Just need to add two 3/4'' Spears gate valves and a 1'' TEE and glue all of my fitting together and this Saltwater mixing station will be completed. Next, will be the custom stand. I just started my frame to hold both of my 32 gallon Brute containers...

Material:
4 2x4's
6 cinder blocks
1'' pcs of Plywood
 

Attachments

  • IMG_3170.jpg
    IMG_3170.jpg
    60.1 KB · Views: 0
Back
Top