daniloronchi
Member
How to take picture of our aquarium: photography course part I
During my visit to the eighth edition of Salento Aquarium, I did a lesson on a subject that I really like “Aquarium, how taking pictures“, and are therefore here, as promised, to propose a mini-course as a guideline how to photograph in the aquarium, getting the best with our equipment, obviously the course is open to all, since most of what is written applies to any photographic genre, even though the examples will focus on the photographs in the aquarium.
I hope that the course will be useful and that you enjoy reading it, and if you have any requests please leave your comments.
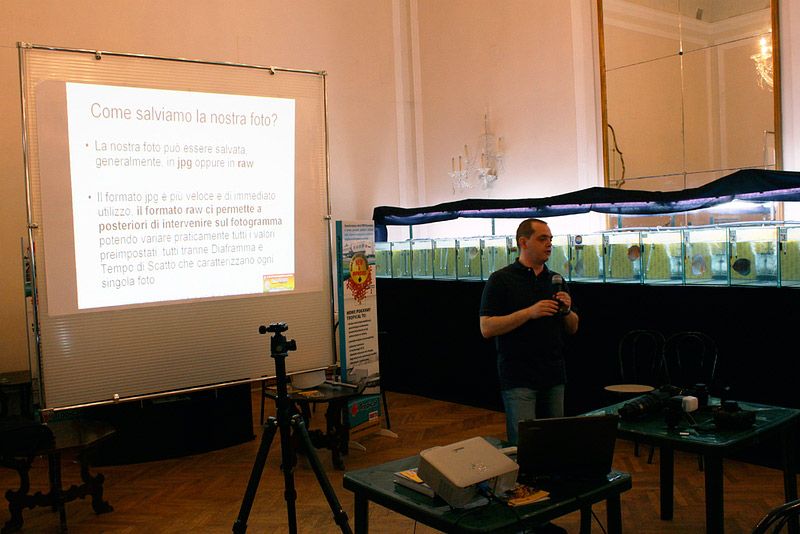
This is the first part that covers the basics of photography, the choice of lenses and the setting of the machine, the second part will address specifically the photographs in the aquarium, going into the details of how to photograph aquariums, fish and corals , and the last part will cover instead the development of the digital negative, the RAW file.
The basic settings in a camera are the shutter speed (T or S) and Aperture (A or Av).
• The Aperture tells us how much light gets inside the camera
• The shutter speed tells us how long the light enters into the camera
Soon after we have to consider the White Balance and ISO
• The White Balance tells us how our sensor reacts to the luminous flux, and is the equivalent of the old types of rolls, from his setting depends any color in the aquarium.
• The ISO will indicate what is the sensitivity to light that we ask to our sensor, and it’s essential in order to have photos that are not blurred
When we take pictures, we must decide the proper balance of the four basic elements that we just saw. Aperture, shutter speed, white balance and ISO, depending on these choices we get what we are seeking.
From this it follows as fundamental the distinction on how to save our photo, which can be saved inside the camera usually in jpg or in raw.
The jpg format is faster and ready to use but the raw format allows us to intervene in post production and we could change almost all the default values, but Aperture and shutter speed, that characterize every single photo, as we saw above and we considered as fundamental.
The depth of field
The focus identifies a plane parallel to the camera in which every object is sharply focused and defined.
The depth of field instead of expanding this concept to an upper and a lower limit, indicating a space where everything seems clear, and that depends crucially from the so-called circle of confusion, in practice and trying to say in simple terms, a point not in focus will seem clear if it will be smaller than what we are able to perceive. It’s a typical case of a picture which appears sharp on the camera screen, but then on the computer screen appears fuzzy.
Depending on our choice will be important to isolate a subject rather prefer to have everything properly focused, and this is precisely the concept of depth of field.
The depth of field is influenced primarily by aperture.
If the aperture is open, ie if the f-number is low (f / 1.8 for example) we will have a limited depth of field.
If the aperture is closed, ie if the f-number is high (f/11) we will have an extended depth of field.
Also the distance from the subject is important, if we are near the subject we’ll have shallow depth of field, and the length of the lens is essential too, since the same scene framed from a lens of a given focal length (eg 100 mm) will have less depth of field of a lens with lesser focal length (50 mm for example).
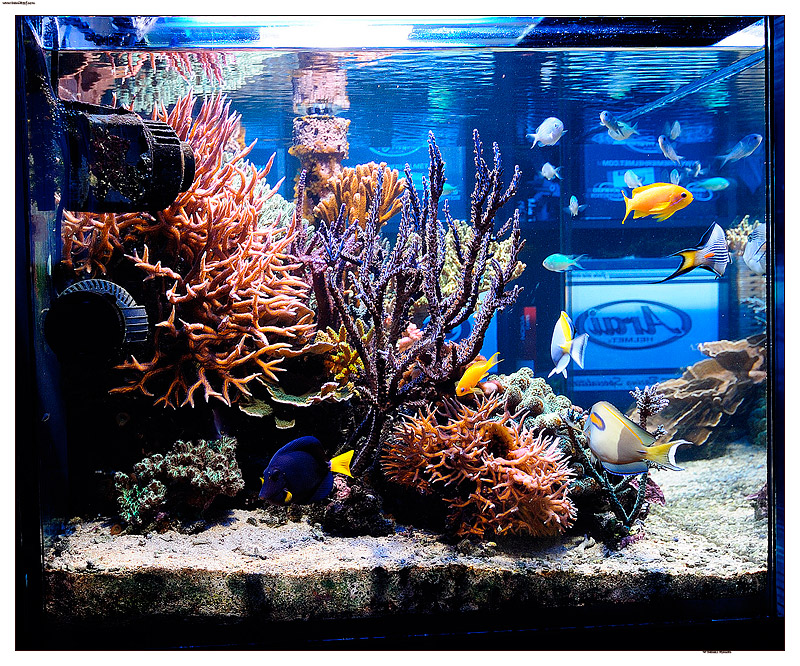
In this photo we see a large depth of field for example. The photo is from the tank of Giancarlo Molendini you can see here and here.
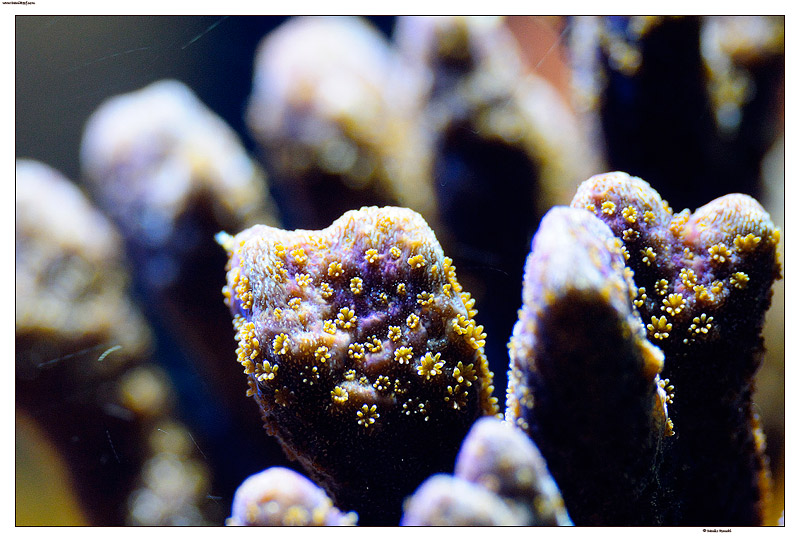
Here instead we see a shallower depth of field to isolate the subject from the background.
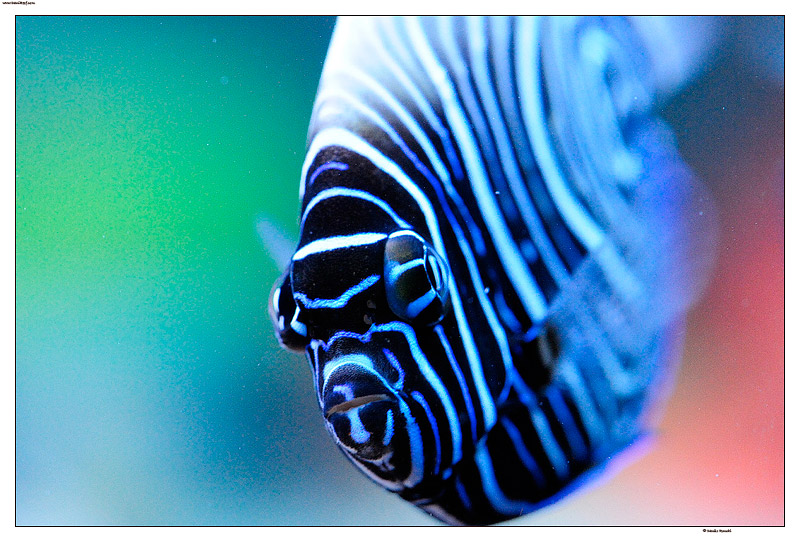
While in this photo we see a very shallow depth of field.
Now let’s see the correlation between aperture and shutter speed
With the same sensitivity (ISO) the amount of light for correct exposure is detected by a pair of shutter speed and aperture values, such as “1 / 125 sec f 5.6″ this pair of values identifies the amount of light in the time. Depending on our choices of depth of field, we can open or close the aperture or adjust the shutter speed to obtain many right couples of values.
But if the light is not enough … what can we do?
Increase sensitivity or use the flash, although in the aquarium I don’t like to use it, so we can only increase the ISO, but it will increase the electrical disturbance called noise.
In any case using the flash is not easy nor always possible, and deserves a large separate discussion.
How to set up our camera?
I tend to use the camera in one of the following three settings:
Aperture Priority (A or Av) = suitable for macro and aquascape
Shutter priority (S or Tv) = for photographs to fish
Manual = maximum expression, but slightly more complex
In fact, many compact cameras and some dslr, also have a number of preset scenes that can assist those not so unfamiliar with what we are going to explain, but since the use of scenes does not guarantee a wide margin of setting, I prefer to explore the concepts and take steps accordingly.
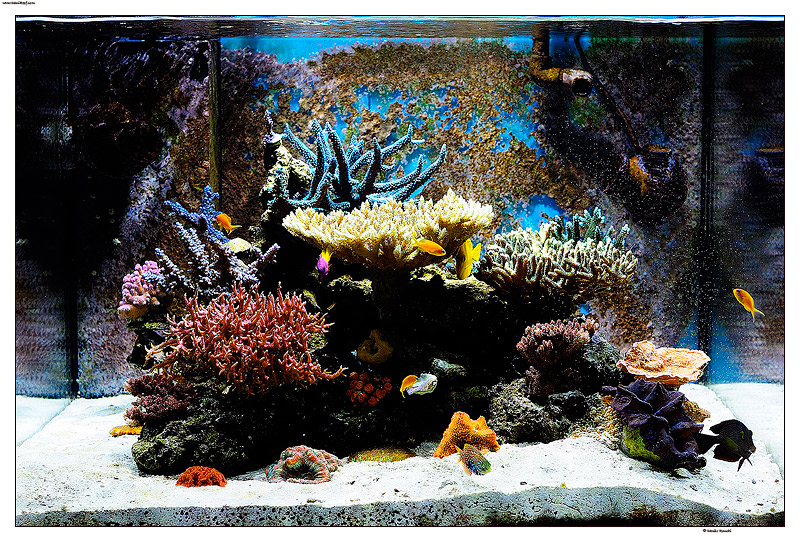
The picture above represents what is generally called Aquascape and portrays the Roberto Franchini’s tank that you can see here, the settings are Nikon D300, Nikkor 50 mm f1, 8 – Aperture f / 5 – shutter speed 1 / 160 sec – ISO 500.
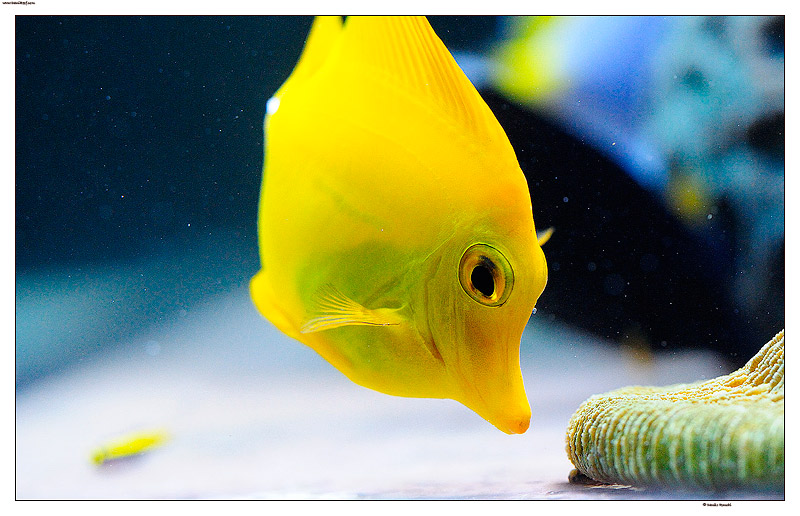
The photo above portrays a fish moving and then shooting settings are Nikon D300 with Sigma 150 mm macro – Aperture f / 4.5 – shutter speed 1 / 400 sec – ISO 1600.
Let us now discuss the lens as the choice becomes very important for us.
The lens allows the light enter into our camera and, depending on its characteristics, leads us further away (wide) or closer to the subject (telephoto).
The lens is characterized by two main parameters, the focal length and aperture.
The apertureshows us what is the maximum amount of light that can enter the lens in a unit of time.
To shoot in the aquarium I use generally the same lenses, like Nikon 50 mm f1, 8, used for almost all the pictures.
The Nikon 70-200 f2, 8 VR, for the photographs to the fish, seeing that combines high aperture (f/2.8) at an extremely fast autofocus.
The Sigma 150 macro for macro photography.
And, last but not least, the Tokina 12-24 that I need in all those cases where there is not much space in front of the aquarium and then have to use an ultra wide angle to see the aquarium from the front, with no perspective distortion.
Recently I put also the new Nikon 35 mm f1, 8 in my bag, to use in place of 50 mm for pictures with shallow depth of field but that are not macro.
Can we improve the performance of our lenses? Regardless of their class? The answer is yes, and seized these little tips you can greatly improve the performance of your lenses and pictures:
The maximum aperture also suggests the class of lens, zoom lenses as very bright, say with less than maximum brightness f4, are generally designed to make their best even at full aperture (ie f-number small), unlike the so-called consumer zoom.
In any case, any lens will be better when close of one (or two) stop, then an f / 2.8 will be better at f / 4, although of course the professionals lenses already have a good performance at large aperture and the improvement is noticeable but less marked from what you get with a consumer zoom.
The aperture upper limit depends on the size of the sensor, but to limit the effects of diffraction is not recommended to use aperture more than 11 for APS-C camera or 16 for FF, excluding macro photographs, where we have other logics.
How do we chose the correct shutter speed?
To obtain a technically perfect photo is not enough to decide only the aperture and neglect the shutter speed, because this affects the blurring from hand movement and blurred from subject movement.
We have blurred images generally with a fast-moving subject (fish?) for which the shutter speed is too slow.
The blurring instead, is the camera shake caused by the photographer hand for which the shutter speed is obviously too slow.
How you can avoid the blur?
Avoid motion blur depends on the conditions of what we want to photograph while avoiding the hand blur means to quantify the magnitude of induced motion.
Conventionally, it takes a time equal to the inverse of the focal length used, corrected if necessary for APS-C cameras (x 1.5), this is obviously not a general rule and it doesn’t applies to everyone, so it would be a good idea to do some test shots .
Example: with the same lens of 200mm focal length, the safety time on FF equal to 1 / 200 and on APS-C 1 / 300.
The use of the stabilizer (IS or VR) reduces the shutter speed required for non-moving objects, but can do nothing for something on the move! … ok ok… it depends also how is the movement…
White Balance
With the latest cameras the automatic white balance provides a fair balance but the best choice would be to always measure it to obtain the correct evaluation of the colors by the camera.
In any case it is a parameter that, in broad terms, can be completely re-set to the raw files in the following post production.
After the shot is very important to instantly evaluate the photos on camera, and it is possible using histograms through the camera monitor and other tools that the camera makes available to us.
Highlights on camera
Nowadays we have the opportunity to see the burned areas of the image, blinking, in all cameras, ie areas where no information is recorded.
Histograms show us the distribution of brightness (main histogram), the red channel, green and blue and then allow us to assess whether the photo is properly exposed, if there are burned areas or areas that are too dark.
On the right the histograms as shown in the Nikon D300 and on the left those of Canon 50D as an example.
If the picture is too light or too dark, so the histogram does not satisfy us, that is too far right or too far left, we can intervene using the exposure compensation button and repeat the shot.
We could also intervene in post production by acting on Raw, but doing so we will also get an increase in noise, which might otherwise have been avoided by repeating the shot.
To evaluate the blur we have to zoom the image taken until reach the 1:1 ratio so that we can properly assess the sharpness of our images.
After reading all that exposed here, we can say that to get the most from our pictures, we will:
1) Use an aperture greater than 1 or 2 stops compared to the nominal (minimum) at the focal length of lens;
2) Use a shutter speed that will allow us to avoid camera shake and blurring, or use a tripod;
3) Use a sensitivity such that you can use a shutter speed appropriate (preferably a noising picture than an heavy blur);
4) Use the correct white balance;
5) Check the correct setting in camera and evaluate the shot from the technical point of view so that it can repeatible.
Thanks for your comments.
Danilo
During my visit to the eighth edition of Salento Aquarium, I did a lesson on a subject that I really like “Aquarium, how taking pictures“, and are therefore here, as promised, to propose a mini-course as a guideline how to photograph in the aquarium, getting the best with our equipment, obviously the course is open to all, since most of what is written applies to any photographic genre, even though the examples will focus on the photographs in the aquarium.
I hope that the course will be useful and that you enjoy reading it, and if you have any requests please leave your comments.

This is the first part that covers the basics of photography, the choice of lenses and the setting of the machine, the second part will address specifically the photographs in the aquarium, going into the details of how to photograph aquariums, fish and corals , and the last part will cover instead the development of the digital negative, the RAW file.
The basic settings in a camera are the shutter speed (T or S) and Aperture (A or Av).
• The Aperture tells us how much light gets inside the camera
• The shutter speed tells us how long the light enters into the camera
Soon after we have to consider the White Balance and ISO
• The White Balance tells us how our sensor reacts to the luminous flux, and is the equivalent of the old types of rolls, from his setting depends any color in the aquarium.
• The ISO will indicate what is the sensitivity to light that we ask to our sensor, and it’s essential in order to have photos that are not blurred
When we take pictures, we must decide the proper balance of the four basic elements that we just saw. Aperture, shutter speed, white balance and ISO, depending on these choices we get what we are seeking.
From this it follows as fundamental the distinction on how to save our photo, which can be saved inside the camera usually in jpg or in raw.
The jpg format is faster and ready to use but the raw format allows us to intervene in post production and we could change almost all the default values, but Aperture and shutter speed, that characterize every single photo, as we saw above and we considered as fundamental.
The depth of field
The focus identifies a plane parallel to the camera in which every object is sharply focused and defined.
The depth of field instead of expanding this concept to an upper and a lower limit, indicating a space where everything seems clear, and that depends crucially from the so-called circle of confusion, in practice and trying to say in simple terms, a point not in focus will seem clear if it will be smaller than what we are able to perceive. It’s a typical case of a picture which appears sharp on the camera screen, but then on the computer screen appears fuzzy.
Depending on our choice will be important to isolate a subject rather prefer to have everything properly focused, and this is precisely the concept of depth of field.
The depth of field is influenced primarily by aperture.
If the aperture is open, ie if the f-number is low (f / 1.8 for example) we will have a limited depth of field.
If the aperture is closed, ie if the f-number is high (f/11) we will have an extended depth of field.
Also the distance from the subject is important, if we are near the subject we’ll have shallow depth of field, and the length of the lens is essential too, since the same scene framed from a lens of a given focal length (eg 100 mm) will have less depth of field of a lens with lesser focal length (50 mm for example).

In this photo we see a large depth of field for example. The photo is from the tank of Giancarlo Molendini you can see here and here.

Here instead we see a shallower depth of field to isolate the subject from the background.

While in this photo we see a very shallow depth of field.
Now let’s see the correlation between aperture and shutter speed
With the same sensitivity (ISO) the amount of light for correct exposure is detected by a pair of shutter speed and aperture values, such as “1 / 125 sec f 5.6″ this pair of values identifies the amount of light in the time. Depending on our choices of depth of field, we can open or close the aperture or adjust the shutter speed to obtain many right couples of values.
But if the light is not enough … what can we do?
Increase sensitivity or use the flash, although in the aquarium I don’t like to use it, so we can only increase the ISO, but it will increase the electrical disturbance called noise.
In any case using the flash is not easy nor always possible, and deserves a large separate discussion.
How to set up our camera?
I tend to use the camera in one of the following three settings:
Aperture Priority (A or Av) = suitable for macro and aquascape
Shutter priority (S or Tv) = for photographs to fish
Manual = maximum expression, but slightly more complex
In fact, many compact cameras and some dslr, also have a number of preset scenes that can assist those not so unfamiliar with what we are going to explain, but since the use of scenes does not guarantee a wide margin of setting, I prefer to explore the concepts and take steps accordingly.

The picture above represents what is generally called Aquascape and portrays the Roberto Franchini’s tank that you can see here, the settings are Nikon D300, Nikkor 50 mm f1, 8 – Aperture f / 5 – shutter speed 1 / 160 sec – ISO 500.

The photo above portrays a fish moving and then shooting settings are Nikon D300 with Sigma 150 mm macro – Aperture f / 4.5 – shutter speed 1 / 400 sec – ISO 1600.
Let us now discuss the lens as the choice becomes very important for us.
The lens allows the light enter into our camera and, depending on its characteristics, leads us further away (wide) or closer to the subject (telephoto).
The lens is characterized by two main parameters, the focal length and aperture.
The apertureshows us what is the maximum amount of light that can enter the lens in a unit of time.
To shoot in the aquarium I use generally the same lenses, like Nikon 50 mm f1, 8, used for almost all the pictures.
The Nikon 70-200 f2, 8 VR, for the photographs to the fish, seeing that combines high aperture (f/2.8) at an extremely fast autofocus.
The Sigma 150 macro for macro photography.
And, last but not least, the Tokina 12-24 that I need in all those cases where there is not much space in front of the aquarium and then have to use an ultra wide angle to see the aquarium from the front, with no perspective distortion.
Recently I put also the new Nikon 35 mm f1, 8 in my bag, to use in place of 50 mm for pictures with shallow depth of field but that are not macro.
Can we improve the performance of our lenses? Regardless of their class? The answer is yes, and seized these little tips you can greatly improve the performance of your lenses and pictures:
The maximum aperture also suggests the class of lens, zoom lenses as very bright, say with less than maximum brightness f4, are generally designed to make their best even at full aperture (ie f-number small), unlike the so-called consumer zoom.
In any case, any lens will be better when close of one (or two) stop, then an f / 2.8 will be better at f / 4, although of course the professionals lenses already have a good performance at large aperture and the improvement is noticeable but less marked from what you get with a consumer zoom.
The aperture upper limit depends on the size of the sensor, but to limit the effects of diffraction is not recommended to use aperture more than 11 for APS-C camera or 16 for FF, excluding macro photographs, where we have other logics.
How do we chose the correct shutter speed?
To obtain a technically perfect photo is not enough to decide only the aperture and neglect the shutter speed, because this affects the blurring from hand movement and blurred from subject movement.
We have blurred images generally with a fast-moving subject (fish?) for which the shutter speed is too slow.
The blurring instead, is the camera shake caused by the photographer hand for which the shutter speed is obviously too slow.
How you can avoid the blur?
Avoid motion blur depends on the conditions of what we want to photograph while avoiding the hand blur means to quantify the magnitude of induced motion.
Conventionally, it takes a time equal to the inverse of the focal length used, corrected if necessary for APS-C cameras (x 1.5), this is obviously not a general rule and it doesn’t applies to everyone, so it would be a good idea to do some test shots .
Example: with the same lens of 200mm focal length, the safety time on FF equal to 1 / 200 and on APS-C 1 / 300.
The use of the stabilizer (IS or VR) reduces the shutter speed required for non-moving objects, but can do nothing for something on the move! … ok ok… it depends also how is the movement…
White Balance
With the latest cameras the automatic white balance provides a fair balance but the best choice would be to always measure it to obtain the correct evaluation of the colors by the camera.
In any case it is a parameter that, in broad terms, can be completely re-set to the raw files in the following post production.
After the shot is very important to instantly evaluate the photos on camera, and it is possible using histograms through the camera monitor and other tools that the camera makes available to us.
Highlights on camera
Nowadays we have the opportunity to see the burned areas of the image, blinking, in all cameras, ie areas where no information is recorded.
Histograms show us the distribution of brightness (main histogram), the red channel, green and blue and then allow us to assess whether the photo is properly exposed, if there are burned areas or areas that are too dark.
On the right the histograms as shown in the Nikon D300 and on the left those of Canon 50D as an example.
If the picture is too light or too dark, so the histogram does not satisfy us, that is too far right or too far left, we can intervene using the exposure compensation button and repeat the shot.
We could also intervene in post production by acting on Raw, but doing so we will also get an increase in noise, which might otherwise have been avoided by repeating the shot.
To evaluate the blur we have to zoom the image taken until reach the 1:1 ratio so that we can properly assess the sharpness of our images.
After reading all that exposed here, we can say that to get the most from our pictures, we will:
1) Use an aperture greater than 1 or 2 stops compared to the nominal (minimum) at the focal length of lens;
2) Use a shutter speed that will allow us to avoid camera shake and blurring, or use a tripod;
3) Use a sensitivity such that you can use a shutter speed appropriate (preferably a noising picture than an heavy blur);
4) Use the correct white balance;
5) Check the correct setting in camera and evaluate the shot from the technical point of view so that it can repeatible.
Thanks for your comments.
Danilo
Last edited by a moderator:
