My Project ★ GENESIS ★ 110G (Miracle) SPS Dream Tank - (I) Pre-Build Thread

Wally.B

Active member
My Project ★ GENESIS ★ 110G (Miracle) SPS Dream Tank - (I) Pre-Build Thread

Welcome.
My Name is Wally. Not much of an Alias eh?


Let me start off by explaining the Title of this Thread.


After 20+years in this Wonderful Hobby, I'm attempting one last "New Tank Build (SPS)".

I say (Last "SPS" TANK), since if things don't work out, I'll may go FOLR or NO SPS-Mixed to Simplify Running TWO TANKS.

I do have one OTHER TANK IN 1st Floor KITCHEN (photo Below). A successful 90 Gallon Mixed Tank 15 years old.

32807727454_991c91317c_c.jpg


SPECIAL NOTE: All Photos in this Thread are Stored and Hosted on Flickr

The link to Photo above and all other Photos is here https://www.flickr.com/photos/147613604@N08/.

As per Flickr 3 Party Hosting Policy:

Link back to Flickr when you post your Flickr content elsewhere.
Flickr makes it possible to post content hosted on Flickr to other web sites.
Pages on other web sites that display content hosted on flickr.com must provide a link from each photo or video back to its page on Flickr.
This provides a way to get more information about the content and the photographer.

This thread is NOT about the TANK ABOVE.

This is a continuation of a previous Tank Thread (which describes my TANK Automation [DIY DOSER/Water Changer] , Sump Design, Algae Scrubber, etc)
http://www.reefcentral.com/forums/showthread.php?t=2636608

This THREAD is Part 1 of NEW Larger REPALCEMENT TANK that will including all the pre-build activities, since I am pretty well overhauling my whole 2 tank setup Sump Room. Replacing my 65 Gallon In-Wall BASEMENT Office tank, with a 110 Gallon replacement Tank.

Yes it is really my Dream Tank, since I'm hoping to do everything right this time from all things I got wrong over the years.

Not just another hack/patch which I've done year after year, but a serious overhaul. Possibly Start Tank from Scratch, or just overhaul everything around my current OLD TANK Setup.

I will certainly be reusing my Custom Built Sump, Lightings, Controls, etc.

The meaning of this Aquarium PROJECT GENESIS is....
Similar to the STAR TREK Motion picture where A Genetic Explosion Reduced a planet surface to basic elementary particles, to start a NEW LIFE from a Dead Planet.
http://www.startrek.com/database_article/project-genesis

There won't be any Spock Coming to life in this thread....

In my case, I've struggled over that Last 5 years with keeping SPS healthy and Alive.
Many reasons for Past SPS Failures, my last Tank thread ended with discovering a contamination curse.
http://www.reefcentral.com/forums/showthread.php?t=2636608

Thus my HOPE, DREAM, and some degree Miracle is that this TANK, will be my version of Project GENESIS (ie Success Living, Thriving, Healthy SPS and more)


Let's get to the pre-build details:

This is the build diagram for the 110G TANK which will arrive in about a month.

Tank is being built by MIRACLE AQUARIUMS after dealing with Derek on many back on forth design ideas.

38468269005_afb1c1fd9e_c.jpg


This is the OLD OFFICE SETUP and Tape shows the NEW TANK EXPANSION rough plan.
26871222139_04b99412ef_z.jpg


And the FUTURE 110G Tank INSTALL Conceptual Visualization.

24623076318_67d25eebe2.jpg


This isn't my TANK, but it will be similar (With a EuroTrim Top, and the Overflow Side will be clear)

38561378752_3be3771d6f_c.jpg


and LAST BUT NOT LEAST, this is the SUMP ROOM behind my Office wall.

39033202771_7d97a52f52_c.jpg


Two sumps in this room since one Sump is for the 90 Gallon Mix Tank Directly above in Kitchen.

The SUMP ROOM doesn't look like that anymore, since the 65 Gallon Tank has been removed, for the REBUILD.

39345852401_64d1875f6d_z.jpg


The TANK was moved out few week ago and is Standing/Operating on other Side of Same SUMP.

25054150158_56a83b3917_z.jpg


Look like this a couple of weeks ago....

27170938429_15f4f09d92_z.jpg


Now the Tank is not that clean/healthy due to limited attention and maintenance.

I am still in deep thought, brainstorm mode on what I'll redesign, how things will be put together.

What I do know, it I need to clean out the Sump Room, Cut out a Bigger Viewing Hole (for 2 sided), and BUILD A STAND for new arriving tank.

Stay tuned.....much more to come.

Wally
 
Last edited:
How are you going to light the new tank?
Why 46” but not 48”? That’s all the space you can squeeze it in?
A 4’ t5 would fit nicely over a 48” tank.
 
How are you going to light the new tank?
Why 46” but not 48”? That’s all the space you can squeeze it in?
A 4’ t5 would fit nicely over a 48” tank.

Good question. Since that 46" decision took me many weeks to make.
Few reasons for 46":
1) To stay at 1/2" glass thickness that was the design limit (Safety)
2) I want to have some office desk space for monitor and don't want to rebuild everything. 46" will be pretty tight with 2 Sumps, 1 tank in Sump room.
3) External Sump will take up some space, but that space isn't an issue since Overflow drains will be directly over sump.

My Lighting for short term will be 2x250W MH (Fixture is 48", but Bulbs move on track. Will widen, since currently at 36" width), and 2x3ft T5's.
But the T5 Ballast can handle a 4 foot T5.
 
Last edited:
Wally, im only following if you bring back Spock!
Good luck with this!

Matt, your wish may come true.

The Last Episode of Algae Wars was suppose to be done over this Holiday Break. But with all the craziness, I never even considered it.

Lot's of surprises in the script (and this is the Final Episode with Really Good Ending(s) ). The photography was all done 2 years ago, and just needs assembling.

There are acouple of scenes from Star Trek (not telling too much). Who know's maybe even Spock. Last Episode it was Scotty.

Hoping your Holiday break was nice.
Happy new year.

I've got a busy time ahead of me.

I am trying to decide if new Tank should be Totally a Fresh start, or re-kindle rocks/corals/fish from old.
I did take a water, substrate sample to a biologist for microscope analysis (today). Look like all I have is Cyano.
Plenty of life in my tank (but all good microscopic creatures, and bacteria). There were a few cells that looked like Dino, but nothing to worry about since a spec here or there.
So it appears I am leaning towards re-using old tank internals.
 
As nice as everything is looking, the hawkfish perched at the top of the tank in the very first picture stole the show. Love those fish, just wish they were less aggressive / shrimp eaty.

It'll be cool to see how the sump room comes along too.
 
Hey Rakie,

Nice for you to hop over to this pre-build thread. It actually was inspired by YOU since I wasn't going to start a thread till I got the tank. You suggested I do a thread sooner to keep me extra busy :( . Thanks. :)

I'll only post major milestones till the tank arrives since as you can imagine I have some serious handyman work to do.

It's not just the sump Room, it will be the Office and Rec room too (all to make that opening), and to restore the Flood Damage.

As far as the Hawkfish, (Yes that is a lucky shot and one of my favorites, even though I have nicer shots of tank coral progress). The Hawkfish isn't as aggressive as you think. I have a cleaner shrimp and he's alive after quite some time. Same for all the snails & hermits.

I actually started a mini-thread to address a over population of copepods, ampipods. I thought they were pecking at my Zoa's and now allowing them to open up.
http://www.reefcentral.com/forums/showthread.php?t=2530342
One solution was the HawkFish.

I never solved the Zoa issue (root cause). But reduced lighting and flow helped, or more flow, NO SURE. Kind of gave up, and then one day not to long ago, I noticed a patch starting. Rasta's, LA Lakers, etc. Quite nice and spreading slowly in to a Garden.

I do like the Hawkfish since he does perch from spot to spot, and is quite trained on Flake and Frozen. The only other fish I have are Blue Green Chromis, and my Utility fish (a Lawnmover Blenny).

As far as SUMP it's pretty well ready since I designed it oversized. I'll just need to hook up tank overflow. Will be easy with Overflow at size (vs at back now).
Thinking of swapping out the EuroReef Skimmer with my RLSS DB8i that will be able to handle 110Gallon Tank (AND 100% for sure add more Fish. Possibly use old 65 Gallon tank as QT system).

I am actually thinking the first stage of the tank startup will be just adding the rocks, whatever FRAG survive, and BUILD up a fish population. ALl before I add more Frags.
 
Last edited:
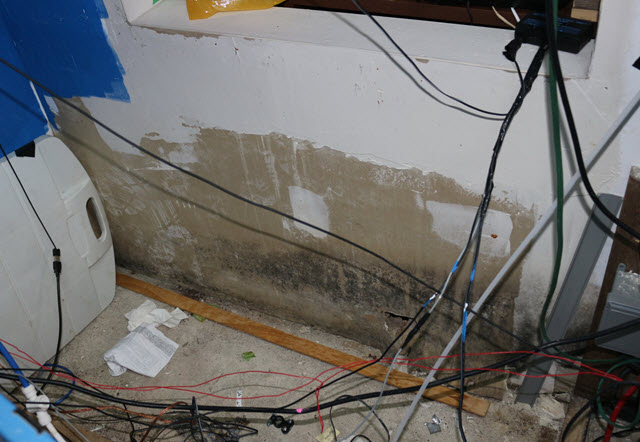
FIRST PRE-BUILD (STAGE) Remove Rot / Seal and Protect

Going to try an do pictures, as much as possible.... rather than my BLAH blah typing.

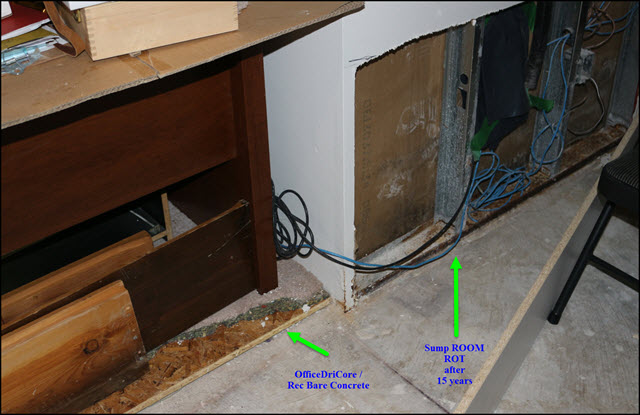
I got to gut bottom walls of the 15+ year old Inside of sump room from years of spills and accidents.

24496347977_31f1471a05_o.jpg


I won't replace with drywall. Either Miracle board, or Plywood.

From outside it will be drywall, but there I will protect floor from any possible spills or floods.

24496347797_67aab82abc_o.jpg


First floor Layer will be DRICORE panels. Which are already in office, but not anywhere else.

DRICORE makes floor softer, warmer, and obviously dryer and Mold resistant underneath.

This is a Dricore panel underneath. Plastic Waterproof Feet.
If a spill happens it will drain (under dricore floor) into Basemetn Floor Drain, and Airation will dry floor out.
24496347667_a21a7ae275_b.jpg


But spills will be contained in Sump room since I will be using BLUESKIN sealing membrane TAPE between Wall and Floor.
(Learned about it to seal up the Kitchen sink which was that Dishwasher Leak).

I just picked up all the DRICORE I need yesterday since it was on sale during boxing week ($1.50 off at home depot)
100 Panels are just enough to cover the REC Room, and bit of hallway entrance.

The REC ROOM is Rectangular so the TONGE and GROVE panels just lock into one another. (Some cut work to stagger and make perfect fit)
(Either Carpet or Composite Wood Panel Flooring will go on top). That is part of Insurance Repair. (Dricore is my cost and work before that top layer goes on)

24496347497_265a8caeb2_o.jpg


Just to be clear. Sump Room floor will remain concrete so if major water spill (Breaches BlueSkin which is highly unlikely), it will flow under dricore subfloor.

That's my next bit of work.
 
Last edited:
I think this is going to be a great build. Wally are you always working on something?
 
Wally you may not think so, but in my opinion, the stuff you are doing now is the most important part of a build. Someday someone will run into this thread and realize Step 1 isn't actually pour water into tank.

May not seem like it, but this is good knowledge and information for people planning a build, and absolutely worth noting For weirdo's like us, this is foreplay LOL


Yea I just learned about Dricore panels and may use them on my new build. I see they have ones that instead of tongue and groove have a locking piece between them.

I hate when people do not show these steps. They build this and they build that but do not show you. Here is my tank and all the stuff I purchased next post there is water in the thing, how is that a build thread.
 
Last edited:
DRI-CORE laying (Practice RUN)

Well thank you for the interest in the pre-build steps. (Got your encouragement posts above :) RAKIE, SHRED5, PIFE )

I wasn't going to post these boring steps, thinking people only want to see TANK fill stuff
I won't over do it, but just the main points/tips. I am learning as I go along.

So here is where I am at.....

You have to practice with DRI-CORE, since once you knock the tongue and grove into one another, they are hard to take apart without damage.
They do lock (via tongue and grove) with a Soft Rubber Hammer and small flat piece of wood.


I could have finished the floor in couple of hours (DOING IT WRONG).

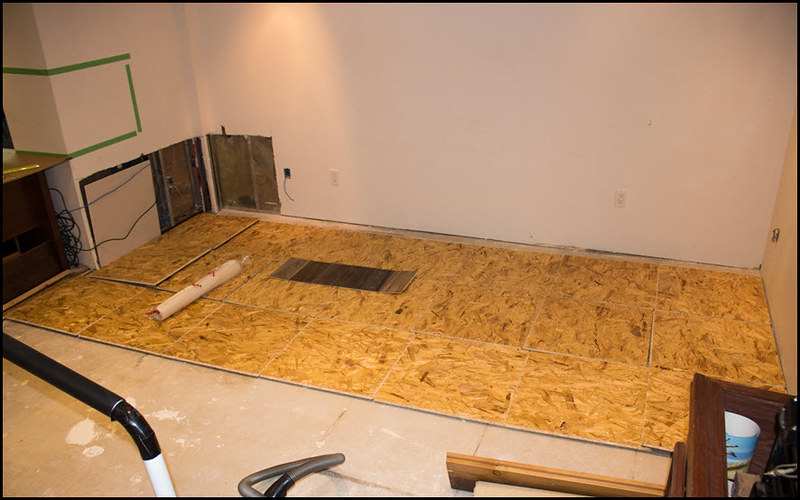
38503728055_2f2ecb7c7f_c.jpg


IMPORTANT TO Leave 1/4" inch gap at walls for air flow, breathing.

The other thing one need to know is the Tile have to be staggered.
Which I haven't done yet. But I'm just getting a feel how many tiles it takes for width.

I may be lucky and only loose a bit of one tile per row.

The other challenge I practices it locking the new tile floor, into the exisiting Office DRI-CORE section. (Things look great for fit and almost zero waste)

On top of this will go the plastic sheet Vapour Barrier. That avoids me the extra protection step of painting the DRI-CORE with Sealer.

On top of that will go Either a underlay, or maybe real CORK Sheets.

And I'm playing with Color Sample of WPC (Flooring). It's the future of flooring (as Laminate is out of date). WPC (Wood Plastic Composite).
100% water Proof. Click Lock install. No saw needed and no dust. Just a X-Acto knife to cut ends.
 
Last edited:
I think this is going to be a great build. Wally are you always working on something?

Glad to have you along for this journey.

Wally you may not think so, but in my opinion, the stuff you are doing now is the most important part of a build. Someday someone will run into this thread and realize Step 1 isn't actually pour water into tank.

May not seem like it, but this is good knowledge and information for people planning a build, and absolutely worth noting For weirdo's like us, this is foreplay LOL

Thanks. Glad to help everyone since I am passionate to share my learnings.
I owe lots of folks for teaching me tank stuff over the years

Yea I just learned about Dricore panels and may use them on my new build. I see they have ones that instead of tongue and groove have a locking piece between them.

I hate when people do not show these steps. They build this and they build that but do not show you. Here is my tank and all the stuff I purchased next post there is water in the thing, how is that a build thread.

Tag along. Glad to have you. The more the merrier. This is hard work, but I love the process of building.

Here is what I read on the DRICORE web site:

-> It can hold up a ton of weight. No problem for a fish tank, or Grand Piano, with all the feet.
-> But only the UNDERNEATH (Plastic layer) is WATER PROOF (TOP IS NO WATER RESISTANT AT ALL) since top layer is real wood particle board (RAW)
------> Smells nice (wife likes the wood smell)
------> But raw particleboard will swell if gets wet (if you wet it, it's ruined). They even recommend not having the raw exposed for more than 2 weeks.
-------------> You can seal it with sealer (Polyurethane), then paint. (which is recommended for use in kids play areas, nothing else on top)
-------------> Or the plastic sheeting I may be putting on top (but there will be gaps)
-------------> OR in my case the WPC Floor which is water proof

BUT I think best it not to place the DRICORE (under a tank).
------> Around tank is what I'm doing (so water hits concrete and flows under the DRICORE)....Like my office did for years.
 
Last edited:
DRICORE (Proof!! 15 Years Later)

Here is why I'm doing DRICORE.
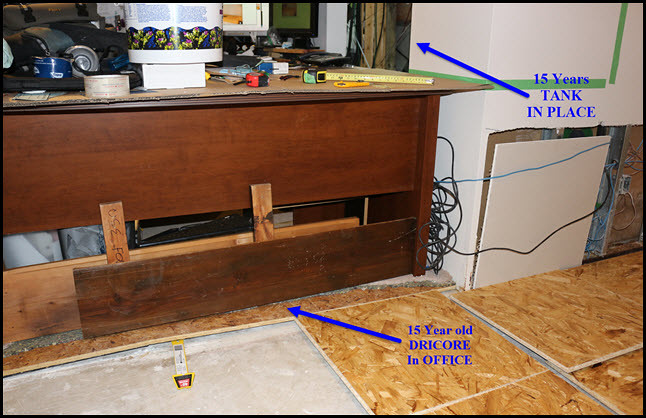
I put DRICORE floor with Carpet in my OFFICE 15 years ago.
I did it for the possible tank spills, BUT ALSO to keep my feet warm and away from Concrete (since I spend hours in that office)

My office is dry, no damage, after tons of spills during the early years.
I got better with automation but believe me, I've a many, MANY accidents.

38673667494_4c246693ed_b.jpg


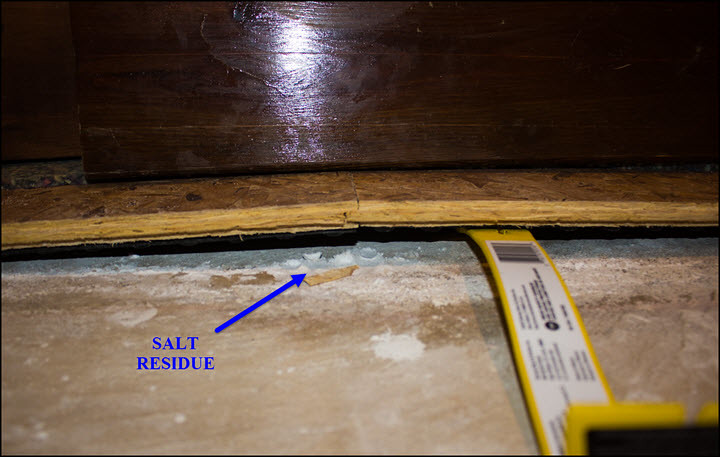
See the office area. 15 years old. New DRI-CORE beside it.

I put a crowbar underneath to have a peek.

25512007578_bb74eae11b_b.jpg


That (white powder) is the (salt water spills) that dried up over the years.
Perfectly fine since Salt is kind of a sterilizer, and resists mold, so it's just there.

I will be removing my office furniture to do top flooring. I may remove the dricore and do a quick vacuum/sweep of salt.
(Vaccum might not be a good idea, since Salt into motors is bad. Maybe Shop vac, but I ruined one mini shop vac, sucking up salt water)

Maybe enough there for a WATER CHANGE :) ) )
 
Last edited:
Haha, nice info that's cool to see. This is the kind of information that may solve problems for people who don't know what to do. I think a proper tank build is the whole journey -- Everything related to the tank. If you need to start with electrical, or flooring, or whatever -- it's all part of it.

My first post in my build thread was a picture of the tank and my planned equipment. The second update was painting the stand, and the next steps I had planned. Third was drilling and painting the tank, etc etc. There's a lot that can go into a build. They don't need it, but I can't tell you how many ideas I had implemented because I saw them in the pre-tank build stages.

The tank also looks pretty crisp. I can't explain exactly why, but some tanks just *look* well built and draw attention to themselves. Might be the way light hits low iron glass, or sharp silicone lines, maybe clean extra polished ends. I can't always put a finger on exactly what makes them look special, but I can tell you the peninsula tank pictured above looks like it fits the description.


All that said -- Great start! I'm excited to see your new tank flourish.
 
Last edited:
Wood Plastic Composite I think was installed in our up stairs bedroom not by us, we just bought the house. It looks like it would be really waterproof. I think the reason they used WPC up there is the floor is not exactly flat and it seems flexible. It was a attic converted to a bedroom at one time, older house. We have so much to do on the house my build will not be for a while except my small upstairs tank.

I like when people get detailed. I have been in the hobby a long time and I appreciate when people go into details on their build. That is where I still learn..

I am now thinking of that same flooring in the basement for my build. I sure did not want just carpet.
 
Looking good Wally.
You missed a question, however.
I think Rakie asked if you were always doing something..
I guess you were off doing something and missed it...
We’ll forgive you.. :p
 
Haha, nice info that's cool to see. This is the kind of information that may solve problems for people who don't know what to do. I think a proper tank build is the whole journey -- Everything related to the tank. If you need to start with electrical, or flooring, or whatever -- it's all part of it.

My first post in my build thread was a picture of the tank and my planned equipment. The second update was painting the stand, and the next steps I had planned. Third was drilling and painting the tank, etc etc. There's a lot that can go into a build. They don't need it, but I can't tell you how many ideas I had implemented because I saw them in the pre-tank build stages.

The tank also looks pretty crisp. I can't explain exactly why, but some tanks just *look* well built and draw attention to themselves. Might be the way light hits low iron glass, or sharp silicone lines, maybe clean extra polished ends. I can't always put a finger on exactly what makes them look special, but I can tell you the peninsula tank pictured above looks like it fits the description.


All that said -- Great start! I'm excited to see your new tank flourish.

Rakie,

I will have to review your thread and many others before I start the tank build stage.

There are many good tips in every build thread for the smallest details. Tricks for running a wire, clamping a hose, tid-bits.

You actually triggered a thought that I need to MARK DOWN (REMINDER).
My sump was designed for the 65 Gallon tank drain (power off). I have no idea how much of a drain will occur with larger tank and external overflow.
The biggest problem I had was with my sea swirl return (it would drain excessively due to the nib being below water). I have to remember to drill a siphon break into that.

Wood Plastic Composite I think was installed in our up stairs bedroom not by us, we just bought the house. It looks like it would be really waterproof. I think the reason they used WPC up there is the floor is not exactly flat and it seems flexible. It was a attic converted to a bedroom at one time, older house. We have so much to do on the house my build will not be for a while except my small upstairs tank.

I like when people get detailed. I have been in the hobby a long time and I appreciate when people go into details on their build. That is where I still learn..

I am now thinking of that same flooring in the basement for my build. I sure did not want just carpet.

I still haven't decided final decision for top flooring.
The original quick decision was just to throw down a replacement carpet, but then I got into thinking this should all be done properly for long term.

Looking good Wally.
You missed a question, however.
I think Rakie asked if you were always doing something..
I guess you were off doing something and missed it...
We’ll forgive you.. :p
Opps. Was skimming too fast.
Actually I do hope this next build ends things and I get a chance to start enjoying my office tank like the Kitchen Tank. (Hardly any work).
I'd love to get back to relaxing and enjoying the tank flourish like yours (which the SPS failures haven't allowed me to do).
I have two books I bought (Orson Scott Card - Formic Wars [Before ENders Game)) that haven't been cracked open.
Over the years, I read every SCI-FI book out there.
And the last episode I watched of GAME OF THRONES is Season 5 (2nd last eposide). I never saw Season 5 ending yet.
***PLEASE NO SPOILERS **. I am looking forward to power watching Season 5 ending and then Season6/7 which I have a copy of ready to watch.
Plus I have my AMIGA restore project that is also on hold.

THAT IS THE DOING SOMETHING I hope for. (Do things, but end the FISH TANK GAMES)
This new tank would have NEVER Ever Happened, without the Basement Flood. (Call is bad luck, good luck. Fate)
Hoping when this tank build ends. I'll not only have a office Tank, but a Rec. Room tank to enjoy R&R.

But to conclude on am I always doing something.
I have 16,14,12 year old kids and they need plenty of my time. Just yesterday only I had to drive them back and forth places (12 times)
Looking forward to school starting again so I can get some traction on the pre-build.
 
Last edited:
THE NEXT STAGE ( Sump Room ) UN-BUILD

The flooring practice was just to see if I have enough DRICORE while on sale this week.

FLOORING WILL be last stage of pre-build since things are going to get messy and no point in destroying good material floor.
Working with All concrete floor will be much easier.

Now I'm going to tackle the delicate tear apart (temp relocation) of all wiring in sump room (while keeping both tanks/sumps running).

Then I'm going to cut out the old bad drywall, etc

I can't really start the TANK stand and wall portal till tank arrives Mid Feb.
I'm a visual/touch-and-feel person and diagrams are good for planning, but having THE NEW TANK to see is what I need to finalize things.

So having things all out and clean/open is my next step.
 
Last edited:
Back
Top