You are using an out of date browser. It may not display this or other websites correctly.
You should upgrade or use an alternative browser.
You should upgrade or use an alternative browser.
New Algae reactor arrived
- Thread starter Ted_C
- Start date

Ted_C
Active member

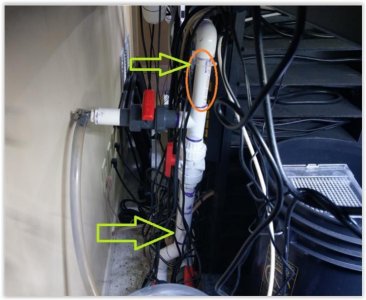
the orange circle is the only place I have to work with. everything else was so darn messed up (too many couplings and mistakes along the way). I doubt I have enough room to cut that pipe - two couplings with two 90's and hose to the reactor.
If I can't make that work - I have to replace all the plumbing and fittings down to the chiller.
Here's the reactor next to my 20# cylinder. I measured it and it should just barely fit behind the tank.

Webmanny
Active member

Ted_C
Active member
I dont really need it to be a manifold but thanks for the suggestion [MENTION=305511]Webmanny[/MENTION] . I have something like a closed loop pump for my sump. from sump to UV to Chiller Back to Filter Sock / sump. 100% of that water is meant to also go through my algae reactor.
I can't make any cuts to the pipe below the true union ball valve - the orange circle is the only space I have left. There's no more "leftover" 1" pipe to put on a coupling because I made way to many mistakes already and had to cut / couple.
One thing I could do: before that top 90 (above my orange circle) - I could probably cut before the 90 / couple it send that to the reactor then cut in my orange circle / couple it / 90 degree for the output from the reactor.
by the way - that tee with the two true union ball valves - that's what I use for my water change. close the bottom valve and open the top valve and I can drain my sump. If I was really clever - I would have plumbed in the fresh saltwater to go back through that pipe after I drained the sump. Sadly - I'm not a smart man...
Ted_C
Active member
ugh... took me an hour to think through and figure out the plumbing supply list I needed to make this work. All the connectors to this reactor are 3/4" fpt fittings. The calcium reactor injection port they supplied are all 1" connections. I was also waiting to hear from Pacific Sun on whether I could make the calcium reactor injection port work with their reactor (they said it should work - but it'll be a test).
1" Coupling (cut the pipe in my orange circle)
1" tee (1" TUBV to 1" mpt x 1/2" fpt bushing to 1/2" hose barb connection to 3/4" tubing to the drain)
1" TUBV (true union ball valve - FPT connectors)
1" mpt x 3/4" FPT bushing
3/4" mpt hose barb connection
1" tubing
Hose barb quick disconnect
3/4" mpt hose barb quick disconnect
3/4" fpt x 1" mpt bushing
1" TUBV
1" nipple
1" fpt x 1" male union (Calcium reactor injection port - the orientation of this is important if it turns out I need High pressure / low pressure. the female end has to be the inlet)
1" threaded coupling
1" mpt x 3/4" fpt bushing
3/4" nipple
3/4" fpt reactor
3/4" fpt hose barb quick disconnect
hose barb quick disconnect
1" tubing
3/4" mpt hose barb connection
3/4" fpt x 1" mpt bushing
1" fpt x 1" mpt street 90
1" tubv
1" mpt x 1" fpt street 90
1" nipple
1" fpt inlet for chiller.
True union ball valves (spears) are actually pretty expensive right now - $51 bucks a piece. Total price came to $225.
So lesson learned (again) - always try to use threaded instead of glued fittings - especially around true union ball valves - or else changes in the future can be quite expensive.
Systemwizardinc
Member
If i had the cash i would do that to good luck with it
Ted_C
Active member
Got the reactor installed over the weekend (6/22) - I must say - I'm seeing improvement already in the display tank (was having troubles with blue-green slime algae that seems to be abating).
The light out the top of this thing doesn't work too well in a darkened living room. I can cover the top with construction paper or towels (without them touching the fins) and am fine with that.
That's Blood on the wall - my blood. Those fins up top there are super sharp!
For those thinking about using the quick-disconnects hose barb fittings - dont waste your time. they always leak. I replaced them with regular threaded hose barb fittings and good old fashioned hard plumbing fittings.
A few other notes: The 3/4" street elbow fitting at the top leaks (even after replacing the quick disconnect fitting) between the lid and fitting. I tried sealing it up with rectoseal on the threads - same issue. I put some weldon 16 around the interface between fitting and lid (effectively melting the acrylic lid to the fitting) - it helped - but still have a drop or two a day escaping.
The calcium reactor injection port plumbing was all 1" and the reactor was 3/4" - I had to use a buttload of 3/4" to 1" threaded bushings to make everything work.
Lesson learned as well - if your looking to make the connection on top removable - you need a 4" 3/4" nipple. 3" is too short and you wont be able to tighten the union - although it appears to have been tightened (dumped about a gallon or two on the floor before I could get the pump turned off on that one...)
I shortened the connections for the water drain out to the garage laundry sink (the 4" black gasket cap there) so I can slide the reactor in and out for the eventual maintenance it will need.
And all of this work and moving the CO2 bottle around must have killed the JBJ Bubble counter that was on there. couldn't get a bit of gas to go through - the integrated check valve crapped out on me. waiting on replacement parts so I can get this hooked up correctly and working again.
Ted_C
Active member
Update: Do not recommend Pax Bellum
Update: Do not recommend Pax Bellum
Here's an update on this reactor.
Last month, I was pulling the reactor out of my setup to give it a good deep cleaning (2nd time since I've owned it - so about 10-11 months old). Got it drained and took it outside and the bottom fell off.


Luckily - this happened when cleaning and not while running. This isn't why I can't recommend Pax Bellum though - it's their horrible support with this entire experience.
Maybe I've been spoiled by dealing with LFS only or by dealing with Ecotech marine.
As soon as it happened - I contacted Pax Bellum via their facebook page / facebook messenger to show the problem with these same pics. I never elaborated about when it occured (cleaning versus a running tank) Pax Bellum asked how old the reactor was because they haven't used 3/4" fittings for over a year. in other cases of support directly to the manufacter - especially for something as catastrophic of an entire unit breaking like my pics show due to shoddy acrylic work - it's never a question on how old the product was.
Regardless, I found this thread and a few others to show I received the reactor in June of last year. This wasn't good enough proof for Pax Bellum. I had to go back to Unique Corals to have them look up and send my original invoice. Not a huge deal - but still proof that they wont stand behind their product based on age.
So Pax Bellum agreed to send a new reactor body on their dime. The problem is - they've upgraded all of their fittings to 1". So they asked if I needed a new lid. My Lid's alway's leaked around the PVC Fitting no matter what I tried to fix the problem and I did tell them this. No matter, they charged me $150 for the new lid (so not entirely on their own dime).
Never once was I asked about the health of the tank (did this cause the tank to crash) or if this flooded my living room or anything like that.
So I can't recommend Pax Bellum products due to the above.
Update: Do not recommend Pax Bellum
Here's an update on this reactor.
Last month, I was pulling the reactor out of my setup to give it a good deep cleaning (2nd time since I've owned it - so about 10-11 months old). Got it drained and took it outside and the bottom fell off.
Luckily - this happened when cleaning and not while running. This isn't why I can't recommend Pax Bellum though - it's their horrible support with this entire experience.
Maybe I've been spoiled by dealing with LFS only or by dealing with Ecotech marine.
As soon as it happened - I contacted Pax Bellum via their facebook page / facebook messenger to show the problem with these same pics. I never elaborated about when it occured (cleaning versus a running tank) Pax Bellum asked how old the reactor was because they haven't used 3/4" fittings for over a year. in other cases of support directly to the manufacter - especially for something as catastrophic of an entire unit breaking like my pics show due to shoddy acrylic work - it's never a question on how old the product was.
Regardless, I found this thread and a few others to show I received the reactor in June of last year. This wasn't good enough proof for Pax Bellum. I had to go back to Unique Corals to have them look up and send my original invoice. Not a huge deal - but still proof that they wont stand behind their product based on age.
So Pax Bellum agreed to send a new reactor body on their dime. The problem is - they've upgraded all of their fittings to 1". So they asked if I needed a new lid. My Lid's alway's leaked around the PVC Fitting no matter what I tried to fix the problem and I did tell them this. No matter, they charged me $150 for the new lid (so not entirely on their own dime).
Never once was I asked about the health of the tank (did this cause the tank to crash) or if this flooded my living room or anything like that.
So I can't recommend Pax Bellum products due to the above.
bmullikin1
New member
wow, horrible customer service, glad it didnt happen while running, someone was watching out for you
Ted_C
Active member
haha webmanny - you know this hobby all to well ")
All it took for plumbing when the reactor failed was to remove a hose clamp and use one of the union portions of the union ball valve to bypass the missing reactor.
Re-plumbing it was a breeze as well - two 1" close nipples and two 1" true union ball values (all threaded). The hard part - I had to take it apart a few times due to leaks with my threaded fittings and re-goop the threads and tighten the connections up.
I'm still using reducing bushings for the 3/4" hose I'm using.
Birtikidis
Member
What a bummer. I really wanted one of those.
Similar threads
- Replies
- 19
- Views
- 3K
- Replies
- 8
- Views
- 495