Sabodish's 170 gallon cube build thread

sabodish

New member
Well, the wife and i had a baby about a year ago, so this became too small

100_0005.jpg


and we had to buy this.

frontofhouse.jpg


so, that means this (360 gallon) had to go.

3306tankfull.jpg


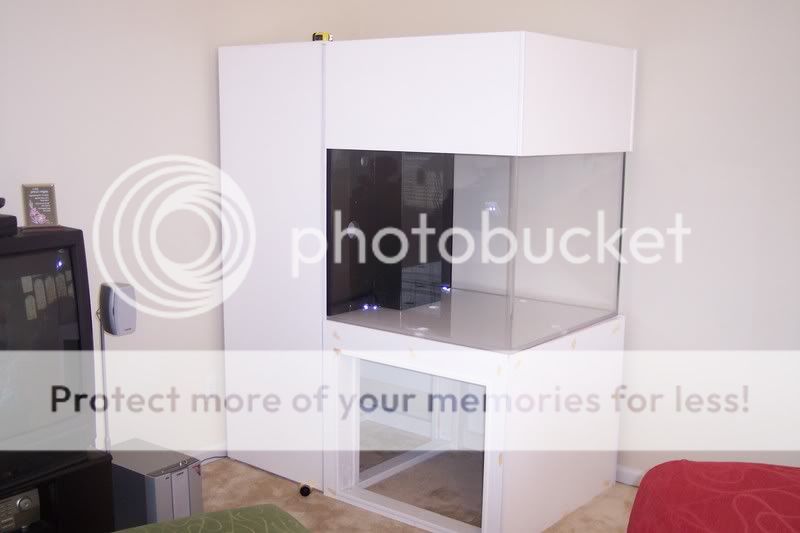
and replaced by this 170 gallon cube.

anglenewcube.jpg


due to the house being on a slab, i will lose my dedicated fish room and have to house all the equipment under the stand. or in this case, a small closet attached to my stand, more on this later.


tank specs:
-36"x36"x30"x3/4" acrylic cube built by andy at myreef creations.
- sump, my reef creations standard reef sump, with fuge
-DIY stand and hood.
-euroreef 8-3, which i converted to a recirculting skimmmer
-circulation, (2) OM 4 ways, water being provided by 2 sequence darts. once closed loop is returned through the bottom 4 holes, while the other loop is returned through bulkheads in the corners at the top through the eurobracing. CL intakes are on the rear wall, covered with large spa strainers.
-return pump is a small mag 7, which feeds my skimmer also.
-lighting will consist of (2) 400W DE metal halide icecap horizontal pendants being powered by icecap electronic ballasts. i will also be running (4) 3' VHO actinics powered by an icecap 660.

tank will be bare bottom and house a mixed reef.

so now..on to the construction pics. please share comments, critiques, or anything else.

-mike
 
in stand building, i had admired the stand that "sonofgaladrial" built for his 48x48x24 cube, so i wanted to use his basic idea, but i needed to tweak it a bit to fit my needs. the stand frame is built out of 2x4's and then covered in 3/8" sanded plywood. i painted the entire stand with 3 coats of kilz and then 2 coats of white paint.

001_27.jpg


002_26.jpg


003_25.jpg


004_24.jpg


005_23.jpg


006_22.jpg
 
now, as i mentioned before, i needed some extra room as i was losing my fishroom, so i decided to build a little closet on the left side of the tank to house equipment.

007_21.jpg


008_20.jpg


painted...but still a long way to go

100_0743.jpg


100_0746.jpg


100_0747.jpg
 
Bummer you had to go with suck a smaller tank, bigger house smaller tank?? I dont understand. Anyway looks like things are commiing along great
 
it was now time to turn my attention to the hood, i needed somthing that would be able to lift on a piano hinge as my wife did not like the idea of putting hooks int he ceiling and using a electric hoist like i wanted, so this is what i came up with. the hood is built from 1" stock if i remember right and was then covered in 1/4" sanded plywood and painted with kilz and white paint just like the stand.

009_19.jpg


010_18.jpg


011_17.jpg


012_16.jpg


013_15.jpg
 
now, the fun part...my wife and i about killed ourselves trying to lift this tank onto the stand. thank god she works out and was able to help a ton.

tankonstand1.jpg


i decided to throw down some linoleum the builders were nice enought to leave me. just there to prevent little spills, if something major should happen, it wont really help.

linoleumdown.jpg


dooron.jpg


bulkheadsarein.jpg


hoodon1.jpg


hoodonangle.jpg


hoodanddooron.jpg


bothdoorson.jpg


complete.jpg
 
now for a few equipment pics...not really much to see her except some pipe, and pumps, but i know how you equipment junkies are..i still need to get some pics of my skimmer. i also purchases 2 american DJ power strips to make things a little easier.

heres the plumbing in the closet..you can see the intakes from the tanks to each closed loop pump and one of the OM 4 ways. in addition, you can see the sump how it will sit. its a tiiight fit in there.
019_9.jpg


just a close up of how is plumbed the 4 way

020_8.jpg


under the tank pump and OM 4 way

021_7.jpg


close up of under tank 4 way

022_6.jpg


thats it for now...i will begin making RO/DI water this week and hopefully will be adding about 150 pounds of either fiji LR or Pukani LR, still havent decided. but before that, i have to get my electric straight. shouldnt be too bad, i had my electrician install (3) 20 amp GFCI outlets right behind the tank during house construction....only problem i foresee is where to put an auto top off bucket...
 
Very Impressive...Great Attention to detail and super clean looking...Only question: Closet looks a bit narrow: Would you have preferred it a bit wider?
 
i preferred it ALOT wider...the original plan was for a 48x48x30 tank with a closet, but once i laid it out on the floor it got vetoed by the boss..the final dimnsion ended up being 5 feet for the tank and closet.
 
sold it all to fund the new tank and equipment...i had to sell all the old stuff and get rid of the tank as the wife didnt want hte house on the market with a huge fishtank in the basement. so, there was about a 6 month lag from taking down my old tank, to having this one to where it is.
 
yikes, that sis a long time to go without having a fish tank, sorry to hear it, but at least your new one will have all that you want , and more! BTW, congrats on the new house and baby!
 
Back
Top