The novireef: 230G first timer reef tank build

Novireef

New member
Hi,

As you notice by the post count, I'm brand new here. Well, not exactly new as I've been reading for months on end through all the great info that is available here.
Next to that we've been planning on a reeftank for quite some time... about 5 years. It has been put of for so long since some renovations were planned as well. Now that these are nearing completion, we've also started the setup of our tank. We refers to my wife and myself, we see it as a mutual project (allthough she tends to focus on the future livestock but who can blame her).

It will be a slow process, setting this up. We're doing most of the work ourselves (including welding a stand) and since there are some tasks left related to the renovations and next to that we don't have that much spare time due to our jobs, it'll be a slow but steady process.

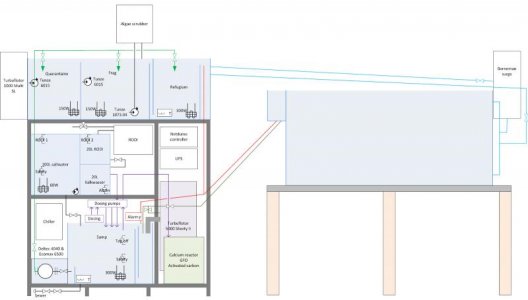
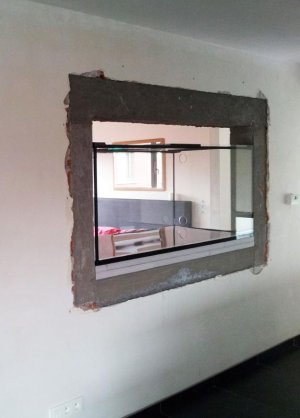
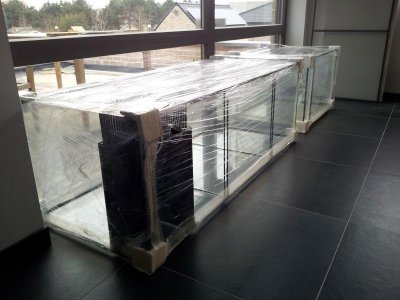
The end goal is a in-the-wall 230G MD with a gravity fed 60G sump, pretty standard there. The sump will return the water to an inline, combined QT/frag/refugium tank (split in 3 with baffles). Of course the QT section can be separated and operate on its own whenever there is something in there. The last section (the refugium) gravity drains into the MD through a Borneman surge device (which needs to be absolutely silent and bubble free, there's a challenge there).

I'm going to document the build in this thread but will elaborate on several topics in a blog which can be found here. There is also a screenshot in a first post with a drawing of the planned system.

The reason for starting this thread is a way to document the build, share it with the community and obviously be all ears for any hints or remarks that the community has in mind for these newbies :spin1:
 
A first update (a month after the first post, slow process as announced) to announce the arrival of the tanks.

In the meanwhile the stand has been finished (3 brick walls with a concrete plate cast above it) and the hole in the wall is in place (including concrete support beams as it's in a supporting wall).

I'm including a picture of the tank in place as well as a picture of the QT/frag/refugium and the sump still wrapped up.

The picture of the DT shows the drilled holes in the side which will be the outlet for the surge. The other side harbours the external overflow box. The tank is elevated somewhat with insulation (polyurethane) as we decided to put it up a bit higher than we first had in mind. Once the tank is filled the surroundings will be plastered so that only the glass without any seams remains visible.The back and sides of the DT will be covered with black acrylic inside the tank. It won't be a see through tank (it's between the living room and our bedroom...) The overflow will be drilled in the acrylic and the corners will be rounded with another piece of acrylic. These will be where the cables of the 4 Tunze 6105 come out of the tank so that they remain hidden. The end goal is to hide all and any equipment and to create an 'infinite' look to the reef through a seamless black background. We will try to shield the acrylic from light as much as possible to prevent corraline growth. I don't know if my explanation makes any sense but it'll be documented in future posts for sure :twitch:

Next action points on our list are:
  • Installing the background acrylic in the tank.
  • I've started the welding of the stand for the QT/frag/refugium which is almost done. It then needs a 3 layer coat of 2-part epoxy paint.
  • Put the sump and QT/frag/refugium in place
  • Start all the pvc plumbing

In the meanwhile we decided to go for LED's for the lighting. We had an Aquamedic Aquasunlight NG (2x250W+4x54W) ready for the tank but at a lenght of 120cm (47") it would be somewhat short for our tank and seeing the power savings on LED swayed our opinion. We sold the Aquasunlight and started looking at the Ecotech Radions. The specs of the XR30w Pro seemed very interesting to us but they come at a hefty price. So I decided to DIY XR30w 'clone' fixtures. I'm almost through the selection of the LED's. I am planning some differences as opposed to the Radions to have some more white light available without diminishing the amount of blue so we don't skimp on PAR. The drivers are known as well (all Meanwell) and the PWM controlling of all the 9 channels will be done with my DIY Netduino controller (which is still in concept phase).

Long story short: a lot of work ahead :cool:

More to come as we progress (remember, slowly ;))
 
Somehow the pictures didn't make it through it seems.
New attempt:
 

Attachments

  • 201304061226.jpg
    201304061226.jpg
    39.7 KB · Views: 6
  • 201304061231.jpg
    201304061231.jpg
    58.7 KB · Views: 10
What am I looking at in the 2nd pic?

And btw-I have 4 radion Gen2s and you won't be disappointed. Much happier than with MH.

My thread is here too, I'm no further along than you are. It's under cannons 210 build
 
What am I looking at in the 2nd pic?

It's a pic of the QT/frag/refugium tank with the sump next to it. It's still wrapped in plastic as it was delivered. The one in front is the tank that will house the QT section, frag section and refugium (separated with baffles and the QT section capable of running on it's own or running inline if no QT is needed. I hope it'll never run inline if you catch my drift. The picture is actually showing the backside of the tank with in the closest corner the overflow box with 3 holes in it. There's two in the back that will drain towards the DT and one in the bottom that will be an emergency overflow. There's a schematic of how the tanks will be setup if you go to the blog (novireef.blogspot.be).

And btw-I have 4 radion Gen2s and you won't be disappointed. Much happier than with MH.

I'm convinced that it'll be a step up from MH. Certainly regarding heat and controllability. I am going to DIY the fixtures though. Our tank dimensions are 170x75x70cm (67"x30"x28") and I'm planning on 4 fixtures of 110W of LEDs each. That seems to be similar to the 4x130W you have for a length of 84".

My thread is here too, I'm no further along than you are. It's under cannons 210 build

Looked it through and is looking nice :)
You do seem ahead, your tank has seen water ;)

Thanks for tagging along by the way, I've subscribed to your thread as well :)
 
That sounds like it's gonna be awesome, I cant wait to see the inline in action!!!

Just out of curiosity, what's your budget for your led build. I only ask because I've done the DIY build for my 90 and after doing the math recently...it wasn't but a few hundred cheaper than the radions.

That bein said, I've had my hands in 5 separate DIY led builds locally so if you need some input let me know.
photo-42.jpg
 
That sounds like it's gonna be awesome, I cant wait to see the inline in action!!!

Thanks, we are quite anxious as well. Reality does temper that anxiety effectively though. With busy jobs, 4 kids and work remaining on our renovation project, we hope to have the system up and running by the end of summer...

Just out of curiosity, what's your budget for your led build. I only ask because I've done the DIY build for my 90 and after doing the math recently...it wasn't but a few hundred cheaper than the radions.

That bein said, I've had my hands in 5 separate DIY led builds locally so if you need some input let me know.

Well, I'm still doing some research but I've decided so far on 4 fixtures with following LEDs for each:
  • 3x Cool white (Cree XM-L U2) @3000mA
  • 3x Neutral white (Cree XM-L T6) @3000mA
  • 5x Violet (Semiled C35-X) @700mA
  • 5x Royal Blue (Cree XT-E) @1500mA
  • 5x Blue (Cree XP-E M2) @1000mA
  • 2x Green (Cree XP-E G2) @1000mA
  • 1x Amber (Cree XP-E A2) @500mA
  • 1x Red (Cree XP-E R2) @700mA
  • 2x Hyper red (Philips LXM3-PD01) @700mA
Total cost at Rapidled is 667$ including shipping and 60° optics on all of the LEDs.

The drivers will be all Meanwell:
  • 2x LPF-90D (2 channels of white)
  • 2x LPF-60D (Royal Blue)
  • 1x SP-200 PS with 6x LDD-xH drivers
As you can see, I'm going to drive the 4 fixtures in series through the same driver for a channel (adding drivers for each fixture seperately seemed like overkill to me and added substantially to the total cost).

The drivers will set me back 215$

Add in 4 heat sinks, 4 ventilators, connectors and the works, ... should add another 225$ give or take.

In total I come to a cost of about 1.1k for 4x 110W with 9 PWM controllable channels (each LED type separately). A single G2 XR30w retails for 825$ over here and a pro is available for a hefty 1270$ :facepalm:

I hope I'm not overlooking something regarding DIY LED setups? If not, the savings alone would convince me but next to that it's an appealing project to me (definitely the part regarding the integration with the DIY controller I have in mind).

I would appreciate any and all remarks or hints on this plan based on your experiences with those earlier builds.
 
I hear the busy life!!! I have 3 myself and don't have many days off.

Sounds like its gonna be a wicked fixture.

I'm sure I'm missing an exchange rate or something, I just paid 650 for each of my G2s. :/

Sounds like you've got it all worked out. Are You gonna use the berquist pads to attach the LEDs or screws?
 
I'm sure I'm missing an exchange rate or something, I just paid 650 for each of my G2s. :/

I noticed. At us online stores G2s are commonly retailed for 649$ which equals to 500€. The pros I encountered for 899$ (700€). In Europe they retail the G2s for 645€ and the pro's for 990€ (both about 30% above US retail).

Sounds like you've got it all worked out. Are You gonna use the berquist pads to attach the LEDs or screws?

I'm still doubting between either screws and thermal grease or straight on thermal adhesive. The latter has less thermal resistance but is pita when a led needs to be replaced. I'm not planning on using thermal pads since their thermal resistance is the highest of the 3 options.
 
I noticed. At us online stores G2s are commonly retailed for 649$ which equals to 500€. The pros I encountered for 899$ (700€). In Europe they retail the G2s for 645€ and the pro's for 990€ (both about 30% above US retail).

That sucks! I wouldn't pay that much for the G2s either. How much you think it is to ship them from here? I'll hook ya up. :hmm5:


I'm still doubting between either screws and thermal grease or straight on thermal adhesive. The latter has less thermal resistance but is pita when a led needs to be replaced. I'm not planning on using thermal pads since their thermal resistance is the highest of the 3 options.

I went with the pads and never had a problem but I did u-channel, had I gone with heat sinks I would have used screws. Paste alone is the worst. Talk about a PITA!!!
 
That sucks! I wouldn't pay that much for the G2s either. How much you think it is to ship them from here? I'll hook ya up.

It does but on the other hand it made the decision to buy or to DIY a no-brainer. Shipping them over was something I contemplated as well but decided not to because of the potential difficulties if I ever needed to rely on warranty. Next to that, I'm unsure what and if, how many duties / taxes would apply.

I went with the pads and never had a problem but I did u-channel, had I gone with heat sinks I would have used screws. Paste alone is the worst. Talk about a PITA!!!

Yeah, I'll probably end up using screws. I'll decide when I get the heatsinks in.

I've worked a bit on the layout of the stars on each of the 4 heatsinks which will be 200x150mm (7.9"x5.9") with a thermal resistance of 0.4°C/W (about 1°F/W).
It's based on the Radion pro layout with the spectrum-completing LEDs in the center and the blue LEDs surrounding them. I've put them pretty close together now to prevent banding and maximizing the shimmer but have been doubting if I shouldn't spread them out more to disperse the heat better. Any thoughts or ideas on this layout is more than welcome.
 

Attachments

  • Star layout.jpg
    Star layout.jpg
    64.1 KB · Views: 8
I love the layout but IMHO you should ditch the NW and go with just CW. Also, 3 REDS are too many, I'd drop one and add another CW. Other than that, I think your color will be very nice.
 
I love the layout but IMHO you should ditch the NW and go with just CW. Also, 3 REDS are too many, I'd drop one and add another CW. Other than that, I think your color will be very nice.

I've been contemplating the NW because of the kinda blue hue you get with Radions at full power blue. The whites don't quite complement the blues to a daylight white but rather a 14Kish look (played around a bit with a demo Radion pro fixture in a LFS). We would really like to have a natural daylight look to the tank (10Kish I guess) and were hoping to achieve that with adding the NW.

If it doesn't work out, we still have more CW power than the Radion pro's and we have the NW in addition. I imagined to end up with a combination of CW and NW at some percentage with the blues high up to maximize PAR while still achieving that natural daylight look.

Regarding the reds, I added the two types to also have the option regarding bandwith but also as a gimmick to look at the night life without sending all pods and other critters scurrying about (I've read that they don't see the red light).

What do you think?
 
Last edited:
I agree with the mentality of getting a natural look with the NW but to be perfectly honest...they don't look natural, they look like crap! You should easily be able to achieve a 10k look with CW.

As for the REDs, I'm not sayin take em out, I like the REDs....BUT...they are CRAZY powerful so I was just sayin you don't need 3, 2 is plenty.

I've read the same thing about critters not seein red, I haven't tried it out with my Radions yet.

Bottom line is that it's personal preference and because you're doing DIY, if you don't like the color...CHANGE out 4 leds for 20 bucks. :thumbsup:
 
I agree with the mentality of getting a natural look with the NW but to be perfectly honest...they don't look natural, they look like crap! You should easily be able to achieve a 10k look with CW.

I agree, it's a fine line between the 'yellow' look and the 'blue' look to a tank. We think both look crap and want that exact line :) Experimenting with the Radion pro's on the tank in the LFS, I wasn't able to get the 'right' look (to us) with the blue's full on. Since it's those that provide the most PAR, I would like to be able to have them full on and still hit the mark exactly between 'yellow' and 'blue'. Truth is though, we'll probably never have them full on if we don't want any corral to end up with 'sunburn' ;)

As for the REDs, I'm not sayin take em out, I like the REDs....BUT...they are CRAZY powerful so I was just sayin you don't need 3, 2 is plenty.

I've read the same thing about critters not seein red, I haven't tried it out with my Radions yet.

Bottom line is that it's personal preference and because you're doing DIY, if you don't like the color...CHANGE out 4 leds for 20 bucks. :thumbsup:

Hmm, you made me think there. I actually started out with the two hyper reds mimicing the Radion pro's and added the third 'normal' red afterwards to further cover a full spectrum. TBH, I ordered the LEDs yesterday so I'll have them laying around. I think I'm going to start out with one red and one hyper red and see if it lights the tank up enough for critter spotting. The spare hyper red (at 660nm) will come in handy for the planned algae scrubber. If one hyper red is satisfactory, I can leave it at that or toss another LED in on any of the channels. Both the white channels are at their maximum though, the driver is at maximum capacity with the 12 XM-L (3 on 4 fixtures). But if needed an additional driver can be added or I can even create an extra white channel. I have 2 more channels available on the 12x PWM board I plan to hook up to the Netduino controller, one channel is needed for the surge device (consider that a teaser with more to come later) :cool:
 
Small progress update. I've finished welding the stand for the sump and QT/frag/refugium and applied the first two primer coats of 2-part epoxy paint. Hence it's white now but will be black with the two coats of finish on it. The whole stand is sealed in epoxy so I hope that I won't have any corrosion issues. The only exposed areas are the weld nuts on the bottom that provide the threads for the feet. The holes on the side that are visible on the picture are in the meanwhile stuffed and covered in epoxy as well.

Netduino? That's pretty awesome in itself...intimidating to me, I'm an apex guy.

Creating a controller DIY is another of those projects that seem like fun to do. I create software for a living (in .Net) hence the Netduino (which is programmed in .Net) was an obvious choice regarding the platform. The electronics of it all is more challenging for me but as I'm leaning towards mostly pre assembled extension boards to create the controller, I think I'll be able to manage... I hope... ;)

The only drawback to all that DIY is the time that sinks into each of those projects. Nevertheless, as fun as it will be to have an up and running (and hopefully running smoothly), the whole experience of planning it out and executing most of it ourselves is as much fun :)
 

Attachments

  • 2013-04-14-19.12.37.jpg
    2013-04-14-19.12.37.jpg
    65.5 KB · Views: 7
good luck on the build cant wait to see the progress!

Thanks. We aim for slow but steady progress :)

Coming along. I'm curious to see how you're gonna use that rack.

The attached picture should satisfy curiosity :) The rack is the gray support for all the equipment including sump and the QT/frag/refugium.

Once the rack is ready we'll start the plumbing. That reminds me, I need to order some more parts asap ;)
 

Attachments

  • Plan aquarium.jpg
    Plan aquarium.jpg
    32.7 KB · Views: 6
Last edited:
Back
Top