200 Gallon in-wall project

Hotpuppy

In Memoriam
Hi,
I've been lurking for a while and decided to share information about my project build.

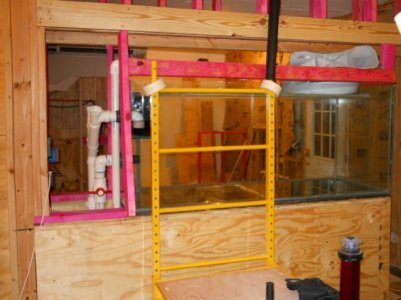
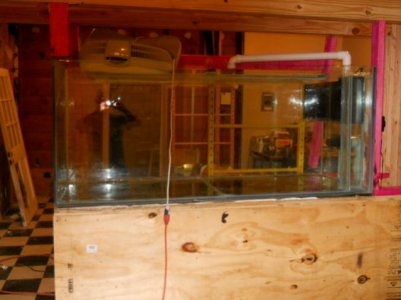
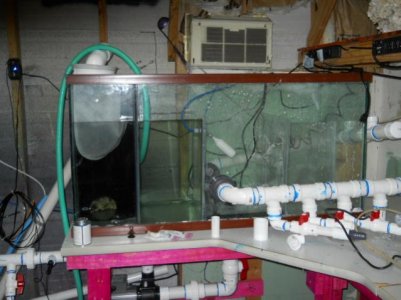
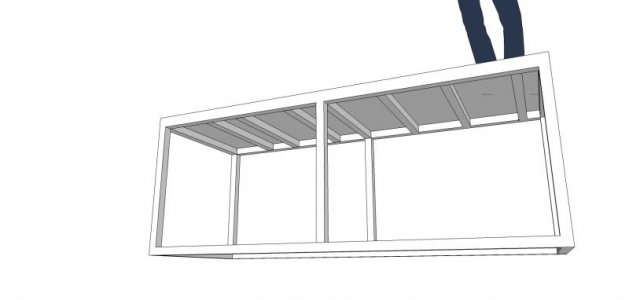
I'm installing a 200 gallon in-wall tank as a room divider in a master suite. As I go along I will share my thrills and chills. I also want to share some of my DIY stuff in hopes of encouraging others to do the same.

This is my second reef tank, and it's been about 12 years since the last one. The last one was a 135 gallon show tank.

The new tank (to me) is a used custom all-glass tank sourced via Craigslist. It is 72" long, 25" wide and 30" deep with an approximate water depth of 24". It's made of 1/2" non-tempered glass with a 1/2" plywood bottom backer.

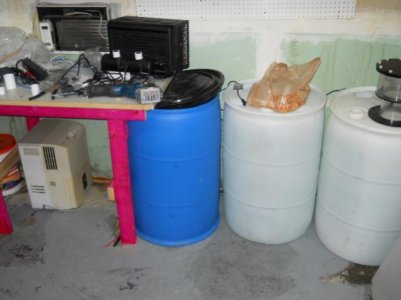
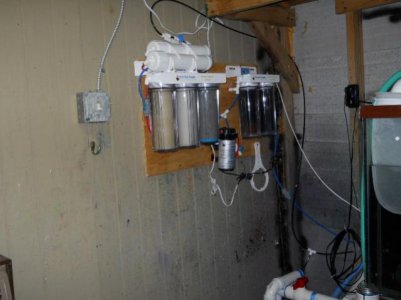
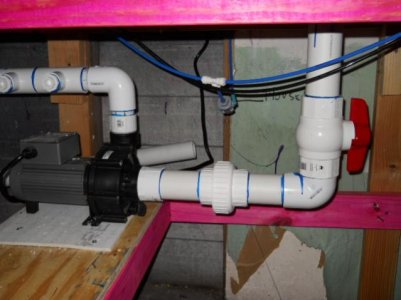
As I'm on a budget I try to renovate and innovate wherever possible, while still installing a nice system.

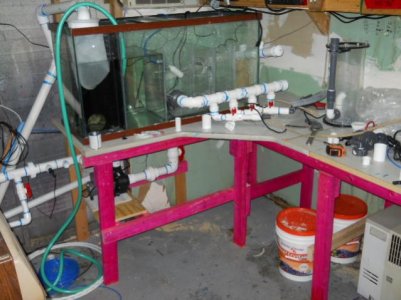
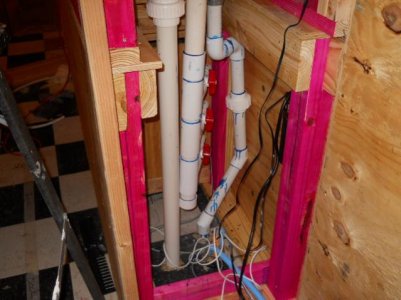
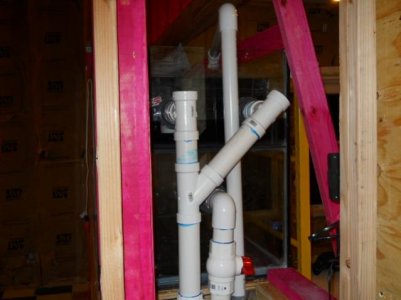
Here is some HD video I shot when I drilled the return holes in the tank. The tank does not have an overflow so I am building one. I've chosen to locate the holes on the side of the tank because - A) the end glass is less complicated to replace then the bottom in the event it breaks, B) In the event that my overflow fails I will not lose all of my water., C) it conserves tank space for animals.

http://www.youtube.com/watch?v=r9x9vV2cXRY
 
Well, I did a 75% FW test today..... very minor drip in one corner... so time to drain and reseal that corner. As an update I opted to reseal the tank.

The stand is sturdy, but I have concerns about it's levelness..... the warp did not come out of the plywood as expected... so the plywood on the bottom of the tank had some minor gaps with the top of the stand.

I think I'm going to shim it level and then raise the tank and lay a nice bed of polyurethane between the two. Probably with a sheet of plastic between the tank and the polyurethane. I don't want to bond the tank to the stand.... as tempting as it is. What the poly will do is squish out and then turn into a very hard surface A blob every 3 inches should be more than sufficient to support the tank.

A regular tank is edge supported, but this is a custom tank with a solid plywood bottom.... I'm assuming it needs to full bottom support... any comments or feedback?
 
After some thinking (which can be dangerous and expensive).... I concluded that the tank is bonded to the 3/4" plywood that is attached to it... and thus is dimensionally stable..... so bonding the 3/4" plywood of the stand to the plywood of the tank simply means I'll have to pry it out... but that it will be supported.... so I'm going to join the two pieces of plywood after leveling it....

My thinking is that if I crack the tank it is not going to make a difference... if I have to pry the plywood loose. However, if I don't support the plywood I'm much more likely to crack the tank... vicious circle eh?

I have 3 concerns that a polyurethane bed will address:
1- The base is not level to my satisfaction (3/8" over 6 feet and 1/4" side to side)
2- The plywood on the base has some bow in it that did not come out when I filled the tank 3/4 of the way. Closer inspection shows that the polyurethane under the base plywood is the culprit.
3 - There is a hairline gap under the center of the tank and a 1/4" gap around the edges... i.e. uneven support, which I don't like.

Polyurethane (Premium PL by Loctite to be specific) will go in soft, fill the gap and harden like a rock while providing a bond between the plywod on the tank and the plywood on the stand.

One drawback is that when the house shifts I could have issues... however, the stand isn't likely to warp... it's got triple diaphram bracing from front to back (3/4" plywood) and double bracing along the X axis (6 feet) in the form of 3/4" plywood. In addition there are numerous 2x6 and 2x4 members which were intended to create a very stiff foundation for the tank.

I suspect the problem is not critical or I would have a broken tank by now.... I filled it to 75% (145 gallons) of it's theoretical 200 gallon capacity. That should have put substantial stress on the system. Anyhow, the fewer stressors the better.

I have two areas that have a seep... not good, but easy enough to fix. drain, dry, scrape, silicone and wait. Better now than later.

In other news, I acquired a 90 gallon tank that I am using as a sump. I resealed it today and began dividing it for a sump. The refugium will be a separate tank from the sump. I'm going to use a food grade plastic 55 gallon drum and simply cut it in half. That will yield a 35 gallon sump. I'm debating putting it outside for lighting purposes.

I'm planning to convert my Precision Marine skimmer to a airstone driven one.... if that doesn't work it will leave via ebay and be replaced by a DBIY (Design Build It Yourself) counter-flow airstone skimmer. Limewood aka Basswood is very easy to get locally and compressed air is cheaper than lots of water volume. The venturi in the PM skimmer is crazy... I took it apart today to investigate putting an airstone in it's place. 500 gallons/hour through 4 holes about 3/16" ... no wonder it presents 20 feet of head to the pump. What an expensive way to make bubbles! (190 watts/hr) Comes out to $16.50/mo for the skimmer.... vs using a submersible pump at 150 gph @ 10 Watts which costs 86 cents a month to power. Eheim pumps are around 10 watts.

I'm debating the need for a closed loop.... currently planning 1500 gph for the sump and filter loop with only a fraction of that diverting to the skimmer, rock rubble, chiller, heaters, etc etc.... roughly 7x turnover which is not enough for a reef.

My design goal is to emulate two small coral heads that might be found in Cozumel Mexico. I've always loved that place when diving. I originally was going to use power heads to create some surge, but I'm thinking that laminar flow might be a better idea overall and then use pump cycling and power heads to create surge.

I will be managing the tank with a ReefKeeper Elite, so I was planning to utilize it's wavemaking capability along with it's moon/light control functions. It will also manage the heaters and chillers. I want to allow some flux in my water temps..... target is 81 degrees, but I'll tolerate 79 to 83. Below or above that will invoke a heat or chiller. The goal is to facilitate some water temp fluctuation as this is a normal part of the marine ecosystem. I may tighten that down the road.

I'm also heavily considering installing 2 sun dome type skylights. Home Depot has them for $150/ea and it will allow the sun to boost my light while using my LED's as supplementary. I am installing 2 EcoXotic 100W LED Pendants with the dimming ballasts and the ALC from the ReefKeeper. That will allow me to dim my LEDs. I'd love to incorporate some sort of light sensor to brighten them when the weather is crappy and dim the LEDs when it's ultra sunny. Heck WalMart has them.... but that's a tinker with it down the road problem. For right now, the idea of supplementing my tank with 600 to 900watts (2 to 3 units) of sunlight is very tempting. I have to believe that the more I can provide a natural environment, the easier it is going to be....

On that note, I'm planning to accomodate a DSB of approximately 6 inches deep. It is in a 15 gallon section of the sump and will hold roughly 6 gallons of sand. The idea is that by having 10 inches of laminar flow across the DSB it will more closely mimic a natural environment.

The sump design basically treats the skimmer as a secondary process. This still facilitates the appropriate tank turn of about 2x/day through the skimmer. However, the design drops the water through a filter sock, then forces it up through a rubble bed, across a DSB and into the return. The return houses many pumps including the refugium, chiller, skimmer, and return pump. The heaters will be in either the DSB section or the return section. I'm very likely going to drill the bottom of the return section to facilitate the return pickup... it ensures that it's never out of prime.

I have not yet figured out where I'm going to put my make up water tap..... that's TBD, but probably in the DSB section as it should be more stable. I may have to fabricate a break for it to ensure it isn't buffeted by water flow.

Anyway, it's alot of info.. but I like to slightly over-engineer my systems and it serves me well.
 
Well, a short update..... I have the plumbing to and from the sump connected. I'm battling a corner seep. Retested it today. Had great flow with a Reeflo Dart/Snapper Hybrid running in Dart mode.

Drained the tank and preparing to do something different.

I've twice used silicone. Last time I filled some of it with a underwater rated drinking water safe epoxy. Still had a seepage. I noticed an oily residue when I removed the silicone. I'm thinking this is from the epoxy. Grrr.

I used Acetone this time to remove the residue. I then abraded the surface with 220 grit sandpaper and then sealed the corner with a thin film of fast cure 5200 polyurethane.
 
Had to run earlier, but wanted to add that polyurethanes are chemically inert once they complete reacting. I researched the ingredients and have concluded that it will be safe for my application. I'm using a very small amount and plan to overlay it with silicone.

There are some nasty ingredients in 4200 and 5200 but they are used to complete the chemical reaction that forms polyurethanes. The key is that it only cures to a depth of 1/8" so it's important to make it thin to get complete curing.
 
Well, I'm still fighting a seep in one corner. Failed a water test today. Even tried food coloring and at one point put on a wet suit and grabbed my mask and snorkel and got in the tank looking for the problem. Spent 45 minutes in there and couldn't find it.
 
With the help of a friend and some food coloring we found the seep. We applied the food coloring in the suspect corner while the tank was drained. Sure enough it wicked in.

I made the very difficult decision to strip the tank and reseal it. Thanks in large part to these forums I discovered that Silicone 1 is NOT suitable for aquarium use. I picked up several tubes of RTV 108 (GE / Momentive). It was $10.55/tube at Grainger and they had it in stock.

The theory was that sooner or later I would have seal problems as the tank is in the vicinity of 200 to 220 gallons. I don't need stray salt water in my bedroom!

The silicone 1 was not adhered as thoroughly as the previous sealant. It came out very easily. It was applied with a razor cleaned surface and Denatured Alcohol for surface prep.

The RTV 108 was applied to a razor cleaned surface that was prepped with Acetone. I consider Acetone to be a better degreaser for adhesive work. As a courtesy reminder, always work with plenty of paper towels and plenty of ventilation in the form of fans.

RTV108 applies totally different, skins faster and looks like typical aquarium sealant. Whereas Silicone 1 looks like.... well ....caulk.

I believe Silicone 1 is fine for small tanks. It's what sealed my 90 gallon sump... and it's holding the plexiglass partitions in place just fine in there. I don't think it's an ideal aquarium sealer.

I also resealed a 55 gallon tank this evening. I picked it up for $30 and plan to use it as a refugium. Two 1" bulkheads are en-route. They will serve as entry and exit points.

I've got some very nice "Pukani" rock from BRS. I started looking through "Dream Reefs" (or some similar named book) for ideas on aquascaping. I plan on making some aragrocrete as well to supplement the Pukani. It fits in my budget, or what's left of my budget. I'll be using the Aragocrete as a rubble rock for the sump and perhaps some fill in pieces in the display tank. I like that it's responsible and economical. Oh and it's pest free... lol. I plan to use some Hydraulic cement to help set my Pukani rock. It's sometimes called Thorite, but commonly sold as Quikrete Hydraulic Water Stop cement. It's a hyper-setting concrete - sets in 5 minutes. 20# for $11.50ish.... way cheaper than "LF$ Epoxy". It's available in soothing grey. :)

I hate to be cynical about LFS... but really even in Houston I'm skeptical. One was completely clueless about proper lighting and LED lights.... the other had 2 specimens with ICK in one of their tanks. When this was pointed out they shrugged and didn't seem to care that 20 other tanks were on the same water.... same LF$ store had signs everywhere warning that "it's yours when you walk out the door." All they needed was another sign offering free ICK with saltwater purchase. Really irresponsible and dooms the average aquarist.

5 points for isolation tanks.... which is high on my list as soon as I get the main system up and stabilized.
 
And, because I know how fun pictures are... here are a bunch of pictures.

The tank is a peninsula/wall tank. I have also included some pics of the sump and fish-room.

Pic 1: Tank as seen from bedroom. Note temporary mount for ReefKeeper to left of tank. No access is intended from this side.
pic 2: Bathroom side. Tank maintenance will be done from this side.
Pic 3: Right side of fishroom. Blue is salt make up, middle is fresh RODI, right is "wastewater" to be recycled for irrigation.
Pic 4 is left side of fish room including sump
Pic 5 is a closer pic of the sump. I'm using an external manifold with individual valves. I anticipate having a cooling issue most of the year so I want to keep my larger pumps out of the water. I'm primarily using Eheim pumps as they are reliable and efficient.

I'll point a few other tidbits out.
1) I'm using rolls of tape on the scaffold to prevent any accidental glass/metal contact.
2) The fan in the tank is to keep air circulation. I have the AC set to dehumidify in this room.
 

Attachments

  • DSCN0007.jpg
    DSCN0007.jpg
    44.7 KB · Views: 4
  • DSCN0006.jpg
    DSCN0006.jpg
    36.5 KB · Views: 4
  • DSCN0013.jpg
    DSCN0013.jpg
    32.3 KB · Views: 3
  • DSCN0014.jpg
    DSCN0014.jpg
    49.2 KB · Views: 4
  • DSCN0011.jpg
    DSCN0011.jpg
    45.2 KB · Views: 3
Last edited:
Here are a few more pics of the plumbing:
150 gallon a day RODI
Return Pump (ReefFlo Dart/Snapper Hybrid, runs in Dart mode, draws 1.1A @120V) - Note the 1/2" ports in the return line for probes.
On the side of the tank where the closed loop will be (center pipe/manifold) and the return and supply plumbing
Last pic is the upper plumbing that connects to the overflow. Because the design spec is very close to the capacity of a 2" pipe I chose to double them up. This gives me some backup if something jams one pipe.

The preliminary water test was good but it's going to require some tuning to be gargle proof. I'm planning on incorporating ideas from a variety of designs.
 

Attachments

  • DSCN0015.jpg
    DSCN0015.jpg
    34.3 KB · Views: 3
  • DSCN0010.jpg
    DSCN0010.jpg
    38.6 KB · Views: 3
  • DSCN0005.jpg
    DSCN0005.jpg
    44.8 KB · Views: 4
  • DSCN0004.jpg
    DSCN0004.jpg
    34 KB · Views: 3
Last edited:
Well, today brought some success. The system now appears to hold water! I think it's a combination of using RTV 108 and having found a suspect area in the previous seal job.

I'm currently "wet testing" my system to see if there are noises or things I don't like. If it works for a day or so I will drain out as much water as possible and begin to fill it with RODI water.

I've debated adding NSW as the Gulf of Mexico isn't that far away and it will deliver a wealth of "little things" if I add even as much as one 55 gallon barrel of NSW. I plan to obtain my "muck" from the gulf as well.
 
Well, square one is where I'm still at..... I've been plagued by seepage on one side of the tank... so I went to Harbor Freight and bought some suction cups and took the tank apart. I plan to re-assemble it tomorrow.

One odd thing is that the tank has a split bottom, two pieces of glass. I'm going to replace one of them because it has a chip in the corner. I'm going to drill the other piece and move some plumbing to under the tank. Anyone have any thoughts on split bottom tanks? I can't find much on them and the seam wasn't a leak source, but it doesn't exactly make me comfortable either....
 
Big changes

Big changes

I took the tank apart last night. I've decided to re-cycle the tank as a frag tank. I pulled the glass apart and will put it in storage.

I am going to DIY an acrylic tank, and of course size matters, so it will get bigger.

I went and purchased some scrap 1/4" plastic to play with. I'm building a small box to test out my fabrication techniques. 8 inch square with 6 inch sides.

Tentatively, the design is for a Acrylic tank, approximately 94" long, 36" deep and 30" high with a target water level of about 28". I anticipate using 3/4" for the sides and 1/2" for the top and bottom.

I'm leaning towards a steel stand with 3/4" plywood top and a 1/2" piece of foam between the tank and plywood.

Design volume is somewhere in the vicinity of 420 gallons and is based on the available space and material costs. Basically, when I start buying 3/4" sheets I can build a tank of about this size. The height is what gets me. If I wanted a 24 inch deep tank I can drop to 1/2" and shave costs... but I really like the look of a 29" tank and the glass I currently have is that deep.

The glass tank could have been repaired, a new bottom from glass cages was about $150 delivered. However, it's a compromise. I found some questionable plywood under this tank and by the time I've replaced the plywood, glass, and resealed it.... I'm still back at trying to clean the glass and praying it doesn't work.... meanwhile it's a compromise on size.

The primary reason to DIY is a) because I can, b) to get exactly my way, and c) because I have the time and money to work on it.

Glass vs. Acrylic has been debated to nauseum, but I think acrylic will work better. It's lighter which gives me more weight dedicated to water. It will tolerate the realities of a wooden house better than a glass tank.

I did spend some time analyzing the load and floor structure and determined that the floor is overbuilt (which was how I designed it 5 years ago) and that while it should handle it just fine, I'll add a supplemental pier under the end of the tank. I calculated that the point load that the tank exhibits is 176 lb/sf for the tank and water, excluding rock, fish, farts, stands, worms, powerheads, etc. However, the tank has a clear area around it of approximately 3 feet which means I can look at the clear area as part of the foot print. So my load for the area that includes the tank is 30.67 lb/sf which leaves me a reasonable margin. The span in question is 2x8 Southern Yellow pine, 12 " OC, 10 foot span (really about 9.4 feet) Due to the way the building is layed out a foundation beam runs under one end of the tank. The tank runs parallell to the joists and should span approximately 4 of them. sub-floor is 3/4" T&G screwed and glued. While the floor is probably fine with a 2 ton load, I'm going to reinforce it with a supplemental pier under the tank. This will provide a margin of error.
 
I got around to playing with sketchup.... here is the rough idea for a steel aquarium stand. I'm going to build it from 2" square tubing, .125" thickness (1/8" wall). Mainly 1/8 because thin metal is a PITA to weld for me.... I find GMAW and SMAW (MIG and Stick) to be easier processes to use...... I have a bottle of gas so I'll try to do it as MIG and if my little mig welder gives me grief I'll drag out my stick machine..... anything thinner would be really hard for me to weld with stick....

The basic concept is 3/4" plywood on the top of the stand and cross members distributed approximately every 12" or evenly. I plan to fabricate some shear bracing as well. Couldn't figure out how to draw it in sketchup. I considered leveling feet, as that is a nice option, but it will take me some time to make them and then I'm concerned about the point load. If need be I can jack one side of the stand and shim it. I just don't anticipate the house moving that much. This section is almost 6 years old and has been pretty stable.
 

Attachments

  • aquarium stand.jpg
    aquarium stand.jpg
    20.2 KB · Views: 5
Nothing like a new day to revise your tank design... lol. Bought the acrylic locally today though, so it's narrowing.

Checked the price of glass with GlassCages... they were very reasonable but, I think acrylic is the better option for me.

Still working through my test "tank", 1/4" acrylic, 8" square, 6" walls. It's really intended to be a box that floats and lets you look down. In the meanwhile it's helping me tweak my fabrication processes. I'm testing WO4, WO3 and WO16 along with various finishing processes and methods.

Target tank specs will be 96L,36W, 23H. 1/2" Acrylic top, bottom, sides, 3/4" front and back. Acrylicast GP for front/back, Plexi G for the rest. I may create an external sump on the end.

I wanted to push 24" for the height, but I just can't be sure of getting a perfect cut, so I'm allowing 2" of scrap in my 3/4" panel. That essentially lets me cut it in half with the circular saw and then run it through the table saw for sizing.

I have a piece of 48x96x3/4, 48x96x1/2, and a 75x100x1/2. The 75x100 will yield the top and bottom and saved me some money. The 48x96x1/2 will yield the sides and have plenty leftover for a sump (1/2 sheet ought to do it). It also should yield some test pieces and gives me a little extra in case something doesn't go right.

I had planned to build a steel stand, but I think I'm just going to do wood again and overbuild it with 1.25" plywood for the top. :)
 
Well, I got the sides cut tonight and the first joint is curing. Tank volume will be roughly 315 gallons. Size is 96x36x23 with a design depth of 22 inches.

I will post pictures tomorrow. I'm not thrilled with the first joint, but it will hold water and besides it's the rear corner of the tank. I hope to have the sides together tomorrow. Thursday the top and bottom sheet will come in and I'll be able to get those cut down and glued on. :)

Perhaps by next Monday I'll be ready for a water test. I'm going to give it a few days to cure before I water test it.
 
Here are some fabrication pictures......

First up - I am using a Diablo 40 tooth blade to make my rough cuts. I was really pleased with the cut quality of the blade.


Second - some shots of my saw guide. I opted to use clamps and available materials to form a straight edge. Again, I was very pleased by the results. I wound up using 3 materials:
- various clamps
- blocking as needed
- Shelf hardware. The first cross cut used a shelf track. The only requirement here is that it needs to resist lateral bending and be straight.
DSCN0017.JPG

DSCN0018.JPG

DSCN0019.JPG


To locate the cut position I used these steps:
1- Mark where I want the cut to be at both sides of the cut. (a line between two points is usually straight)
2- Measure the distance from the edge of the saw to the edge of the blade, including the blade in the cut. I chose to put my fence on the right.
3- Carefully mark the fence position relative to the cut position.
4- Install the fence.
5- Check it twice before cutting, including walking away between checks!!!! This material is $310 and $500 a sheet, so yes, you can walk away for a minute.... trust me it's cheaper.
6- Slowly and carefully make your cut. Pay attention to saw position to avoid wander. If you must take your eyes off the saw, stop it. Then carefully restart.

Closeup of the saw blade:
DSCN0020.JPG


Closeup of the cut... the face going down is the factory edge, the face going away is the fresh cut.... Not bad......
DSCN0021.JPG


Be sure to mark your panel
DSCN0022.JPG


I like to mark where the factory edge is.... so I don't lose it's location.
DSCN0023.JPG

DSCN0025.JPG

I also like to mark my cut as "rough" or "shop" once it's finished. That way I know where I need to inspect closely.
 
Last edited:
Here are some shots of the front and back panels being cut.... this is 3/4 material, the rest of the tank is 1/2".

DSCN0025.JPG

I'm using angle iron as a straight edge. It's approximately 2x2x1/8 or 3/16 angle. It's sturdy stuff for a rough cut. I probably could have used this is as a finish cut, but I calculated a inch of waste in.... and it turns out that was a good idea.
DSCN0026.JPG


Closeup of the clamping
DSCN0027.JPG


Here you can see my markup - where I want the cut and if you look to the left you can see my mark for the fence.
DSCN0028.JPG


Just to remind folks, the items at the top should ALWAYS be accompanied by the items at the bottom.... use hearing and eye protection with your saw and fence. The ear muffs were $4 at Harbor Freight. The glasses are a wrap around "comfort style" that were $8. I actually really like them, which is a first for safety glasses.
DSCN0029.JPG


Here is why it's important to:
- Plan for waste with rough cuts
- Keep your eye on the saw! I looked up to mess with the cord.
- Material is cheaper then fingers... so in the end I'd rather mess up a panel than me!
- This edge will go to the top of the tank.
DSCN0030.JPG


I wound up being able to machine most of this out.... as my rough cut was slightly oversize. Had I tried to make my rough cut my final cut I would have had issues. However, my rough cut was 24" and my finish size was 23.5.
DSCN0031.JPG

DSCN0032.JPG
 
Back
Top