You are using an out of date browser. It may not display this or other websites correctly.
You should upgrade or use an alternative browser.
You should upgrade or use an alternative browser.
36x18" 40B Stand Build
- Thread starter mdenigris
- Start date
mdenigris
New member
No sump. Here's the plumbing plan.. I've since decided on changing the 60 cube to a 40B because the dimensions of the 60 cube felt a little cramped for me (I think the inhabitants will be happer with a longer swimming lane).
That grand scheme was discussed in another thread here: http://reefcentral.com/forums/showthread.php?t=2146199
But you make a good point. I'll be sure to only use pocket screws for the top center cross support, this way I ever did want to use this stand with a sump, I can unscrew the support and drop it in.
muttley000
MTS Sufferer!
Looks good and as said above will be plenty strong!
I never thought about using only 3/4" plywood, makes sense now that i look at it though. I guess just living in Southern California, having 2x4's is a little easier to wrap my mind around with potential earthquakes. but still there is no guarantee, beautiful craftsmanship and i love the shop, tons of room!
mdenigris
New member
Thanks Joe.
I think I'm going to order pre-built doors for this project. While I may be able to build them myself, I'm not sure I could replicate the workmanship of machine made doors on my first attempt.
http://www.patriotcabinet.com/kitch...ed-panel/manhattan/manhattan-white-birch.html
I think I'm going to order pre-built doors for this project. While I may be able to build them myself, I'm not sure I could replicate the workmanship of machine made doors on my first attempt.
http://www.patriotcabinet.com/kitch...ed-panel/manhattan/manhattan-white-birch.html
reefermad619
New member
That price per a sq. ft. Seems a little high. With that price my doors for my stand, 21"W x 30"H, would have run $190/door. Damn! This place had nice doors and was cheaper than any other place I found. http://stores.ebay.com/DOORSANDPULLS
I still ended up making my doors anyway. I had a bunch of scrap wood laying around and wanted to use it.
I still ended up making my doors anyway. I had a bunch of scrap wood laying around and wanted to use it.
MentalNote
New member
I made my stand doors. It was my 2nd attempt at doors, both were successful. It can be frustrating, but i'm proud of my work now and I saved money.
If you decide to make your own you have a lot of options. One is to use pocket holes. Here is a great tutorial outlining another: http://lumberjocks.com/kolwdwrkr/blog/12589.
Do you plan on staining the cabinet? How are you sealing it?
Good luck.
If you decide to make your own you have a lot of options. One is to use pocket holes. Here is a great tutorial outlining another: http://lumberjocks.com/kolwdwrkr/blog/12589.
Do you plan on staining the cabinet? How are you sealing it?
Good luck.
mdenigris
New member
I'm planing on staining with Minwax White Wash Pickling Stain and Polyurethane. Maybe I should use some kind of sealant and white paint inside? What's the prevailing wisdom on this?
I set the inside shelf about 1" below the openings to contain minor spills.
Oh, and I've decided to build the doors...let's just go ahead and call the woodworking a meta hobby at this point.
I set the inside shelf about 1" below the openings to contain minor spills.
Oh, and I've decided to build the doors...let's just go ahead and call the woodworking a meta hobby at this point.
Last edited:
Here's a stand I've been making the past few days for my daughter's 40B. For piece of mind, I don't think you can overbuild, especially if the piece is going to be furniture grade. This tank will have a matching 20" high canopy. I'm also building an identacle stand and canopy for my second 60x30x30. Build it right and it will last for many years to come.
Attachments
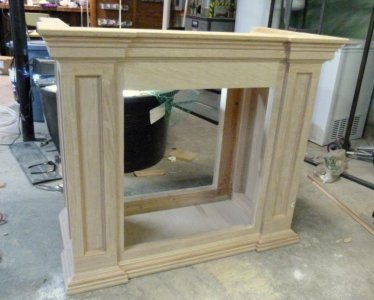
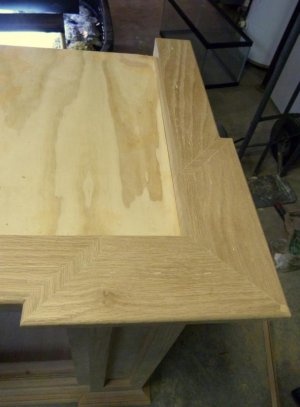
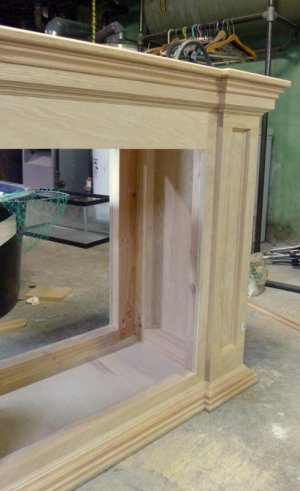
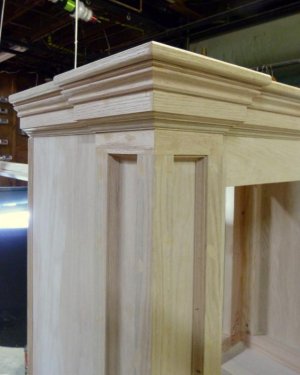
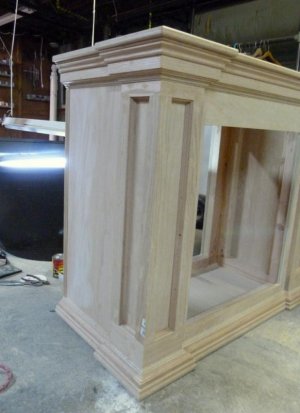
Sure, I'll post some more pics late today. Basically, I built the frame from 2x material, them skinned it in 3/4" ply. I then made a face frame from 3/4" oak ply and attached 4 smaller face frames on the corners made from 3/4" oak, which starts to give you the corner bumpouts. On the inside of the corner bumpouts, I made cove mouldings from oak. I then just began making different moildings and attaching them around the top and bottom of the stand to build up the crown and base profiles. I capped the top of the stand/crown with 3" oak, which I used a roundover bit on the outside, and followed the profile of the crown all the way around. The main thing is being square on the actual frame build, then being accurate on all of the moulding cuts as you build it up. If you're not, every mistake will be mirrored on the next step. I'll post pics to give you a better idea of what was done.
mdenigris
New member
More progress this weekend.
Installed a skirt to conceal the bottom rim of the tank.

Trimed the skirt

Finish trim

I floated the shoe 1/4" off the bottom for shim clearance and to make sure the plywood is supporting the weight. It also makes the stand look like it's floating above the floor.

Installed a skirt to conceal the bottom rim of the tank.
Trimed the skirt
Finish trim
I floated the shoe 1/4" off the bottom for shim clearance and to make sure the plywood is supporting the weight. It also makes the stand look like it's floating above the floor.
muttley000
MTS Sufferer!
Great job on both stands! I think they both came out great!
pryorrods, I'm sure that would hold up a tank 5 times the size you are putting there!
pryorrods, I'm sure that would hold up a tank 5 times the size you are putting there!
Triggerfish
Active member
looking good..any progress on the doors?
Similar threads
- Replies
- 6
- Views
- 3K
- Replies
- 33
- Views
- 7K