I'm seeing if there is interest in 3d printing a venturi valve I designed years ago that is way better than the regular ones found today.
I thought id start a new thread to make this less pump specific.
Originals:
http://www.reefcentral.com/forums/showthread.php?t=1874829
http://www.reefcentral.com/forums/showthread.php?s=&postid=13591049

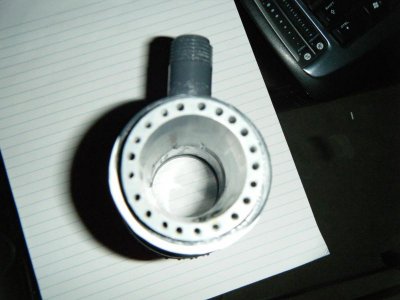
Back when I first built this valve it was a pain to build. And I could only do it by hand for a large valve. which in this case is 1.5 inches wide.
I've been in the hobby since 1985 and probably built 20 performance skimmers in the days when the store ones were crap. I stopped development in 2006 with this as it was way more than I needed. and I'm not a machinist.
But with 3D printers I bet one of you might easily be able to duplicate this and scale it down for another pump. Which coupled with the new DC variable pumps should make this valve very usefull for high capacity skimmers.
Probably around 2015 when I was tuning my skimmer I hit a sweet spot and the output of the valve was so high that it overloaded the skimmer water outlet which was only 1.5 inches. There was a massive air water mixture in the skimmer. Its a BIG skimmer. Beer fridge size. The sound of the reeflo orca pump changed and I'm not kidding but it was akin to a turbo kicking in. But being an AC pump this spot of air mix to input water volume was very hard to find. The next step would have been to re-build the skimmer so it was recirculating with this valve, so I could separate water input.
But I left the hobby soon after due to catastrophic tank failure.
I'm scaling back up now and should be reefkeeping again in a few months. I got covid bored and my kids are now grown. If any of you have a prusa 3d printer out there give it a go. I actually bought an early robo 3d for this that never worked well. And although I rebuilt the print head this past chistmass its still too crappy to spend time developing this venturi . In my case its a new prusa printer or 3 new radions so my 3d aspirations are a while off.
For those of you not familiar with physics principles, putting a venturi on the suck side of the pump is actually a stupid idea. Venturi's really do much better on the pressure side. And the idea for this valve came out of early discussions on this forum around this fact , when needle wheel skimmers started out as foam pads zip tied to pump vanes on this forum.
This venturi I built opened up the throat and there is no venturi.
Instead I re-established the intake water volume, ( like 3 times what was constricted) and that water when it hits the center of the pump vane (or needlewheel in this case) quickly accelerates 90 degrees and washes past all those little holes, which through the miracle of Bernouili cases air to be sucked in after the fact. But in this case the density of water entering the pimp is untouched allowing the pump vane to really get a bite into the water and air only gets mixed a spit second later after the water is accelerated.
As I said in the earlier post when I added a pond pump that others were using to overcome the poor stock venturi performance, pumping air into this new valve did nothing but interfere with the performance.
I was too busty raising kids after I built this thing to do any real performance studies. I can say that the valve ran flawlessly for 12 years. I didn;t even need to clean it. Now writing this I am wondering if the way this valve works I even needed that pinwheel or that it might work better with a regular pressure pump vane. It will be still months before i can try that.
So for any reefers out there with a decent 3d printer and serious 3d cad skills please give it a go.
I thought id start a new thread to make this less pump specific.
Originals:
http://www.reefcentral.com/forums/showthread.php?t=1874829
http://www.reefcentral.com/forums/showthread.php?s=&postid=13591049
Back when I first built this valve it was a pain to build. And I could only do it by hand for a large valve. which in this case is 1.5 inches wide.
I've been in the hobby since 1985 and probably built 20 performance skimmers in the days when the store ones were crap. I stopped development in 2006 with this as it was way more than I needed. and I'm not a machinist.
But with 3D printers I bet one of you might easily be able to duplicate this and scale it down for another pump. Which coupled with the new DC variable pumps should make this valve very usefull for high capacity skimmers.
Probably around 2015 when I was tuning my skimmer I hit a sweet spot and the output of the valve was so high that it overloaded the skimmer water outlet which was only 1.5 inches. There was a massive air water mixture in the skimmer. Its a BIG skimmer. Beer fridge size. The sound of the reeflo orca pump changed and I'm not kidding but it was akin to a turbo kicking in. But being an AC pump this spot of air mix to input water volume was very hard to find. The next step would have been to re-build the skimmer so it was recirculating with this valve, so I could separate water input.
But I left the hobby soon after due to catastrophic tank failure.
I'm scaling back up now and should be reefkeeping again in a few months. I got covid bored and my kids are now grown. If any of you have a prusa 3d printer out there give it a go. I actually bought an early robo 3d for this that never worked well. And although I rebuilt the print head this past chistmass its still too crappy to spend time developing this venturi . In my case its a new prusa printer or 3 new radions so my 3d aspirations are a while off.
For those of you not familiar with physics principles, putting a venturi on the suck side of the pump is actually a stupid idea. Venturi's really do much better on the pressure side. And the idea for this valve came out of early discussions on this forum around this fact , when needle wheel skimmers started out as foam pads zip tied to pump vanes on this forum.
This venturi I built opened up the throat and there is no venturi.
Instead I re-established the intake water volume, ( like 3 times what was constricted) and that water when it hits the center of the pump vane (or needlewheel in this case) quickly accelerates 90 degrees and washes past all those little holes, which through the miracle of Bernouili cases air to be sucked in after the fact. But in this case the density of water entering the pimp is untouched allowing the pump vane to really get a bite into the water and air only gets mixed a spit second later after the water is accelerated.
As I said in the earlier post when I added a pond pump that others were using to overcome the poor stock venturi performance, pumping air into this new valve did nothing but interfere with the performance.
I was too busty raising kids after I built this thing to do any real performance studies. I can say that the valve ran flawlessly for 12 years. I didn;t even need to clean it. Now writing this I am wondering if the way this valve works I even needed that pinwheel or that it might work better with a regular pressure pump vane. It will be still months before i can try that.
So for any reefers out there with a decent 3d printer and serious 3d cad skills please give it a go.