55 Gallon Reef Tank Build (55gal – I know)

ChitownBrickie

New member
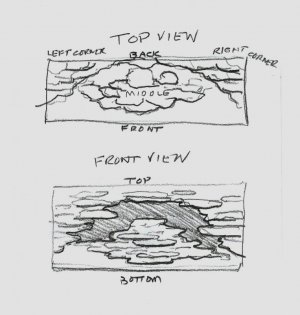
I got the stand ideal from a fellow reefer here on RC . I don't want to be redundant in showing how I built it, but if anyone is interested I would be happy to upload some pictures of how it was constructed.

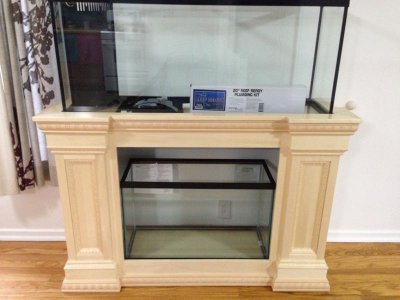
I have tinted glass doors for the stand, but I won't be putting them on until after the sump and plumbing are complete. They will just be in the way right now.
I will build the canopy for it next winter when I have more time.

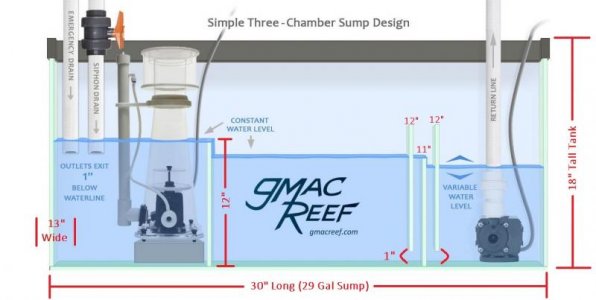
This is the Sump design that I intend to follow. I am always open for suggestions if anyone would like to share some ideals.

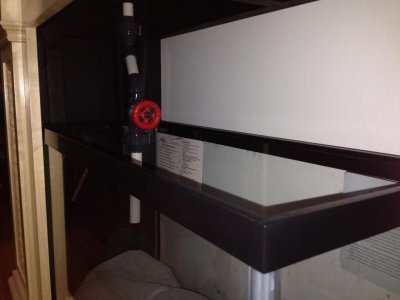
I'm in the plumbing process right now"¦ I will be using the Herbie Overflow method. Here is a picture of the main drain mock up. I will be using schedule 80 pipe. I'm just using schedule 40 for the initial design (fittings are not glued). The emergency drain is just the same, minus the spear's gate valve.
I'm contemplating putting a cepex ball valve on the emergency drain, any thoughts?
 

Attachments

  • 1.jpg
    1.jpg
    51.7 KB · Views: 4
  • sump-design-diagram-gmacreef.jpg
    sump-design-diagram-gmacreef.jpg
    38.5 KB · Views: 4
  • 3.jpg
    3.jpg
    33.4 KB · Views: 3
Last edited:
Very good start. And that stand is amazing...hope your reef looks even half as good as the stand it sits on. :D

I'll be sure to follow along.

Gate valves are easier to fine tune than ball valves. Ball valves usually are pretty sticky...you get them close to adjusted just right and then...damn! Too far. A gate valve allows for a more fluid, fine tuned adjustment. And make sure whatever valve you use has NO metal parts inside.

Thanks, I hope so too! I'm going to put some thought into it. I'll be pleased if it turns out half as good as yours. Being a narrow tank, I don't see a foam back ground being an option, but I will work something out. Thanks for following along, I appreciate it.

I bought a spears gate valve for the main drain, the fine tuning drain. I just checked after you said that, It's plastic :)
I'm wondering if it is necessary to put one on the emergency drain. I can really only see it's purpose if I want to close the E-line so that I can remove the E-pipe inside the overflow for cleaning, correct?
 
Looks awesome so far!! I'm looking forward to reading along. As for no space for a foam back, consider a shelf/cave rather than a back. Then you have another tier to the tank, this would provide diverse hiding area for tank life and bring that portion closer to the light too. Just a thought I had when you mentioned it. 2 complaints people have about 55's, the narrow tank and the depth in comparison to front to back.. Could be an interesting addition if your as creative as mmittlesteadt


40b mixed reef build with 40b sump
Reef Octopus 110 classic skimmer
Duel jaebo wave makers
Jaebo DCT 12000 return pump
300W Chinese Blackbox LED modified to run on APEX

Thank you and thanks for following along too. I definitely understand those two complaints regarding a 55 gal reef. That is a good suggestion! I thought about incorporating some arches even, but nothing is set in stone yet. It will come  mmittlesteadt reef is sweet
 
If I were rockscaping a 55 gallon, I would build up rockwork that terraces up like steps, that are offset so as to not shade the steps below it.

Build up the terracing rock steps (to place corals on) by starting from the sides, working front to back and inward towards the center, so that as the rockwork goes in towards the center it also gets further away from the front. By the time it is built up in the middle, if you looked down on it, the whole middle of the tank is wide open.

Then build up rockwork shelves in the middle, with it being highest in the middle and tapering off as it goes towards the back.

This way you can have the Sides and Back create an arc (both looking top-down and from the front view). Then the middle is built up where the sides and back don't shade it, and it will get shallower as it reaches towards the back and sides. That way neither they won't overlap much and shade the other. You almost have to treat it like you are designing two different tanks (one wide, long but narrow one along the back, and one short but tall one in the middle). Look at the attached pic for ideas.

The back part curves one way over the middle (but not covering it), and the middle part curves the opposite way under the back (without being covered). Paint the back all black and this rockscape will create lots of free, open space for fish and water flow, but also it will appear like it has a lot of depth (front to back).
 

Attachments

  • 55gallon.jpg
    55gallon.jpg
    65.2 KB · Views: 4
If I were rockscaping a 55 gallon, I would build up rockwork that terraces up like steps, that are offset so as to not shade the steps below it.

Build up the terracing rock steps (to place corals on) by starting from the sides, working front to back and inward towards the center, so that as the rockwork goes in towards the center it also gets further away from the front. By the time it is built up in the middle, if you looked down on it, the whole middle of the tank is wide open.

Then build up rockwork shelves in the middle, with it being highest in the middle and tapering off as it goes towards the back.

This way you can have the Sides and Back create an arc (both looking top-down and from the front view). Then the middle is built up where the sides and back don't shade it, and it will get shallower as it reaches towards the back and sides. That way neither they won't overlap much and shade the other. You almost have to treat it like you are designing two different tanks (one wide, long but narrow one along the back, and one short but tall one in the middle). Look at the attached pic for ideas.

The back part curves one way over the middle (but not covering it), and the middle part curves the opposite way under the back (without being covered). Paint the back all black and this rockscape will create lots of free, open space for fish and water flow, but also it will appear like it has a lot of depth (front to back).

That is awesome design! Thank you. I'm looking back and forth between your picture and my tank and I can see the potential very well. That is a slick layout  Now, would you butt the rock right up against the glass on the back left and right sides, or leave a little space between the two? I may get lucky, and have the weekend off. If I do I will make a cardboard mock up and show it to you. I Want to see it myself!
I do intend to do something in black with the back of the tank. I've been debating between painting it or using window tint. I've only seen pictures so it's difficult to tell which looks better.
 
That is awesome design! Thank you. I’m looking back and forth between your picture and my tank and I can see the potential very well. That is a slick layout  Now, would you butt the rock right up against the glass on the back left and right sides, or leave a little space between the two? I may get lucky, and have the weekend off. If I do I will make a cardboard mock up and show it to you. I Want to see it myself!
I do intend to do something in black with the back of the tank. I’ve been debating between painting it or using window tint. I’ve only seen pictures so it’s difficult to tell which looks better.

From the standpoint of eliminating dead spots and keeping water circulating throughout, I would keep the back corners filled with rock, tight to the glass. You have an angled overflow in your back left (which is good) so I would glue rock to the overflow wall on that side and then create ledges coming off that. Then duplicate the back right corner to do the same thing (but maybe smaller). This will keep anything from settling in the far back corners, making the back essentially rounded so water can naturally flow in a circular pattern.

The pic below shows what I did with mine (using a fake rock wall, but you can use natural rockwork and duplicate it). By carrying a shallow ledge across the top back (and painting the back black) it makes it look like a deep cave which will give the appearance of more depth (front to back) yet not cover the middle rockwork. It also will give a small ledge all across the back to put other corals on, whereas otherwise it would just be wasted space (which is real estate you can't afford to lose with such a narrow (front to back) tank.

rockwall2.jpg
 
I found a thread on aquascaping 55 gallon tanks here on RC. I found this pic of one that is pretty close to what I was thinking of the middle section (but this guy didn't do anything with the back corners as I'm suggesting).

attachment.php
 
This is my 55...was setup for seahorse but now they are gone im thinking of a redesign for reef

520426962b07bfd8380d230605d0203a.jpg


Sent from my SAMSUNG-SM-G930A using Tapatalk
 
Back
Top