68 CREE LED 3 mean well 60-48p driver parallel build

the RBT are simular to corals they need a lot of blue light. The most common problem for people that cannot keep them alive is that they do not have enough Blue Light. I had one in y 120 gallon with T-5's for three years and it never divided, and never looked fantastic. When I added 6 3 watt Royal Blues about 13 months ago it tripled in size and now I have three of them all huge.

Macro algea is different than corals though. Macro algea's that work as good scrubbers while they uses some blue light they also need Red light. This is evedent in nature where they gorw great in calmer and shallower waters than they do in deeper water. I use one neutral white and one daylight Compacts over my refugium. There is noticably more growth on the side that gets the neutral light comprared to the daylight side. but all my macro algea is Cheato which loves to float on the surface. Some of the other macro algeas may be different.
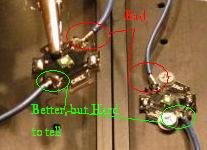
 
And the beat goes on....
F0710874-B3D9-4529-ABCF-8AFE81461407-375-0000004CE39F4594_zpsf338e020.jpg


B3071614-A32B-4BD5-BF45-5674EE3F10D5-375-0000004CE7A70CAB_zps8cc133d1.jpg


C2974566-C59A-47B2-A5F4-302AA2978D26-375-0000004CEBCD095B_zpsae1c2ee6.jpg


A7D07448-380D-4426-B563-224000EAEF51-375-0000004CF01D3D8E_zps1c1b9b15.jpg


7658DD5E-B1EB-4CF5-B04F-F784CD256AAC-375-0000004CE1207EE9_zps4e4e583e.jpg


Paint's drying on these and I picked up supplies to mount the fans. I'm not sure I need 4 but I have 4 and have room for them so I may use them. Hopefully they're up in time to go watch the Super Bowl

More to follow...
 
Halleluiah

Halleluiah

A busy weekend "“ and it kind of paid off.

First order of business was to deal with the fans. I've never had this experience before but I was happy and had to tell someone "“ so this is the best place I could say it. I'm not sure if anyone here cares but I definitely know no one at home (or at work) cares so you guys are my only shot. I went to Lowes to get some extra hardware and I had about 10 minutes before I needed to pick up Saturday's dinner. I wanted some way to mount the fans without attaching them to the housing/frames I made so that the fans would be part of the housing and LED heatsinks could freely slide in and out. I was looking for anything that would work and stumbled on this 4' piece of PVC channel. I have no clue what it's used for. It was near the tile area so maybe someone has a clue but other than the expense (it was $10) it was PERFECT. I even had enough of the PVC trim board I used to mount the stuff in my electrical component box left to make the spacer/sides. Only an 1/8" to spare "“ now that's efficient! So here it goes"¦.

I cut out 2 14" pieces and measured and drilled 2 3.5" holes for the fans

324BED26-BD68-4D2E-973E-4678198BE1DB-897-00000130AE2F29AA_zps4572dda3.jpg


Then I drilled for the fan mounting holes and added the PVC trim board "œlegs" or sides

D1F0E9D7-FF1F-4AAF-AAF2-1A2905309F2D-897-00000130B50D8977_zpsfab0a9df.jpg


The fans fit right in "“ like a glove!

8762A0E2-1ECF-4401-82A2-33A99AD7E461-897-00000130B291E095_zps3ca60623.jpg


83816874-8598-400C-B110-9477B72D2DF4-897-00000130B8C8CF21_zpse13d66e8.jpg


Got them all assembled
FB0FA0E9-803B-470D-A57D-8FD52EC2F496-897-00000130BC2838C8_zpsc6a88665.jpg


B4ED55F7-B971-401C-AF26-1E1DF8E8D3A3-897-00000130BF3BBE05_zps38338a47.jpg
 
…and put them up
9745407B-1FA8-4636-9D06-CB376DA4B042-897-00000130C22AC47A_zps9c1de0d8.jpg


I’m not sure I needed all this access but I still say you can never have too much (I just may need the ladder to get them up and down – but I made the stand really high so if I’m doing anything in the tank I need the stepstool anyway….

8F90F9F3-0F63-4344-AC95-ABC97D8E48E6-897-00000130C4A680F9_zps48f23a78.jpg


And I finally fired them up (this was about 2AM so everyone (and everything) was a little disoriented and shriveled up as it was the middle of their night - sorry fellas)

9920D475-4ABD-4611-BC9A-E217E4535F3B-897-00000130CA9AEEE4_zps7f9b850e.jpg


48AC4E58-DEE2-4A05-ABF6-BDBEC0746FBF-897-00000130C743A124_zps278c5bde.jpg


The questions I have at this point….
I have the fans blowing away from the sinks – is that correct – drawing the hot air away as opposed to blowing cool air across the fins?

Also, when I had the moon lights on, there appeared to be several LEDs that were energized. They were just barely lit. not even as much as the low light from the driver when the controller is off but the power to the driver is on – Nothing is crossed but the wires for everything are sort of braided together into a harness of sorts. I thought that it could be leaking a touch of power. Or the moon lights are much brighter than I would have liked – perhaps it’s just reflecting off the surface of the water and hitting those LEDs. I’m not sure but other than that everything seems A-OK!

Of course now I need a new controller and my wife has already insisted that I get the doors done – I had to use cardboard to close up the hood so the lights don't blind us until I get them done - I guess she doesn’t care for the look... :)
 
one more question:
As far as power and acclimation – right now I have the lights set as follows – I’m using the Rapid controller which is running a 12 hour cycle – 1 hour sunrise, 1 hour sunset. The lights are at 40% white, 40% blue and 30% mixed color. Does all of that sound ok – how quickly can I ramp them up and how high should I be aiming?
 
I'd actually flip the fans around so they are blowing cool air down onto the fins in this situation. it's a bit counter intuative as you basically going against natural convection but is more effective in this settup. this will accomplish 2 things, one it will cool more effectively, and two it will force dry air from outside the canopy down over your led rig helping to prevent mosture and salt spray buildup and any possible corrosion issues on the leds.

if it is just the white leds that appear to be "energized" then I'd bet it is the blue moon light reflecting back up and making the phosphor glow a little bit.
 
Side note: If you have blue LEDs that are lit when the moon lights are on you most definately have a few faults somewhere on both affected strings (in which case break out the multi meter and track them down)


Aclimation wise I might start out even lower, 25%, 25%, and whatever looks good with the colors. then watch your corals, they will let you know if they need a bit more light. be very patient, give them several days to adjust to the new lighting, they may streach out initially even if there is actually too much light for them, since the spectrum is going to be very different from what they are used to.

watch closely for bleaching in the stony corals, and for softies that don't open back up after a couple days.

ramp things up slowly ~5%-10% or so per week. give your coral time to adjust. you'll probally end up between 80-100% the closer you get start making smaller adjustments.
 
Good find on that PVC channel for the fans ;) I have no idea what it would be for either, maybe trim for glass block or somthing? I can think of a few uses for it though, I may just have to swing by Lowes myself and snag some up........
 
It's definitely just the whites and not blues or colors. Here's an awkwardly taken shot (I covered the moon light. There's a white star that you can see. That's the glow. I tried shielding and it doesn't appear to be catching a reflection. I also unplugged the moons to see if it is storing a phosphorescent glow (like glow in the dark plastic that glows after the light is taken off the plastic). Nothing was glowing as soon as I killed the power. What I can't figure is why there'd be any faults. The moon are completely independent except for sharing space on the heatsink. If I test, any thoughts on what I should be looking for?
 
Well, if you blocked all the blue light hitting the white led and it was still glowing then you definately have more than one fault on your heat sink and solders.

:headwally: Doh!, I hadn't noticed your solder joints before, but I think someone else mentioned it a ways back. most likely you have a wire or solder touching the edge of your star chips in more than a few locations. the exposed wire really shouldn't extend beyond the solder pad. I.E. insulation of the wire should be touching the edge of the chip, not potentially bare wire. see pic.

You probably don't need to fix all of the solders, that would suck, but defianatly take a close look at them and fix any that may be suspect. (worst case you spend a few hours and fix them all when the wife isn't around to give you heck....)

I'll assuem that you didn't do a fault check before fireing them up? Set your multi meter to the diode test, put one probe on the heatsink, touch the other to the heat sink (it should beep) if it does then move one of the probes along to each positive and negative LED pad, noting which ones make the meter beep (those will be your faulty solders and the ones you must fix)

Probably you have a bad positive on the white, and a bad negative on one of the moon lights at a minimum in order to make a connection light up........

Better to find the problem now than much much latter. Double Doh!! (if it makes you feel better I still make bad solders on LEDs and get faults, and I've soldered up over 200 of the things now, not to mention the dozens I've swaped out to fiddle with color)
 

Attachments

  • IMG_2034_zps72de7cad.jpg
    IMG_2034_zps72de7cad.jpg
    8.1 KB · Views: 14
here's a pic for reference of an ~OK solder joint on one of my test rigs, It's been resoldered half a dozen times, so not the cleanest looking chip. that black on the edge is flux from the solder that I just haven't bothered to clean off yet.....
:beer:
 

Attachments

  • IMG_8979_sm.jpg
    IMG_8979_sm.jpg
    41.2 KB · Views: 14
Yeah I know there are a few suspect joints - I got what I could out of my beginner skills. Oh well. Nonetheless, I triple tested every joint before I even started the driver part of the project. I did each star, the ajoining stars to test the solder joints (e.g. testing the neg coming off #1 to get the pos of #2 and the pos on #3 for the neg of #2) maybe a poor description but this was described to test the solder joints on what was star #2 in my example by lighting #2 with a diode test by not touching #2 for the test. Final test was a resistance test to make sure there was no continuity between any star and a y bare metal on the heatsink - a short test. I found and corrected 2 issues before I ever test fired it. I was SO careful so I had enough confidence to try one more thing before I started re-soldering. I think I wasn't doing enough to block out the moon lights. I wanted them left on so the energy would be running through so I covered them with black electrical tape. The whites were barely visibly glowing and if they did at all it seemed related to what blue was leaking out from under the tape. Hopefully I'm ok there. Thanks as always for the advice though.
 
Yeah I know there are a few suspect joints - I got what I could out of my beginner skills. Oh well. Nonetheless, I triple tested every joint before I even started the driver part of the project. I did each star, the ajoining stars to test the solder joints (e.g. testing the neg coming off #1 to get the pos of #2 and the pos on #3 for the neg of #2) maybe a poor description but this was described to test the solder joints on what was star #2 in my example by lighting #2 with a diode test by not touching #2 for the test. Final test was a resistance test to make sure there was no continuity between any star and a y bare metal on the heatsink - a short test. I found and corrected 2 issues before I ever test fired it. I was SO careful so I had enough confidence to try one more thing before I started re-soldering. I think I wasn't doing enough to block out the moon lights. I wanted them left on so the energy would be running through so I covered them with black electrical tape. The whites were barely visibly glowing and if they did at all it seemed related to what blue was leaking out from under the tape. Hopefully I'm ok there. Thanks as always for the advice though.

Whew! close call :)
 
Fans are turned around. One of the "Y" splitters was bad (looks like they forgot to strip the wires to one leg before they crimped)
I'm up close to 50% at this point. So far I'm not sure I see a difference yet but I'm still hopeful.
My control box is getting up to about 110 and the drivers are as high as 145. Any thoughts if this is problematic - I could cut a fan hole but I'd like to keep it dry and dust free if possible. A fan will make it like my PC in there and it'll get full of dust and suck in a fair amount of salt air - so I'd rather avoid this if the Meanwells can withstand the 145...
 
Gentlemen,
Great and informative thread...
I had an issue with the hardware I was using to mount the LED's to the heat sink. I changed up and went with NYLON hardware. Had lots of arc points between the supplied flat head steel screws.

Attached is my arrangement. just dropped down to 50% as the corals were coming out with RayBan's on!!

thanks
Drew
 

Attachments

Fans are turned around. One of the "Y" splitters was bad (looks like they forgot to strip the wires to one leg before they crimped)
I'm up close to 50% at this point. So far I'm not sure I see a difference yet but I'm still hopeful.
My control box is getting up to about 110 and the drivers are as high as 145. Any thoughts if this is problematic - I could cut a fan hole but I'd like to keep it dry and dust free if possible. A fan will make it like my PC in there and it'll get full of dust and suck in a fair amount of salt air - so I'd rather avoid this if the Meanwells can withstand the 145...

according to the data sheet thier operating temp range is -20 up to 60 celcius. max of 140 farenhight. The data sheet doesn't say about the temp the driver actually runs at but I'd imagine your ok as they would shut down if too hot (basically they'll start flashing on and off) the bulk of the internal components can tolerate over 100 celcius but if your measuring at the plastic case then interan temps would be much higher! can you measure the metal heatsink inside the driver? pop the cover, run it for a day and then measure, just power down before touching cause the heatsinks carry live line voltage as well as DC so you need to use caution. But opening the drivers up inside your enclosure might be a good idea as they are meant to be run in free air convection. Mine get rather warm to the touch just mounted to the concrete wall behinde my tank.

I'd suggest posting this question to the DIY forum directly as many others could weigh in with thier experiences and knoledge on the specific situation here.

Worst case, add a fan, the drivers are water resistant so salt and dust won't damage them and you wouldn't need much of a fan, just a few dozen cfm would suffice, nothing like the jet engines than are in most PCs.
 
acclimation wise, since your up to 50% now let it chill for a full week before raising any more. If your corals (particularly lps or any SPS you may have) start to streach out still after a week continue increasing incramanetally, patience is key here, as coral can tollerate low light much longer then too much! and it can only take a few days to bleach a colony. Your RBTA will be a good indicator also as they can easily relocate if lighting is not to their liking, but it takes them a couple days to think about it :)
 
My meanwells get pretty toasty mounted to the inside of my cabinet, but they are not in a closed box. To be honest, I had the idea of housing them in a box, but I didn't want to run the risk of them overheating. If i were you, I'd throw a fan on the top of the box as exhaust and filter the intake.
 
I know a PC tower fan would have been overkill but I sort of regret not finding a server or PC case to use instead of the "alarm" box I used. I could have used one of the old ones I have and hooked into the power supply for the box fan. If I had it to do over I would have gone the case route for the components

acclimation - thanks zachts - I'm REALLY trying to be patient - I’m starting to see some minor recovery and my inclination is to crank them up hoping for some positive affirmation of success. Too bad I don’t know someone with a PAR meter
I am noticing some cyano so I have to figure if that’s from neglecting some water maintenance while my attention was focused on the build or if it’s the changed spectrum and increased schedule – the Rapid controller is running on a 12 hour schedule with 10 hours at 100% (1 hour sunrise ramp-up and 1 hour sunset ramp-down) Obviously NOT ideal but finding cash for a suitable controller upgrade with 12-16 isn’t in this year’s budget….
 
I know patience is tough :) post up a pic of your tank, maybe a few close ups of corals, if you can. I'll lend what I can through pics as to whether corals look like they need more light or not.

Most likely the cyano is due to both the sudden increase in par from the LEDs and some built up nutrients from neglect. even though they don't look brighter I garantee they are puting out more par than the old lights! a couple water changes and some filter media should get things back in to check.

how's your water parameters? on my tanks I actually saw a decrease in nucience algea after switching to LED.

a small 40mm fan might be all you need, and even sealed up inside the box possibly to help with heat transfer through the metal and air in side. but you could just screw it to one of the nockouts. (check this but I think it could be run off the controllers powersupply, I don't recal the voltage or current output of those)
 
Back
Top