Paul, if this is to be a reef tank, you *may* wish to re-think it? Acrylic bowfronts are a royal PITA to scrape coralline from and you will likely get far more scratches than a straight tank; and you've got 4 of those panels to clean.. just thinking out loud
")
I'd form the pieces though if you want to do this. Even parking the pieces on a form in a hot car will help. Cold forming and bonding 1/2" - may not turn out as you wish.
James
James,
Yes it will be a reef tank. An upgrade to my 240 g mixed reef. I have had a bowfront before and didn't notice any big difference in removing coralline algae. you may have to scrape left to right instead of up and down to get the scrapper to sit flat against the tank.
I do have a homemade acrylic oven and I could use it to form the pieces. I thought that since I was using such a large radius that I could save the time of building a form and that the acrylic would be more pristine if there was no chance of mark-off etc.
If I were to try something in the middle to make the acrylic a little more pliable as you suggested, I'm afraid that might not work if I put it together over a period of days because once I make the first seem it would no longer fit into the oven.
At what temperature do you think would start to make a difference?
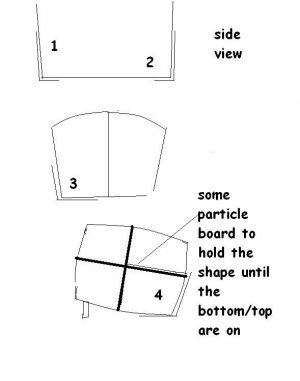
Maybe this is a bad idea. My original intent was to build a 31" radius cylinder with two vertical seems. I later decided that I don't like the distortion that a cylinder gives you so I switch to the square Idea. I thought that the tank I described might be a compromise between the two designs where the curvature would be minimal and have no real distortion effects.
have no real distortion effects but would have an interesting look.
James,
Yes it will be a reef tank. An upgrade to my 240 g mixed reef. I have had a bowfront before and didn't notice any big difference in removing coralline algae. you may have to scrape left to right instead of up and down to get the scrapper to sit flat against the tank.
I do have a homemade acrylic oven and I could use it to form the pieces. I thought that since I was using such a large radius that I could save the time of building a form and that the acrylic would be more pristine if there was no chance of mark-off etc.
If I were to try something in the middle to make the acrylic a little more pliable as you suggested, I'm afraid that might not work if I put it together over a period of days because once I make the first seem it would no longer fit into the oven.
At what temperature do you think would start to make a difference?
Maybe this is a bad idea. My original intent was to build a 31" radius cylinder with two vertical seems. I later decided that I don't like the distortion that a cylinder gives you so I switch to the square Idea. I thought that the tank I described above might be a compromise between the two designs where the curvature would be minimal and have no real distortion effects but would have an interesting look.
I appreciate the feedback.
-Paul
") send me an email if you want. the PM thing drives me nuts.
send me an email if you want. the PM thing drives me nuts. 