Another Custom Stand Construction Thread- 120 Gal.

I bought the master kit that goes for $139.

I'd recommend it to anyone who has never done pocket joinery before. Its got everything you need, plus the kreg mini, plus a DVD on the how to's as well as tips and tricks.

Marino your stand is so beautiful ... I also have purchased my kreg jig specifically to take a go at my new stand build that will start shortly.

After visiting their website ... I'm pretty sure I'm going to order the benchtop precision router table as well. Looks very well built.
 
LoJack- good luck. Sorry but I just saw your pm. Post pics of your progress!

Here are some pics of the tank inspired by your build.

I was sure to give you credit both here on Reefcentral and my local forum I post on.

Thanks again for the detailed pictures you posted of the construction process. I'm not sure I would have been able to handle the pillar construction without them.
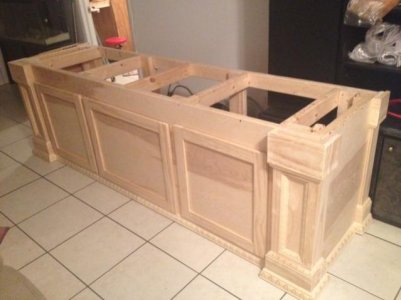
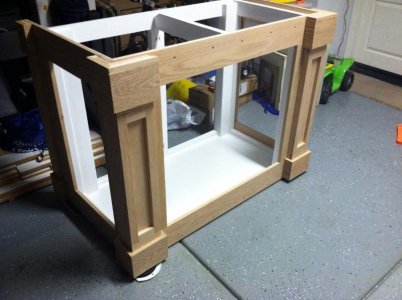
Rough:

IMG_2387.jpg


Two coats Red Mahogany - 3 Coats Gloss Poly:

b7e17f2e.jpg


I wanted to build mine with maple so badly. But I can only get oak locally and wasn't willing to do it all by mail order. Since I was staining dark anyway, I just sucked it up and constructed the stand out of red oak.

And a few more:

28c26c79.jpg


0b43e3d1.jpg


IMG_2391.jpg


There were also a few things I did differently ... based on things you had mentioned you would have done differently.

The inside and top of the stand are painted. I didn't bother with stain since its pine and it would look drastically different, but I still painted it with a black paint to give it a finished look.

I also really wish I would have sanded more ...

My trim was also different from yours and that was just personal preference, and what I could actually make at home with the bits I had.

I just wanted to say thanks again for originally posting this thread ... my stand would not be what it is without the time and effort you put into yours, and then the time and effort you put into making it public for us.

--Tyler
 
Tyler that looks fantastic. Water in the tank yet?

Nope, the tank failed. Noticed a small chip in it when I got it into the basement ... and decided not to risk the tank.

I am now waiting on my tank builder to complete a new tank for me.

Worked out well. Now I get what I want. Black Silicone, Eurobracing, Starphire glass.

Just sucks that I have a delay for a couple weeks now. Gives me time to get the canopy and raised panel doors completed while I'm waiting though.

Thanks again for the inspiration !
 
Marino,

Just sent you a PM. You've done a awesome job....not only on the tank, but obviously inspiring many other readers including myself in your great work.

I've just recently started my stand for my 120 gallon reef. I can't wait to be done, but then again, I can't wait to keep working on it since it is my current project. I'm not sure how I'm going to complete the trimming yet and if ill find the same as you have in my local HD or Lowes. But we'll find out soon enough!

Thanks again for sharing with us.

Simon
 
This is an awesome thread. I started building my stand from this. Great job and thank you. I do have a question though. What kind of router bit did you use for the top? You said it was a ogee bit. I am looking for the design but everything I see is a round design and this one seems more square. This is what is holding me back. Here is my set up so far, Thanks again.
 

Attachments

  • image12.jpg
    image12.jpg
    32.9 KB · Views: 27
Looks great. I used an ogee bit then flipped the piece upside down. So the routed edge is on bottom, not top. Hope this helps.
 
I loved your stand so much, I am making my own stand based on your design. I'm attaching a picture of mine so far. I am about to start applying the crown and base moulding and the trim work...the main problem I ran into is that the front of the column is so narrow that if I put trim work outlining the interior of the column, that the open part would only be 1 & 1/4" wide. So, I am thinking of putting the trim pieces only on the top and bottom of the face. That keeps the opening about 3 & 1/4" wide.
 

Attachments

  • image.jpg
    image.jpg
    66.3 KB · Views: 28
Back
Top