bidny
Member
Welcome, everyone!
Some Background
My wife and I moved into our new home in Lincoln Park, Chicago back in July 2015. Previously, I had been running a 90 gallon Oceanic Tech Tank but knew I wanted to upgrade after we moved. So, I set up a temporary Rubbermaid holding tub for the live rock, coral, fish, and other life in the basement of the new house.
As things go, we had our first child in October, so we put the aquarium plans on hold for a few months.
Originally, I had planned to set up a 36”Lx36”Wx24”H “cube,” similar to d2mini’s first build (http://www.reefcentral.com/forums/showthread.php?t=1757436). However, my wife and I decided that the planned location had multiple limitations.
Our new home has a nice finished basement with full-height ceilings, and we found a perfect location next to our utility room, equipped with water and drain access.
Unfortunately, I plan to turn the majority of the utility room into a bathroom in the future, so there’s no space for a proper fish room. Instead, the sump will need to live under the tank with some limited access to the utility room for water production, storage, and drainage and some placement of electronics.
My dream tank has always been a drop-off style, similar to these builds below, but our basement has limited entrance width. To go with a drop-off style, I would have needed to limit the width (front to back) to 24”, which is smaller than I wanted to go. Also, the “perfect location” for the tank does not work well for a drop-off style tank, due to existing walls.
http://www.reefcentral.com/forums/showthread.php?t=2511159
http://www.reefcentral.com/forums/showthread.php?t=2367394
http://www.reefcentral.com/forums/showthread.php?t=2363639
http://www.reefcentral.com/forums/showthread.php?t=2121728
http://www.reefcentral.com/forums/showthread.php?t=2435062
Instead, I decided to go with an even larger tank than originally planned
The Plan
The perfect location is a bit larger than 10’ wide and 30” deep, but I’m a bigger fan of exposed open-top rimless tanks than the built-in style. I think rimless tanks themselves are beautiful, like a prism - a coral prism - filled with all the colors of the rainbow. So, I decided to go with an 96” long rimless tank, which will provide some space on either side for additional viewing. The tank will be 30” deep, leaving some space in the back for tile work on the rear wall. I will be leaving the back of the tank clear, since I enjoy the illusion of the fish floating in mid-air.
The tile behind the tank will be white with a 3D wave pattern, similar to below.

Instead of a traditional stand, I plan to build the stand across the entire 10+ feet of the opening. This provides three things: a built-in look, ample area to place my sump and equipment, and the modern appearance I’m trying to achieve. The stand will be made of rectangular tube steel and skinned with a yet unknown material. I am looking into using a white quartz material on top of the stand, surrounding the aquarium.
The Tank
After some research and looking into pricing and availability, I decided to purchase the tank through Miracles in Ontario. I have read many good things about their aquariums, but I have also read some less enthusiastic reviews as well. Many of these took place a few years back, and talking to Derek at Miracles, he says the company has worked to improve their seams and overall quality.
At this point, I’m cautiously optimistic. When you pay good money for a custom aquarium, you obviously have certain expectations. We’ll have to see how well Miracles is able to meet those expectations.
Last I heard, they are preparing to cut my overflow holes, and Miracles has said that the tank should begin assembly in around three weeks. Can’t wait!
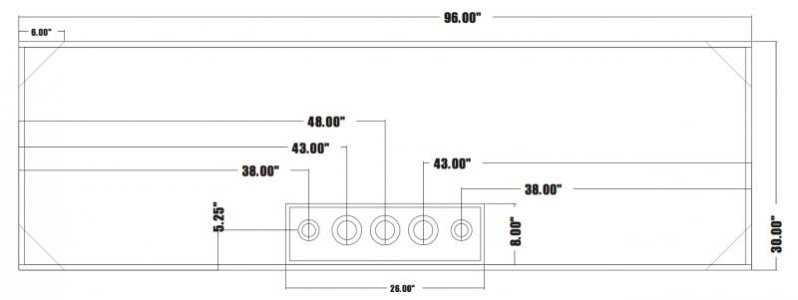
The dimensions of the aquarium are 96”Lx30”Wx24”H using 3/4" inch glass, and all four sides will be Starphire. It will have a single internal overflow in the center of the back, as I wanted to leave the sides of the aquarium uninterrupted for optimal viewing. The top will be rimless, although each top corner will have have a 6” Starphire glass triangle to improve the strength of the aquarium for the gyre and MP40/60s that I'm planning to run. The bottom of the aquarium will also be frameless. This is actually different than most Miracles builds, which tend to have a small black frame around the bottom. Here is the plan:

I went with an internal overflow due to the space with which I’m working. Since I’m not placing the tank into a cutout on the rear wall, an external overflow would have actually reduced the available internal space. There will be three holes for a modified BeanAnimal-style overflow and two holes for returns. I’d like to run the returns back down to the sand bed (with a small hole near the top for a siphon break) and then toward the rock-work to provide a pseudo closed loop type functionality, preventing detritus from building up in the rock.
Equipment
Lighting will be provided via four Ecotech Marine Radion XR30w Pro G3 units to start (already in hand). At some point, I will likely add supplemental T5 illumination to fill in shadows and any gaps in spectrum.
I’m still deciding on the protein skimmer. I have a number of criteria that I’m trying to meet, and I am yet to find the perfect skimmer. Thoughts and suggestions are welcome. I’ll post my criteria in the near future.
I have a Pan World 150PS external pump on hand, but this will likely not be enough flow. I will probably use it for the time being and upgrade in the near future. I will be running my return to a balanced manifold to feed multiple reactors and small frag tank, as well as the display tank.
Right now, I am building out my ATO and automated water change systems, which will reside in the utility room. Due to limited space, I’m using two Brute garbage cans to hold RO/DI and saltwater. I plan to change around 0.5 to 1% of the water each day.
I have been running a Reef Angel controller, and I plan to use it for this new build as well. There is a small chance that I may move over to an Apex, but I have a lot of money tied up in the Reef Angel, and I enjoy the open source nature of it as a developer myself.
While I don’t plan to run a true ZEOvit system, I do plan to dabble with some of the concepts. To do so, I have purchased a Skimz Monzter ZM150 reactor on sale. I expect that I won’t use the ZEOvit products, as I’d like to keep the expense down. I’d also like to experiment with alternatives, so I may try to use GAC or Seachem de*nitrate as the substrate. I will likely use vinegar as the food for the bacteria instead of ZEOfood, and I may look into alternative bacteria sources instead of ZEOstart and ZEObak (e.g., Instant Ocean BIO-Spira, Seachem Stability).
As mentioned earlier, I have a Maxspect Gyre ZF150 for one side of the tank. I will reuse my two MP40wESs for the other side. We’ll see where this gets us before considering alternatives or additions.
For the sump, I am considering an Icecap 48XL, which is a good size sump (48”Lx24”Wx16”H) for the price. I will then run a small separate tank for frags, which will feed back into the sump. I don’t have a light for the frags yet (considering a Radion XR15w Pro), however, I have purchased a Kessil H350 Deep Purple to run over the chaeto that I’m planning to grow in the sump. This thing should be a beast.
My plan is to run 2-part instead of a calcium reactor for now, since I already own the equipment, but I’m keeping my mind open on this for the time being.
Inspiration
I wouldn’t feel right without mentioning some of the other Reef Central build threads that helped inspire me while designing my new tank.
http://www.reefcentral.com/forums/showthread.php?t=1767159
http://www.reefcentral.com/forums/showthread.php?t=2395250
http://www.reefcentral.com/forums/showthread.php?t=2570484
http://www.reefcentral.com/forums/showthread.php?t=2144250
http://www.reefcentral.com/forums/showthread.php?t=1640915
http://www.reefcentral.com/forums/showthread.php?t=1757436
There are still many decisions to make, so I hope everyone will follow crazy ride. I’m excited to have you along, so please leave your comments, questions, and advice, and I’ll do my best to respond and keep everyone updated on the progress.
I’ll try to grab some pictures of the space for the tank and the 2x4 mockup I built to ensure the tank could actually make it into the basement :rollface:
Until next time...
Some Background
My wife and I moved into our new home in Lincoln Park, Chicago back in July 2015. Previously, I had been running a 90 gallon Oceanic Tech Tank but knew I wanted to upgrade after we moved. So, I set up a temporary Rubbermaid holding tub for the live rock, coral, fish, and other life in the basement of the new house.
As things go, we had our first child in October, so we put the aquarium plans on hold for a few months.
Originally, I had planned to set up a 36”Lx36”Wx24”H “cube,” similar to d2mini’s first build (http://www.reefcentral.com/forums/showthread.php?t=1757436). However, my wife and I decided that the planned location had multiple limitations.
Our new home has a nice finished basement with full-height ceilings, and we found a perfect location next to our utility room, equipped with water and drain access.
Unfortunately, I plan to turn the majority of the utility room into a bathroom in the future, so there’s no space for a proper fish room. Instead, the sump will need to live under the tank with some limited access to the utility room for water production, storage, and drainage and some placement of electronics.
My dream tank has always been a drop-off style, similar to these builds below, but our basement has limited entrance width. To go with a drop-off style, I would have needed to limit the width (front to back) to 24”, which is smaller than I wanted to go. Also, the “perfect location” for the tank does not work well for a drop-off style tank, due to existing walls.
http://www.reefcentral.com/forums/showthread.php?t=2511159
http://www.reefcentral.com/forums/showthread.php?t=2367394
http://www.reefcentral.com/forums/showthread.php?t=2363639
http://www.reefcentral.com/forums/showthread.php?t=2121728
http://www.reefcentral.com/forums/showthread.php?t=2435062
Instead, I decided to go with an even larger tank than originally planned
The Plan
The perfect location is a bit larger than 10’ wide and 30” deep, but I’m a bigger fan of exposed open-top rimless tanks than the built-in style. I think rimless tanks themselves are beautiful, like a prism - a coral prism - filled with all the colors of the rainbow. So, I decided to go with an 96” long rimless tank, which will provide some space on either side for additional viewing. The tank will be 30” deep, leaving some space in the back for tile work on the rear wall. I will be leaving the back of the tank clear, since I enjoy the illusion of the fish floating in mid-air.
The tile behind the tank will be white with a 3D wave pattern, similar to below.
Instead of a traditional stand, I plan to build the stand across the entire 10+ feet of the opening. This provides three things: a built-in look, ample area to place my sump and equipment, and the modern appearance I’m trying to achieve. The stand will be made of rectangular tube steel and skinned with a yet unknown material. I am looking into using a white quartz material on top of the stand, surrounding the aquarium.
The Tank
After some research and looking into pricing and availability, I decided to purchase the tank through Miracles in Ontario. I have read many good things about their aquariums, but I have also read some less enthusiastic reviews as well. Many of these took place a few years back, and talking to Derek at Miracles, he says the company has worked to improve their seams and overall quality.
At this point, I’m cautiously optimistic. When you pay good money for a custom aquarium, you obviously have certain expectations. We’ll have to see how well Miracles is able to meet those expectations.
Last I heard, they are preparing to cut my overflow holes, and Miracles has said that the tank should begin assembly in around three weeks. Can’t wait!
The dimensions of the aquarium are 96”Lx30”Wx24”H using 3/4" inch glass, and all four sides will be Starphire. It will have a single internal overflow in the center of the back, as I wanted to leave the sides of the aquarium uninterrupted for optimal viewing. The top will be rimless, although each top corner will have have a 6” Starphire glass triangle to improve the strength of the aquarium for the gyre and MP40/60s that I'm planning to run. The bottom of the aquarium will also be frameless. This is actually different than most Miracles builds, which tend to have a small black frame around the bottom. Here is the plan:
I went with an internal overflow due to the space with which I’m working. Since I’m not placing the tank into a cutout on the rear wall, an external overflow would have actually reduced the available internal space. There will be three holes for a modified BeanAnimal-style overflow and two holes for returns. I’d like to run the returns back down to the sand bed (with a small hole near the top for a siphon break) and then toward the rock-work to provide a pseudo closed loop type functionality, preventing detritus from building up in the rock.
Equipment
Lighting will be provided via four Ecotech Marine Radion XR30w Pro G3 units to start (already in hand). At some point, I will likely add supplemental T5 illumination to fill in shadows and any gaps in spectrum.
I’m still deciding on the protein skimmer. I have a number of criteria that I’m trying to meet, and I am yet to find the perfect skimmer. Thoughts and suggestions are welcome. I’ll post my criteria in the near future.
I have a Pan World 150PS external pump on hand, but this will likely not be enough flow. I will probably use it for the time being and upgrade in the near future. I will be running my return to a balanced manifold to feed multiple reactors and small frag tank, as well as the display tank.
Right now, I am building out my ATO and automated water change systems, which will reside in the utility room. Due to limited space, I’m using two Brute garbage cans to hold RO/DI and saltwater. I plan to change around 0.5 to 1% of the water each day.
I have been running a Reef Angel controller, and I plan to use it for this new build as well. There is a small chance that I may move over to an Apex, but I have a lot of money tied up in the Reef Angel, and I enjoy the open source nature of it as a developer myself.
While I don’t plan to run a true ZEOvit system, I do plan to dabble with some of the concepts. To do so, I have purchased a Skimz Monzter ZM150 reactor on sale. I expect that I won’t use the ZEOvit products, as I’d like to keep the expense down. I’d also like to experiment with alternatives, so I may try to use GAC or Seachem de*nitrate as the substrate. I will likely use vinegar as the food for the bacteria instead of ZEOfood, and I may look into alternative bacteria sources instead of ZEOstart and ZEObak (e.g., Instant Ocean BIO-Spira, Seachem Stability).
As mentioned earlier, I have a Maxspect Gyre ZF150 for one side of the tank. I will reuse my two MP40wESs for the other side. We’ll see where this gets us before considering alternatives or additions.
For the sump, I am considering an Icecap 48XL, which is a good size sump (48”Lx24”Wx16”H) for the price. I will then run a small separate tank for frags, which will feed back into the sump. I don’t have a light for the frags yet (considering a Radion XR15w Pro), however, I have purchased a Kessil H350 Deep Purple to run over the chaeto that I’m planning to grow in the sump. This thing should be a beast.
My plan is to run 2-part instead of a calcium reactor for now, since I already own the equipment, but I’m keeping my mind open on this for the time being.
Inspiration
I wouldn’t feel right without mentioning some of the other Reef Central build threads that helped inspire me while designing my new tank.
http://www.reefcentral.com/forums/showthread.php?t=1767159
http://www.reefcentral.com/forums/showthread.php?t=2395250
http://www.reefcentral.com/forums/showthread.php?t=2570484
http://www.reefcentral.com/forums/showthread.php?t=2144250
http://www.reefcentral.com/forums/showthread.php?t=1640915
http://www.reefcentral.com/forums/showthread.php?t=1757436
There are still many decisions to make, so I hope everyone will follow crazy ride. I’m excited to have you along, so please leave your comments, questions, and advice, and I’ll do my best to respond and keep everyone updated on the progress.
I’ll try to grab some pictures of the space for the tank and the 2x4 mockup I built to ensure the tank could actually make it into the basement :rollface:
Until next time...
Attachments

Last edited:


