Budster's Twin in Wall Build

Options to improve flow

Options to improve flow

After spending the day contemplating the problem, as mentioned above, too little flow in a 2" pvc flex pipe, I guess I have really two options. 1) Add another 2" pvc flex pipe, effectively doubling the flow, or 2) finding larger diameter bulk heads, and increasing the size of the existing pipes. The later would be the cleanest I suppose, however the first would probably be the easiest. I have recieved in-put from some others on other threads today, none of which is to encouraging, seems if you don't do everything by the book, stay strictly with-in the lines, then some on this forum don't want to even talk about it! I guess that's OK for some, but surely their are those out there who have an imagination and can visualize how it could be done different if not even better. If you are one of those, let me hear from ya'.
Pictures of the problem below...............................Budster:bum:
 

Attachments

  • 005.jpg
    005.jpg
    34.3 KB · Views: 18
Configuration #2

Configuration #2

Reefsters:

After some thought about the flow problem I have decided to simply add another 2" flow Pipe between both the sumps, and the fuge/return sump. This will increase my flow rate to about 2000gph in both directions which will be adequate for my needs both now and when I expand this system. Parts were ordered yesterday, new pump should be here monday, and I have drained and started dis-assembly. I will post again when I have re-assembled the sytem in it's second configuration and has been tested. Thanks to those of you who have kept in touch, would like to hear from those who are tagging along but might be shy? Why?................................Budster.:bum:
 
System Up-Date "Here we Go"

System Up-Date "Here we Go"

Since the last up-date, I have finally got the system configured and working as designed. I have replaced the Reef-flo Gold Dart with a Reef-flo Hammerhead (5600 gph). I have also doubled the flo capacity of the sumps and Refugium. After testing and tweaking I have started making salt water, recieved shipment of 250# of Marco Rock, and 200#'s of Bahama Argonite course sand also from Marco Rocks. I have about 140g of salt water in the system so far, I have put my rock in the 70g Refugium tank and have plumbed the return line to the tank directly to the over-flow to get the system cycling water without filling the 200g DT. The rock has been in water now for a few days and seems to be clean and free of any waste. The water tests clean and free of NO3. so cycling appears to not be necessary with this Dry Rock from Marco, so I will begin Aqua-scape and sand tomorrow. I will order 15# of Premium Corraline Live Rock, and 10# of Live sand from Florida Live Rock so when the Aqua Scape is done I will have the rock and sand to "Seed" my tank and start my cycle. I have currently 150g of RODI on hand ready for salt, then on to the display tank when Aqua Scape is done. It has been a long road to this point, but has actually come together very well, I am a "Happy Camper" at this point.

I have included pictures of the final configuration and a brief explanation of each part of the system.

1. This is the RODI, water storage and top-off storage area. RODI is made by the BRS DIY unit at the top left, flows to the top tank (storage) and is moved by gravity to the bottom tank (top-off) or to the salt mixing tank (not pictured). Production is controlled by a shut-off valve in the storage (top) tank.

2. This pic. shows th Bean Animal OF drain system. The syphon is on the far right, a 1" pipe moving currently about 1200gph, working almost fully open. The open channel is the middle pipe, a 1-1/2" pipe with vent line. The emergency is on the left and is also a 1-1/2" pipe. The system is working as advertised, however, if I want to increase flow in the DT I will have to enlarge the syphon line some.

3. This picture shows the Collector Sump, the filter sock, heater and Skimmer pump. This sump will also provide the source for any other reactors necessary. Notice the valve near the floor on the left side of the Skimmer Pump, this is the drain valve I will use to drain water for water changes, it is plumbed directly to the floor drain under the sink along with the system overflow emergency drain.

4. This is the Return Sump. The twin 2" lines on the left provide flo from the Collector Sump, and the twin 2" lines coming in on the right provide flo from the Refugium and Skimmer (via the Refugium). Visable center left you can see the Supply Water pump (yellow) and plumbing used to provide top-off and salt water to the return sump. The Reef-Flo Hammerhead pump is pictured on the floor in front of the Return Sump, In this current configuration it is providing about 2400gph flow rate.

5. This is my 70g Refugium, pictured here with 250#'s of Marco Dry Rock, curing in Salt Water. On the right is the Reef Octopus SRO 500 Skimmer, draining to the Refugium. The Skimmer processes about 600gph and the main pump provides another 600gph to the Refugium, for a total flow through the Fuge of about 1200gph.

See next Post......................Budster
 

Attachments

  • 002.jpg
    002.jpg
    47.9 KB · Views: 21
  • 005.jpg
    005.jpg
    44.8 KB · Views: 14
  • 004.jpg
    004.jpg
    44.3 KB · Views: 16
  • 007.jpg
    007.jpg
    56 KB · Views: 20
(Post Continued)

(Post Continued)

6. This is the mixing tank mentioned in #1. Water from the RODI storage tank is provided by a gravity drain line to this tank. Salt weater is mixed and pre-heated here, then moved to the Return Sump via the supply pump pictured in #4. Here you can also see the SRO 500 on the left of the mixing tank.

7. This is the total system including the DT.

After I finish Aqua-Scape and fill the DT, I will provide pictures of the tank from the viewing side of the system. Well that is about all to report this time, would love to hear your comments on what I've accomplished so far.

Budster:bum:
 

Attachments

  • 003.jpg
    003.jpg
    57.5 KB · Views: 20
  • 010.jpg
    010.jpg
    46.5 KB · Views: 20
Looks like the planning is paying off. Everything looks great! The only thing that makes me a little nervous is the stacked drums. It looks like the rim is deformed already on the bottom one. I would get a board that completely covers the rim to spread the weight out, especially since they are hard plumbed together like that. Are you only getting 2400 from the hammerhead because you have it trimmed down, or is there just that much head you have to overcome? Looking forward to the next update!
 
:bum::bum::bum:
Looks like the planning is paying off. Everything looks great! The only thing that makes me a little nervous is the stacked drums. It looks like the rim is deformed already on the bottom one. I would get a board that completely covers the rim to spread the weight out, especially since they are hard plumbed together like that. Are you only getting 2400 from the hammerhead because you have it trimmed down, or is there just that much head you have to overcome? Looking forward to the next update!

Muttley:

Thanks for the comments! Those barrels are industrial soda syrup barrels and are really heavy duty. It is hard to tell in the picture, but the rimmed edge is about 2" thick plastic. I checked it out and what you were seeing must have been the shadow from the support, the edge is fine. You can tell in the picture the Hammerhead has a gate valve on the output side and it is running at about 50-60% I think, it's hard to tell with those low progression gate valves. Lot's left for future expansion!....................Budster:bum:
 
not sure if its been mentioned but If it were my build i would NOT have that brass valve, every time i look at the pictures i cringe. Go ahead, splurge on another PVC valve and hose bib adapter thats plastic ( maybe 10 bucks). Or at least a plastic valve thats closed before the brass valve to prevent copper leach. Maybe youll want corals some day! Great looking build so far!
 
not sure if its been mentioned but If it were my build i would NOT have that brass valve, every time i look at the pictures i cringe. Go ahead, splurge on another PVC valve and hose bib adapter thats plastic ( maybe 10 bucks). Or at least a plastic valve thats closed before the brass valve to prevent copper leach. Maybe youll want corals some day! Great looking build so far!

Thanks for the heads up! Haven't thought about that! That's a good example of the positive info., sharing your build with others can provide. You've got my back, and I appreciate it.....................Budster
 
System Up-date 11/29/12

System Up-date 11/29/12

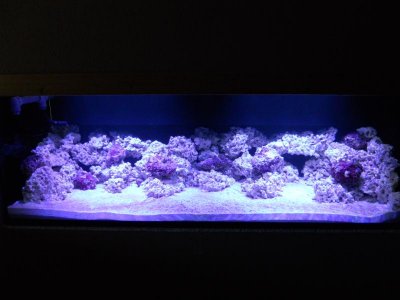
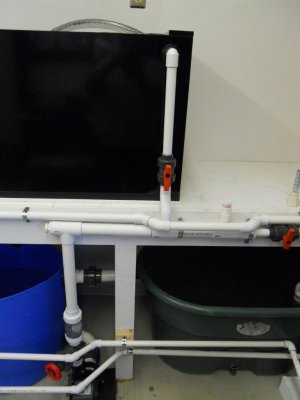
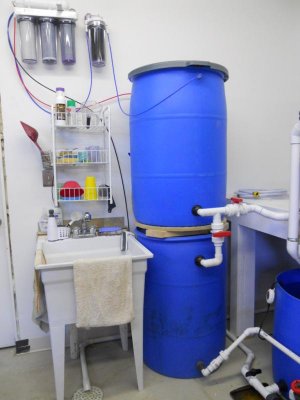
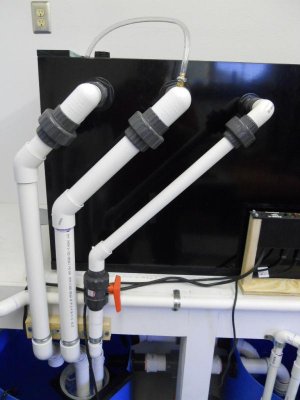
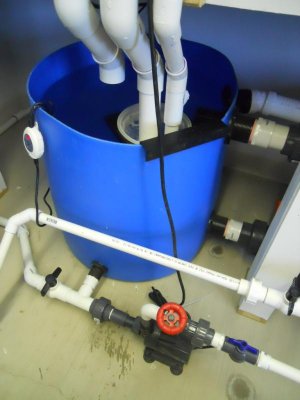
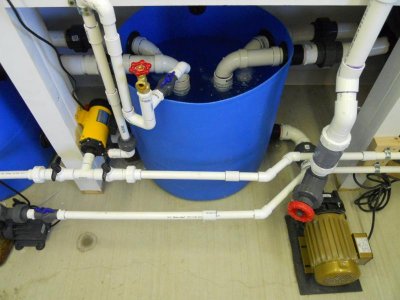
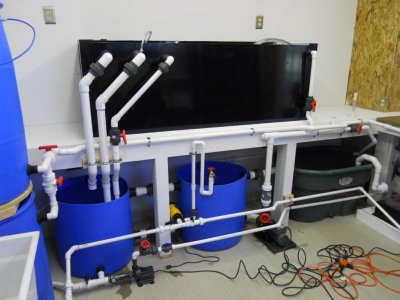
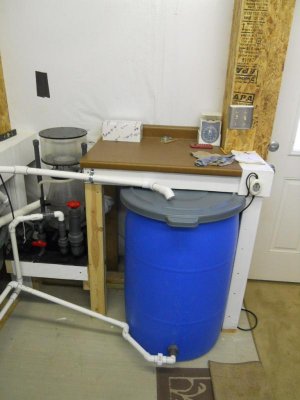
Hello Reefsters...........Well things have progressed nicely in the last month. I have aqua-scaped the DT, built the duplex Refugium, added 340g of salt water started the cycling process and purchased and installed a Reef Keeper Lite reef control system. I used 250#'s of Marco Dry Rock in the DT. as I have always read here at ReefCentral, the Marco Rocks were beautiful, large, very porus and each and every rock in 5 boxes (250#'s) were individually wraped in bubble wrap, almost no rubble, great packaging and great rock. I added to the DT, to seed the "dry rock", about 25#'s of Live rock from Florida Live Rock in Tampa. I purchased my substrate from Marco also, I added 200#'s of course Bahama Argonite sand, it also is very nice. In the Refugium I built a structure from black egg-crate, to create a benthic zone that supports an egg-crate tray that holds approx. 20#'s of dry rock rubble and 25#'s of live rock rubble. When the tank cycles and I start to add live-stock, I will add "Cheato or Culerpa" to the Fuge. I put my water production system to the test, producing and mixing 300+ gallons of Salt Water to fill the system. I was able to produce and mix 300+g's in about 3 days, 55g's at a time, about twice a day. The system configuration makes it very easy to produce, mix and distribute water where and when needed. I am cycling the system "fishless". I placed in the C/C overflow, 3 raw shrimp to decompose and start the cycle. The Amonia levels are currently at about 1.0ppm and nitrite levels about the same, so the cycle has started. There are conflicting opinions about skimming during cycling, but I have chosen not to, trying to promote maxium bacteria growth as soon as possible. Because I used such a large amount of dry rock and dry rubble, the seeding and cycling phase of this project may take a while, however, a clean-up crew can not be too far in the future!

While waiting through this process I decided it would be a good time to add my Reef Keeper controller. I have purchased and installed the Reef Keeper lite, with two power control units (PC4's). I have managed to get the temp. and Ph probes functional, programmed the controller to monitor my heaters, set to sut them down in the event they fail, and have successfully installed a float switch and programmed the controller to manage auto top-off, with no lack of difficulty and frustration. This baby is not easy to use, very cool, but very difficult to understand. First off it comes with virtually no instructions, you have to go to a web site and download a series of manuals for each component. I guess if your young and have been raised in the digital generation, the logic behind this device would be understandable, but being an old analog head, I just don't get it. With the help of some fine Reefsters on their Forum, I was walked, step by step through these processes and have started to catch on. In the future I will program the controller to manage the skimmer, manage cooling fans, create stand-by periods for feeding and maintainance, and provide monitoring and alarms for critical parameters and functions.

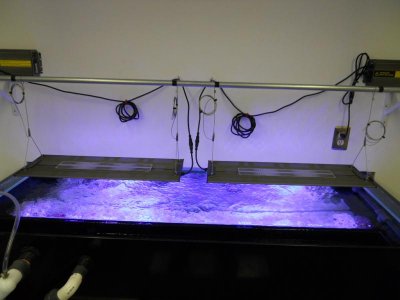
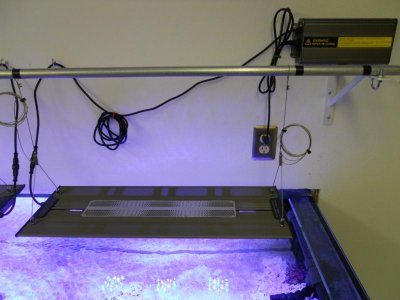
I have made my decession on a lighting configuration. I have decided to bite the bullet and use LED lighting on my tank. I have ordered from Salty Supply, two Maxspect Razors, a new Led fixture from Maxspect maker of the Mazzara LED system. In researching the "expert opinions" on the subject, I decided this new fixture provided all the necessary specs., and then some, at the best price, actually less than comparable ATI Sunpower T-5's. I was sold on the LED concept just couldn't justify the price till I discovered these. The catch? high demand, not availiable till mid december, O well, I can wait. I have also ordered the last of my major expenses, 2 Vortech 40's, should arrive any day now. Based on the difficulty and lack of understanding of the Reef Keeper system, I will use the programable features of both these products to manage their functions, both have extensive capabilities, and can be incorporated into the Reef Keeper system for monitoring and alarm functions.

Kind of got carried away up-dating this project, I hope you can bear with me, kind of excitied about getting this thing going. I have not finished triming the display side of the tank, and building the bar-top under the tank and adding four stools, for viewing, but when I do I will provide some pics. of the "business side" of the tank....................Budster:bum:
 
Thanks Muttley: I haven't seen anything yet, rock was shipped during a cold week-end a couple weeks ago, no heat in the box, rock was pretty cold but not frozen. Don't knoow how much survived the trip? Hope the bacteria made it, I guess I'll know soon.
Budster
 
Clean, simple, & cost effective...if we can ever say that in this hobby :).

I would put a catch basin (Rubbermaid tray) under the skimmer with a small bulkhead and hose that redirects overflows back to the sump. Let's hope you never need it.
 
Clean, simple, & cost effective...if we can ever say that in this hobby :).


Thanks for noticing Mr. Wilson. Much of my design was taken from your posts stressing the importance of using gravity when possible, minimize the use of multiple pumps when possible, and directing skimmer effluent to the Refugium. I also want to thank you for the "Duplex Fuge" design and concept, your posts on this Forum have been at the heart of my design, for that, your comments mean even more. Thanks..............Budster:bum:
 
Up-date.......1/11/13 "Let there be light"

Up-date.......1/11/13 "Let there be light"

Just a quick up-date on the system. Cycling has progressed well, beneficial nitrifing bacteria seem to have developed nicely. All Amonia introduced into the system is processed immediately with zero levels in just hours. Recieved the new lighting system this week and installed it yesterday, it is awesome. I installed the new LED system from Maxspect they call the Razor. I have two 160 watt fixtures, sized by Maxspect for a 6' 200g system. Check out the specs. at

http://www.saltysupply.com/Maxspect-Razor-LED-Lighting-Fixtures-s/16290.htm

The lighting is in place, the tank has cycled and now it is time for some fish and a small clean-up crew to get things started. Stay Tuned............Budster
 

Attachments

  • 001.jpg
    001.jpg
    42.8 KB · Views: 17
  • 003.jpg
    003.jpg
    49.7 KB · Views: 17
  • 005.jpg
    005.jpg
    45.9 KB · Views: 19
Cool Hitch Hikers

Cool Hitch Hikers

Nice Update, Thanks. That is a boatload of equipment with out a doubt. Any cool hiotch hikers on your rock?

Muttley:

I can now answer your "hitch-hikers" question, yes, I have 5 black urchins in the DT, and 2 in the Refugium. They have grown from small spiney specs into large spiney balls about the size of a golf ball so far. They move around the tank during the night and seem to be doing fine. :thumbsup:
 
Crazy, I was looking at miracles and a builder in Texas was actually cheaper for me and I'm in Columbus Ohio
:lol:
Corey
 
Back
Top