DIY LEDs - The write-up

Status
Not open for further replies.
I have a 180 gal tank it is 6 foot long 2 foot wide and i would also like to know what it would take to light it with leds.
http://www.reefcentral.com/forums/images/smilies/smash_ani.gif

Depending on what you want to keep, if you extrapolate based on other people's fixtures, you are probably looking at 120 - 150 LEDs for a 180g tank.

This is assuming XR-E or Rebel LEDs in the highest brightness bins, around 700mA current, and wide optics (or none at all).
 
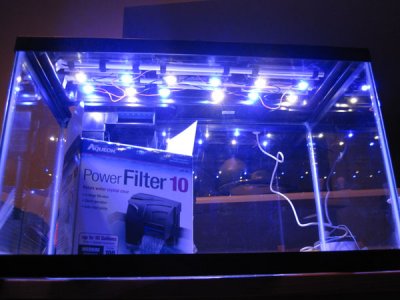
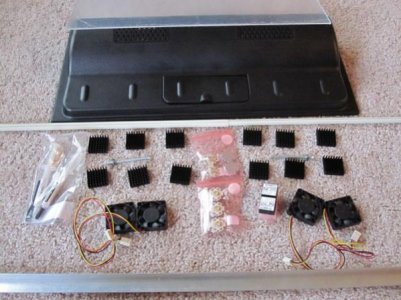
Well I'd really rather talk about this at the original thread, but I've spent upwards of a year developing a custom PCB that solves alot if not all of the issues you guys might be having. It's a 12" X 12" board that has spots for LEDs, drivers, and power. It is copper core and has fans that are thermostatically controlled. Each color channel is dimmable (PWM) and able to interface with DMX to do any of your controlling/programming needs. Its a real clean part, and now that its developed its cheaper than buying multiple boards, heat sinks, etc. It uses 12 clusters of 4 rebel LEDs each. 48 per board. ~400 mA. 84W on paper, but it depends on the power supply. Basically plug and play. I'm working on a fixture now and I am looking for some input (see link above). Sorry if it sounds too much like an advertisement, but honestly I do hope to sell a fixture in the future. But I could possibly sell some of the loaded boards to anyone interested in building their own fixture. Still haven't worked all this out. Just got it two days ago after a long time in developement. All I can say is its awesome! I can't wait to put a fixture over my tank.


I'm interested in discussing some of the choices you made and learning how you made them:

1) That's a lot less heatsinking than most people are using. Did you do math to justify this, or determine it was OK experimentally?

2) Same for current - curious how you chose 400mA.

3) Are you buying Rebels premounted to stars, or soldering them directly to your board?

4) What are you using for a driver?
 
Reflow is pretty much the only way. The solder pads are on the bottom of the Rebels. Hence if you'll be using them, you might want to buy them already mounted to stars - it's usually only a few cents more.

I already got LED and boards separately. I have to figure it out how to solder them together manually. I know some people have done it at home. I was only $3.74 per LED and $0.49 per board ($4.23) comparing to mounted LEDs ($7.11). I saved $172.80 but I have to put my time to solder them. :-)

I will PM you for controller info when I am done with my LEDs. Thank you again

Krzysiek

I forgot to add that I could not find royal blues LED mounted to board, only cool white.
 
Last edited:
Depends on the corals you want to keep, really. 12 LEDs over a 15g should be pretty decent.

Actually, regardless of what you want to keep, I would still suggest going for the most efficient LEDs used (Rebels or XR-E). Anything less is just wasted money in the long term. Even if you don't need all the output, an efficient XR-E turned down to a low current will run cooler, last longer, and use less power than a Luxeon I/III/V adjusted to the same output.

She only likes zoa's, frogspawn, hammers, etc. She's not into "sticks" as she calls SPS

Thanks. I'll be making an order shortly!
 
I already got LED and boards separately. I have to figure it out how to solder them together manually. I know some people have done it at home. I was only $3.74 per LED and $0.49 per board ($4.23) comparing to mounted LEDs ($7.11). I saved $172.80 but I have to put my time to solder them. :-)

Not to rain on your parade, but mounted LEDs can be had close to $5/ea when bought in volume.

That said, you can reflow at home with an electric skillet or toaster oven, but it's gonna take some hacking and trial and error. I've never done it, but it's pretty well documented on the internet. Just google "reflow soldering at home" or something and you'll find stuff like this:

http://www.sparkfun.com/commerce/tutorial_info.php?tutorials_id=59
 
I'm interested in discussing some of the choices you made and learning how you made them:

1) That's a lot less heatsinking than most people are using. Did you do math to justify this, or determine it was OK experimentally?

2) Same for current - curious how you chose 400mA.

3) Are you buying Rebels premounted to stars, or soldering them directly to your board?

4) What are you using for a driver?

The reason it stays cool enough is because the heat sinking is copper with thermal vias. Copper is very conductive. More of experimenting than math. Basically I envisioned the board design after much trial and error with different LEDs, boards, drivers, etc. I had it made custom for me by a professional. I am not an electrical engineer. Right now its at 400mA since its been tested and runs well at that current. But we are stepping it up along the way to see where it can go. The rebels are soldered straight onto the board. Its a built in driver circuit but I'll have to get back to you with details.


I had to mount some cree's onto boards because they turned up seperate but what a stress. I would never do it again, I'd rather pay the extra money to get them pre mounted
 
I got my small heatsinks and leds today, so until now I was working on my new light. I'm pretty happy how these worked out. I think the heatsinks are good enough for the leds. After about 30mins of running inside the lid the temperature of the heatsinks is less than 60℃ which, according to Cree's documentation, will keep the leds alive for average of 100000hrs (almost 11.5 years) at 700mA!

I have plenty of pics, but I'm getting tired now, and I'm not done modding the top of the tank. All in all I'm very happy how things turned out. My goal was to reuse the top of the aquarium that came in the kit and these small heatsinks made it possible. Also the price was even better than getting one big heatsink.

Here are a couple of pics (parts and almost finished product). You will notice 4 small fans. I'm thinking of putting these on the back to blow hot air out if the temperature there gets too high.
 

Attachments

  • 12led10aga.jpg
    12led10aga.jpg
    84.3 KB · Views: 3
  • 12led10aga_parts.jpg
    12led10aga_parts.jpg
    49.2 KB · Views: 3


I had to mount some cree's onto boards because they turned up seperate but what a stress. I would never do it again, I'd rather pay the extra money to get them pre mounted

Hi timmmysli - I'm impressed you were able to solder the ground tab under the LED with the ceramic top stove. A hot plate can also be used. Best as you said to order the LEDs already mounted. The ground pad under the IC is the main heat transfer point - if this is not soldered correctly, the high power LED will not be able to conduct heat well and it will overheat and burn up.

I assume that your wife was not in the house when you did that? I also you my oven (soften spa flex tubing, bend acrylic, etc) for some aquarium DIY but only when my wife is off somewhere ...
 
Hesham, my tip is if you don't have a wife you can do anything whenever you want lol haha

I pre soldered the pads first and did a few test runs melting the solder with the hotplate before jumping in the deep end. I made sure the leds weren't on the hot plate for too long. I read up on all the cree data sheet's first in regards to thermal tolerances during of the leds.

Still wouldn't do it again lol
 
I don't know if anyone ever checked the KWh usage, but I just hooked up my 12LEDs at 700mA with 4x40mm fans and the Kill-A-Watt is showing 34W usage.

EDIT: the current at the Kill-A-Watt is 540mA

Temperature-wise things are much better with these 4 fans. I can touch the heatsinks without any problems.

Here is the finished product hooked to my arduino:

http://joro.geodar.com/videos/leds.html

Thanks for this great project.
 
Last edited:
So who uses LEDs for shimmer? I was looking into T5s, but want MH still for shimmer. Someone mentioned others use LEDS for this. Is this true? Can you use a cluster as a point source for ripple effects?
 
Status
Not open for further replies.
Back
Top