FishMann's 240

FishMann

Member
Ta da!

PXL_20260501_211208351.jpg


Lol, this is what I have been looking at for the past couple of months. But for real, the tank is being delivered next Friday.

It is an Innovative Marine 240 INT with a white stand. 83 x 30 x 22 I opted for their complete system which comes with sump and plumbing. This plug and play is what sold me. I have a slight regret on choosing the INT over the EXT, but space is limited.

Tank will be a mixed reef, with more focus on fish and critters. If I end up with just zoas and shrooms I'd be happy but I am planning on some LPS and hopefully a Monti.

Lighting may be a little unconventional. 3x 66" AI Blades suspended from the ceiling on 2020 aluminum.

Sump: IM's rfs 50 with their MIghtyJet xl return pump

Skimmer: RO Regal 200 INT

I managed to snag 2x MP60s for about the price of one. One is brand new in its box. One was used for about a month.

Heating: 1300w total. 700w (2x350) is IM's Helio PTC heater/controller and 600w BRS titanium on an inkbird. However I am considering returning the inkbird and using an aqualogic/ranco instead.
The room is cold in the winter 60-65. I am replacing the double pane glass in the windows who's seals have failed and I may try that shrink wrap temporary insulation from the box store. Vents are in the ceiling. Floor is slab.

I have 120lbs of caribsea dry special grade. I will be getting some TBS rock and maybe some sand.

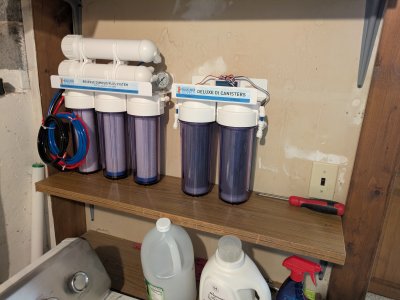
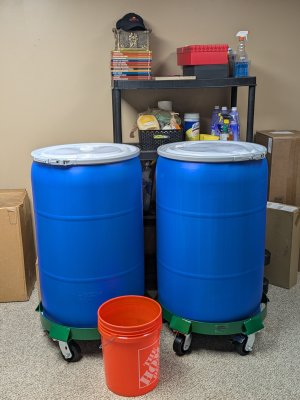
For water making, storage and mixing I have a 6 stage from BRS and 2 55 gallon drums from uline on heavy duty steel dollies. Went with the heavy duty (2000lb) vs regular (1000lb) dolly for the extra wheel. 5 vs 4. I do not want these things tipping over. You could kill a man with one of those casters or at least break a toe if you dropped it.

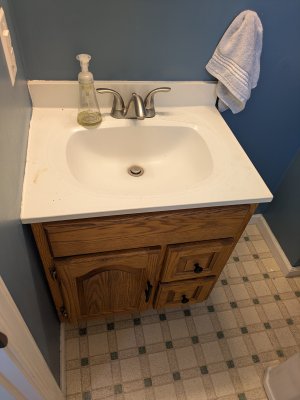
I think thats about it for now. I did change out the old and gross sink in the half bath around the corner.


Haven't had a tank since 2007. Exciting!
.
 

Attachments

  • PXL_20260320_153040213.jpg
    PXL_20260320_153040213.jpg
    2 MB · Views: 34
  • PXL_20260501_211141147.jpg
    PXL_20260501_211141147.jpg
    2.2 MB · Views: 25
  • PXL_20260414_183546126.jpg
    PXL_20260414_183546126.jpg
    2.3 MB · Views: 30
  • PXL_20260416_014317429.jpg
    PXL_20260416_014317429.jpg
    1.5 MB · Views: 32
Last edited:
Let the games begin!
Very nice stuff.

Yup, heat controllers are an absolute must. Heat kills fast. Heat kills all.

the INKBIRD 306 wifi not only stops heaters if overheating, no matter where I am, if heat gets beyond my caps, I get advised immediately and can stop, restart or modify heating requirements remotely in addition to the action taken by INKBIRD. The wifi is a game changer for me.

For me, that came in real handy just a week ago.
Saved everything.

Also, I tried two separate controllers but it did not work. One interfered with the other and heat was going on/off very fast. Went back to one and it worked great allowing only .5 degree variation.

It will be exciting to see your build!

Good luck!
 
Looking like an awesome start! Nothing wrong with using blades. My only possible concern may be the punch to get sufficient light down to the bottom but I haven’t looked at them in a while.
 
Tank may have to sit outside over night before I can bring it inside. Could this be a bad idea?

Temp will drop to 40-45 over night then go up to 60 during the day.
 
I don’t see an issue with one night. You could have some temperature shock but as long as your not banging it around you should be good. And my experience is typically hot to cold not cold to hot though so it may be different. I’d just make sure it’s covered to reduce cleaning necessity
 
Tank was delivered yesterday and the whole process went really well. I was a little anxious about this once I ordered the tank. The shipping you pay for through IM gives you delivery inside a garage rather than curbside but that is solely at the drivers discretion. My driveway has a nice incline to it it so I was anticipating curbside.

My driver was hands down the best possible candidate I could have had. Not only did he back his truck up the driveway and try to deliver at the top of the driveway (gravity did not allow him to get the 1208lb load onto the liftgate), but he was also super patient and helpful. With my girlfriend and I pushing, he pulled the whole thing up to the top of the driveway.

He then helped me break it down and take the sump off the top so the rest would fit into the garage. I then asked him if he would give me a few minutes to open up the crate to check the tank. Again he was very patient and understanding and even helped me lift off the stand (unassembled) so I could get to the crate with the tank.

With everything looking good, I signed his paper, shook his hand, thanked him and gave him $100. He said most drivers would have just left it in the street but that he tries to put himself in the customers position. Truly a great person! The whole process took just under an hour.

Today some movers with experience moving large aquariums are coming to bring it inside.

Oh and I was stressing out the whole morning. Since March, the township has been upgrading the poles and lines in my neighborhood. I already had the new poles in but they chose yesterday to do the lines on my street. They left 10mins before my delivery.
 

Attachments

  • PXL_20260507_180132420.jpg
    PXL_20260507_180132420.jpg
    2.1 MB · Views: 26
  • PXL_20260507_170338980.jpg
    PXL_20260507_170338980.jpg
    2.7 MB · Views: 26
  • PXL_20260507_165005820.jpg
    PXL_20260507_165005820.jpg
    2.4 MB · Views: 26
  • PXL_20260507_164851103.jpg
    PXL_20260507_164851103.jpg
    2.7 MB · Views: 26
  • PXL_20260507_163008025.jpg
    PXL_20260507_163008025.jpg
    3.4 MB · Views: 25
  • PXL_20260507_151113545.jpg
    PXL_20260507_151113545.jpg
    2 MB · Views: 24
  • PXL_20260408_185113421.jpg
    PXL_20260408_185113421.jpg
    3.9 MB · Views: 27
I did call and send these pictures to IM. They assured me that this silicone is just extra and is an extra bead over the silicone between the glass. It is a little unnerving and annoying especially after what I payed for this thing.
 

Attachments

  • PXL_20260507_193140750.jpg
    PXL_20260507_193140750.jpg
    1.3 MB · Views: 28
  • PXL_20260507_193124435.jpg
    PXL_20260507_193124435.jpg
    1 MB · Views: 28
I did call and send these pictures to IM. They assured me that this silicone is just extra and is an extra bead over the silicone between the glass. It is a little unnerving and annoying especially after what I payed for this thing.
I don't like the looks of that. That would make me nervous.
 
What I failed to realize yesterday was that those seams are on the overflow. The actual perimeter seams that join the 3/4" glass all look good! No bubbles.

Anyway tank is inside in a temporary location. They made it look very easy. 4 guys. One big guy, One lineman sized, 2 normal dudes , a custom dolly and no vacuum handles. 800lbs of glass. 30 mins. The amount of stress and anxiety I suffered wondering about these past what ended up being 90mins total was all for naught

Next steps are to assemble the aluminum stand and have an electrician install a couple more receptacles. I wanted the stand set up before having him by so I could place them accordingly.
 

Attachments

  • PXL_20260508_135828426.jpg
    PXL_20260508_135828426.jpg
    3.4 MB · Views: 29
  • PXL_20260508_133740742.jpg
    PXL_20260508_133740742.jpg
    4.9 MB · Views: 29
Ah, for the overflows, no worries then.

FWIW - My tank overflow wasn't sealed well. I just bought some black silicone sealant and redid the seals. Worked like a charm.
 
A poor overflow seal still matters in a power outage. Proper seal - overflow drains to the lowest outlet, tank stays full, leaking seal - entire tank slowly drains to the lowest outlet, maybe overflows the sump.
 
The opposite / "hidden" side of the over flow does appear to be sealed well.

However, below is the plumbing. Main drain is on the left. I haven't looked at the plumbing very thoroughly yet but red arrow is open and I do not see any cap. I Imagine if the situation that kharmaguru has described were to happen then the siphon would break there.

If red arrow does get capped, could I not just shorten blue arrow? Heck are red and blue even needed?


3476364311.jpg
 
What is inside the overflow? My tank has standpipes. So, worst case with leaking overflow would be 1” draining from the tank.

Looking at the diagram you posted, I’m not understanding how the left plumbing works.
 
Someone please chime in and tell me that the stand does not need to be perfectly level. I do have an optional leveling base but my ocd/type A/neurotic/whatever self can not handle adjusting 15 points of contact. I would have liked the extra ~5" of height but I would always be stressing over whether the base was doing more harm than good.
Bubble pics are without the base.
 

Attachments

  • PXL_20260512_203844096.jpg
    PXL_20260512_203844096.jpg
    1.8 MB · Views: 18
  • PXL_20260512_204009162.jpg
    PXL_20260512_204009162.jpg
    2.8 MB · Views: 26
  • PXL_20260509_221205877.PORTRAIT.ORIGINAL.jpg
    PXL_20260509_221205877.PORTRAIT.ORIGINAL.jpg
    1.6 MB · Views: 28
  • PXL_20260509_221217004.PORTRAIT.jpg
    PXL_20260509_221217004.PORTRAIT.jpg
    1.4 MB · Views: 25
It needs to be level. Firstly for a level waterline in your tank, but more importantly that no parts of the tank or stand are more stressed than others.
 
Back
Top