Hiding return pipe inside the overflow pipe

el chupacabra

New member
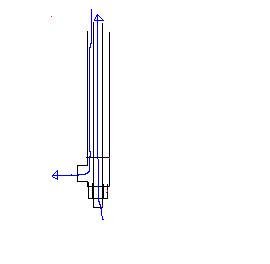
I've made a sketch to show ya'll this example. I want to bring the water return pipe up through the overflow pipe. In the part under the tank there will be an elbow joint inside the outer pipe bending the return pipe through a hole drilled into the outer pipe (to separate the 2 pipes), then trying to seal it up the best I can. Can I do it? I'm not really handy...
overflo2.jpg

overflo.jpg

I'm putting this out there to test the temperature of the idea in the community. Hoping someone has tried something like this and has some tips.

Why oh why would I want to do this? I want a 55g tank that's viewable from all sides. There isn't much real-estate in 55g tanks and I don't want overflow boxes cluttering up the look. At a glance I want people wondering for a second how it works since they can't see anything filter related in the tank. Thats how clean a look I want. I might hide the pipe in rock work if possible.
 
Will it work? Yes. The seal with the elbow into the overflow down the bottom shouldn't be much of a problem as the drain isn't under pressure. It'll also be noisy as hell though 'I suspect.'
What's wrong with a black overflow box with a silent drain and seperate return? Looks just as intrusive I reckon?
 
It'll also be noisy as hell though 'I suspect.'
Maybe, but noise from overflow hasn't bothered me much before. This is only 55g so there isn't that much water rushing down the pipes. There are other ways to deal with noise anyway.
What's wrong with a black overflow box with a silent drain and seperate return? Looks just as intrusive I reckon?
...but the tank real estate that would take up. If I added a second pipe from the bottom it would take up much more than twice the realestate since the pipes have to be spaced far enough for 2 bulkheads or seals. An overflow box would have to be big enough to encompass the two. If this design can hold up safely it will save tons of space. Now the best way to save tank space is drill in the side and have pipes hanging off the side of the tank. And I just can't have that... Although I am still pondering it...
 
On a 55g you really only need 150gph flow through the sump (3x) - if you go with that, noise shouldn't be bad. Drilling the hole for the elbow down below the return, and fitting that elbow, could be tricky/difficult, but not impossible. It looks workable to me.

BTW, why put it near a corner? Since it's meant to be viewable from all sides... If you're going to arrange your rock into a central island, you could put it right in the middle of the tank and T it at the top. If you're going with two islands, then in the middle of one of those...
 
Yes It Works..... My Good friend does this way on his 750 gallon in his resteraunt, but the bottom of his he uses a "T" on the drain placed on its side, and then uses a bushing on the bottom to bush down to his return... I tried to draw a pic quick using microsoft draw.... i cant do your fancy program.....
 

Attachments

  • Baddiagram.JPG
    Baddiagram.JPG
    4.1 KB · Views: 17
BTW, why put it near a corner? Since it's meant to be viewable from all sides... If you're going to arrange your rock into a central island, you could put it right in the middle of the tank and T it at the top. If you're going with two islands, then in the middle of one of those...
That is probably what I will do.
muttley000 Interesting idea. Is this a glass 55? I thought they had tempered bottoms which would be an issue.
I haven't decided yet but I'm leaning on acrylic. I like how there is very little glare on acrylic, hard to tell where water meets plastic meets air etc.
Lukel but the bottom of his he uses a "T" on the drain placed on its side, and then uses a bushing on the bottom to bush down to his return... I tried to draw a pic quick using microsoft draw.... i cant do your fancy program.....
I'm gonna keep staring at that pic until I get it, but how does he fit the T inside the outer pipe? I'm think I'm missing something here... or it isn't inside the pipe to begin with. By the way my fancy program is just the free google sketchup. It can be used to draw product prototypes, dream houses, and fish tanks. It has about a 10 minute learning curve and comes with video tutorials. My drawing can be done in less than 4 minutes.

edit:
kreef82aquavim sells them
Nice, now I have to see if one of the dealers is willing to order it for me, assuming it's not too expensive.
 
I've thought of doing this but haven't had the opportunity yet, just never did an island yet. To explain lukels drawing/ how I would do it. You put a 1 1/2" or 2" bulkhead in the bottom. Add a 4-8" stub of pipe to the underside. Take an appropriate sized T for the pipe and attach aimed in the right direction. Take a reducer bushing that drops to the appropriate size, take a barrel sander such as that for a dermal. Take off the stop/ridge that normally keeps the pipe from sliding all the way through the bushing. Glue a street 90(socket on one side, pipe on the other) to the inside of the bushing, only half way. Glue the bushing into the T and glue the supply pipe to the other side of the bushing. You may need to glue the bushing in first then the 90 from the inside of e T Add the rest of your drain plumbing to the bottom and glue up the rest of the return then slide the overflow over the top. Post some pics so we can see how it all goes.
 
Last edited:
I've thought of doing this but haven't had the opportunity yet, just never did an island yet. To explain lukels drawing/ how I would do it. You put a 1 1/2" or 2" bulkhead in the bottom. Add a 4-8" stub of pipe to the underside. Take an appropriate sized T for the pipe and attach aimed in the right direction. Take a reducer bushing that drops to the appropriate size, take a barrel sander such as that for a dermal. Take off the stop/ridge that normally keeps the pipe from sliding all the way through the bushing. Glue a street 90(socket on one side, pipe on the other) to the inside of the bushing, only half way. Glue the bushing into the T and glue the supply pipe to the other side of the bushing. You may need to glue the bushing in first then the 90 from the inside of e T Add the rest of your drain plumbing to the bottom and glue up the rest of the return then slide the overflow over the top. Post some pics so we can see how it all goes.


That is exactly how it's done. I just couldn't find words to explain it like that. I will take a picture tonight from underneath... , and I'll post it on here!
 
Been in a lot of situations where I needed things overnighted to me... You really don't need to be handy for this one. If you over sand just use a lot of glue or heavy body, never use light body glue, it has no filler, is thin like water and sets up too quick. All three are at home depot, most stuff is medium(only the clear is diferent grades) just check the lable. If it doesn't turn out the first time it's about $5 in parts. Use a coarse, like 60-100 grit, sandpaper drum or else you'll be sanding forever.
 
Back
Top