In By The Skin Of My Teeth ` Skins 180

Skins

Member
Hello everyone. I have finaly graduated to the tank I have been wanting all along; a 6' tank. I started with a 55, graduated to a 75 and then to my current 120 after 2 years. The 120 has been up for a year. My build can be found here: http://reefcentral.com/forums/showthread.php?t=1769611 It was a massive (for me at least :sad2:) undertaking. The whole while, I sized everything such as sump, skimmer, fuge, lights etc. to accomodate a larger tank in the future. Well the future is here. A local LFS is having the 15th annaversary and everything is 25% of. Of course they didn't have the tank I wanted in but was told they would ship one in. So needless to say, I will have a RR AGA (Aqeuon) 180 on wednesday for the tidy sum of $750.00:fun4: .

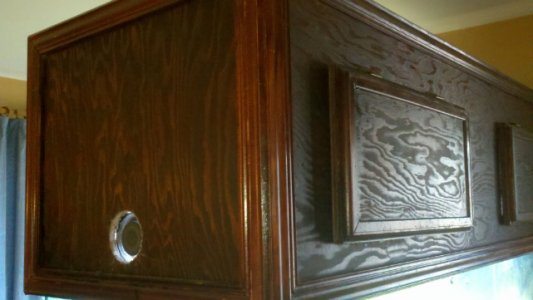
Sooo.. It's time to start the wheels spinning. I did a mock-up in sketchup. I am a noob so please excuse the crudeness. I indent on building the frame out of wood and cladding it in wood raised panels for both the cabinet and the hood. The hood will be mounted to the ceiling

RoughMock-up.jpg


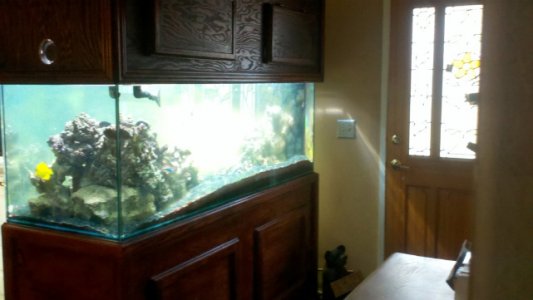
Here is the area where it will go:

IMG00139-20110219-1710.jpg


My plan is to empty the contents and put everything in the sump, disconnect the return and route it back to the fuge. This affords me the time I need to construct everything.
IMG00141-20110219-1727.jpg


More to follow...
 
Sure. The lower one is the sump. The return pump is hooked to this tank. I have dual overflows so one goes here to the sump. It is the pvc line behind the skimmer in this photo:

IMG00142-20110220-0921.jpg


The other line runs the the upper tank which is the fuge.

IMG00143-20110220-0921.jpg


The fuge has two drain lines that dumps back to the lower sump tank seen here:

IMG00144-20110220-0921.jpg


The fuge is baffleless. I created stand pipes to the height I wanted the water to be. I also siliconed a larger pieve of pvc tube over the bulkhead & stand pipe to keep the sand back if I ever had to service the stand pipes.

fugeskimming.jpg


Both tanks a baffleless and have zero micro bubbles because of a setup I concocted that can be found in this thread: http://reefcentral.com/forums/showthread.php?t=1837045
These are mock-up pictures, hencee the duck tape. Everything has been fitted since then and worked flawlessly for a year.
IMG00075-20100421-2027.jpg


IMG00077-20100421-2027.jpg


Hope that helps Rug. If not let me know and I will be happy to answer any other specifics.
 
Soo, wood working isn't my strong suite. Add that to the fact I don't have a real work area nor the tools such as fancy router bits; I have been looking for an easy solution to cladding my upper and lower areas in raised paneling. Has anyone used this place? http://www.wainscotingamerica.com/design-order/raised-panel-wainscot.php

If not, does anyone know of any other options short of going out and buying a small wood working shop?

I do have a local woodworker giving me a price but I have used him before and wasn't thrilled.
 
You could look at pre-built kitchen cabinets from Lowe's or Home Depot to see if maybe you couldn't kludge something together.

Dave.M
 
How exactly are you holding the upper stock tank in place? It looks like there is some type of rack system holding it up, I would like to know more if so. Also did you put regular bulkheads in the bottom of the upper tank?
 
Yes it is a rack system. It is 1" tube steel. It is setup to support the bulk of the weight by the upper rails but it also has lower steel support underneath the stock tank. I wanted the largest amount of water volume and this was the best solution to get two standard 100 gallon stock tanks in a small footprint. The upper overhangs the lower about 6"-8". The upper has two 1" schedule 80 bulkheads in the bottom where it overhangs the lower stovck tanks. As I described above, I slipped a larger pvc pipe over the bulkheads to hold back the sand in the event I need to change out the overflow standpipes. Both tanks have similiar stands. These picture are the mock-up and the welds had not been dressed or painted.

IMG00160-20100320-1118.jpg


IMG00172-20100320-1708.jpg


IMG00173-20100320-1708.jpg


IMG00175-20100320-1959.jpg


IMG00208-20100403-1923.jpg


Installing the drainline for the upper stock tank.
IMG00008-20100410-1722.jpg
 
Cool, thanks for the detail, an idea I may have to steal sometime:) Have you ever had problems with the bulkheads leaking on a not so flat surface, or do you just put them in the flatest spot you can find?
 
I used some furniture grade plywood and some molding to make the facade on my hood and stand. skil saw and a mitre saw and thats it (besides glue and screw and hardware of course).
 

Attachments

  • 623427889_photobucket_15397_.jpg
    623427889_photobucket_15397_.jpg
    88.6 KB · Views: 4
  • 623427889_photobucket_15395_.jpg
    623427889_photobucket_15395_.jpg
    96.1 KB · Views: 4
  • 623427889_photobucket_15394_.jpg
    623427889_photobucket_15394_.jpg
    82 KB · Views: 3
I'm glad I could help. I know a bulk of my ideas are not my own either. As for bulkheads on the underside, they have never leaked. The underside of the stock tanks have reinforced webbing. In between the webbing the the surface is perfectly flat to accept standard bulkheads. That was a breeze compared to replacing the stock bulkhead that comes with it on the side.
 
I used some furniture grade plywood and some molding to make the facade on my hood and stand. skil saw and a mitre saw and thats it (besides glue and screw and hardware of course).

Thanks. That is the way I will head if I can't solve to raised panels. I am still noodling out how to incorporate my design and also make the upper bulkhead accessible for cleaning/maintenance while still giving the illusion of a solid piece at the upper bulkhead. I hate woodworking.
 
Minor update. Met with a woodworker. I have him working on some plans based on my sketchup. Hopefully this Friday he will be out to get precise measurements of the area and the tank.

Also, I pick up my tank tomorrow. I can't wait.

I also started getting a trickle of things in that I started ordering.

Very excited about this one. Since my fish room in in the basement, I love the idea of having a remote head unit so I can control everything remotely from the main head unit upstairs on the display tank. Bad news is I cant find my SID and I need to upgrade my units before putting them on-line. Bummer.

REMOTE HEAD UNIT:


IMG00149-20110222-1610.jpg


I also got a SL2. I have the SL1 with the temp and pH in the basement sump room. I want this to be upstairs so I have temp and PH for the display. I plan on dropping them in the overflows to hide them. A side note; what in the world is up with DA's manufacturing? Every time I try to order the salinity probe it is not in stock...ever...at any vendors or thiers....GRRR

SL2:

IMG00150-20110222-1615.jpg


Still waiting on my first wave of BRS stuff.
 
Went to pick up my tank. It has the Faux woodgrain trim instead of black trim. BOOO. Back it goes. I have to wait until NEXT Wednesday now.

No one has used the light hanging system I posted above?
 
Minor update for those who care.

Got a package BRS:

IMG00170-20110225-1357.jpg


Nice new topoff unit:

IMG00171-20110225-1358.jpg


Also got my new SID so I can upgrade my ReefKeeper and install my new components:

IMG00172-20110225-1359.jpg


I also ordered 100 lbs of shelf rock from BRS. I plan on completely redoing/re-attaching my corals in the new tank.
 
So I continue to gather all the odds and ends I need for my upgrade. I currently have two 400watt setups running radiums in the hood of my 120. I needed a third setup so I started looking around for another Bluewave . I knew that they had been discontinued but I found a few places that had them still in stock. However, I was lucky enough to stumble across a local craigslisting that had two 400 watt bluewave I's and huge matching reflectors for the same price of one new one shipped! To top it off they were only in service 3 months. Add to that, I now have a back-up ballast in the event one goes done. At any rate, now I need to get a third reflector to match the other two.

IMG00173-20110226-1136.jpg


HUGE reflector compared to my sunlight systems batwings I currently have.


IMG00176-20110226-1137.jpg


Also the wood worker came by to get dimensions (less the tank dimensions) and work me up a price. I have to get this ball rolling.
 
Great start keep updating. I get lucky and can go to BRS and shop ;) so there is no waiting... good for me but my wife isn't thrilled.
 
Great start keep updating. I get lucky and can go to BRS and shop ;) so there is no waiting... good for me but my wife isn't thrilled.

Thanks. I would be broke if I could just walk into brs.

nice start man!

Thank you.

Great plan, following along.

Thanks. Hopefully the plan stays on track.


Not much to update. I uploaded Myreef 2.0 for the Reefkeeper. I must say I am impressed with its functionality. Everything loaded properly from the SID2 and no issues with dead PC4's and such. On the flip side, there are some gripes. Needing to take the entire system off line is daunting when you have 4 PC4's and a hand full of modules. Add to that that the SID cord is roughly 18" and it creates a MAJOR pain trying to access hard to reach components. On top of that, it has to be plugged into a laptop and the USB side does not seat tight. On several occasions, I bumped it and had to start all over on the particular module. Grrrr. I'm keeping an eye on the system because I programed it and woke up this morning and one of my halides was still on. I have read that on numerous occasion when people upgrade to myreef2.0 that the whole system becomes unstable and random setting go haywire.

Tank comes in Wednesday. I am praying it's correct. Still waiting on the woodworkers quote.

Lastly, Has anyone had issues with MP40's where the wetside magnet basically melts to the base? I can't figure it out but I believe it is radio noise from a ballast or PC4. I have played with the pin spacer and every time, after about 5 days, I get the red/green error. Open it up and see that the magnet is grooved and stuck to the bottom. I have switched out power sources, drivers as well as the dryside. I have rebuilt the wetside enough times to buy a new one altogether. Same results. Weird thing is I have another one on the other side that has had zero problems on the original bearing and bushing for over a year. I have had zero luck getting it figured out with Ecotech and I believe I am out of warranty now.:furious::hmm3:
 
Back
Top