IvanTheTerrible
Fish Nerd
I wasn't planning to start a build thread until I was much closer to actually finishing the build. However, I think it will be helpful to have a thread where I can document things as I go. Hopefully, some of you will enjoy it as well.
As the title suggests, this is going to be a very, very slow build (painfully slow). Much of that is driven by my schedule. My kids are involved in a lot of activities from spring through early fall, and I try to get in some of my other hobbies while the weather is nice. That leave late fall and winter to get all of the lingering home improvement/repair jobs done and to work on the tank. That being the case, I probably won't put water in it until this time next year.
A little background - growing up we always had a fish tank in our house. They were freshwater setups of increasing size and it was my job to take care of them. Those poor fish. I had no idea what I was doing, and neither did anyone in my family. At one point, I decided it would be good to take everything out of the tank and "thoroughly clean" it once a year. A thorough cleaning consisted of dragging everything to the back yard and spraying it with the hose. Essentially, I cycled my tank (and the poor fish) every year. The tank was surprisingly successful and most of my fish lived many years until I was in high school and we gave the tank away (7+ years). I always wanted to have a big, saltwater fish tank and vowed that it would happen when I had a home of my own. Fast forward many years, and I'm finally getting around to putting the big tank in place. For the past year I've been keeping a 20 gallon nano. The nano is great and has taught me a lot. It's also allowed me to play with different equipment, learn which features were important to me, and refine my plans.
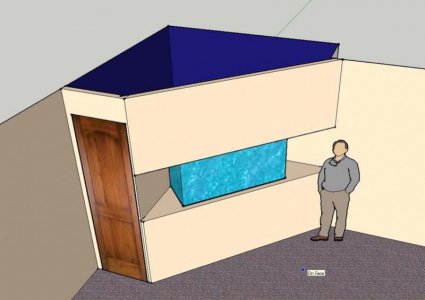
This tank will be installed in my basement, which I finished about 10 years ago. Because I'm adding a small fish room, that is going to complicate this build somewhat. When everything is complete, it should look something like this.

The plan has changed some since I made that figure, but I'm too lazy to update the sketch. The tank was made by customaquariums.com. The price was great, but communications not so much. The tank dimensions are 72"x30"x24" (LxDxH). The front is 5/8" low iron glass. The bottom and back are both regular 5/8" glass and both sides are 1/2" glass. I had them drill the back for the overflow, and plan to run a beananimal setup. Communications with them started out rough. For some reason I wasn't getting the emails they were sending. They quickly got everything sorted out and we were up and running (I thought). They were very helpful and stepped through everything with me. I'm sure I wasn't the perfect customer since I took the time to double check everything and asked what felt like a million questions. I ordered the tank in mid-October and started to get serious about my planning. Tank delivery was promised to occur by January 1st, but I figured it would be a week or two after that. In late December, I emailed them. They were getting hit with a pretty bad storm and promised to get back to me in the new year, which didn't happen. I emailed them a couple of times but didn't get a response. Then one day, the trucking company called and said they had a delivery for me. :eek2: They wanted to know if I wanted it delivered tomorrow or the next day (a Friday). I said Friday, since I didn't have anyone lined up to help unload it yet. I went home and immediately started recruiting, and watching the weather. Unfortunately, the tank wasn't the only thing scheduled to arrive on Friday. Winter Storm Jonas was supposed to hit my area at some point during the weekend.
Friday finally came and I was NERVOUS. The weather forecast was updated and the snow was supposed to start falling around 4:00PM. The tank was scheduled for delivery between 4 and 6. I called the dispatcher for the trucking company on Friday morning and confirmed that the delivery was still going to happen. She confirmed everything was on schedule and asked if a big trailer could get to my house. I said No, and she said it wouldn't be a problem. I asked if the trailer had a lift gate, and she said that it would. I was happy, sent a text to my helpers to let them know it was a go, and left work early so that I could go home and prepare. It started snowing around 2:00, so I shoveled my driveway. The tank was going to be stored in my garage, which is at the rear of my house. There's a slight slope to the driveway so I planned to keep it shoveled to make sure we didn't slip when carrying the tank. The snow hadn't stopped and by 3:30 I (and my helpers) was really nervous. I called the dispatcher and she promised to have the driver call when he was on his way. Around 4:00 I went out to shovel again. This time I also used the Prestone Driveway Heat I had purchased for dosing the nano tank. About 4:30 the driver called. He was only about 10 minutes away and said he would be at my house soon. I asked if he had a lift gate and he said no. Apparently, the dispatcher told him I would have a bunch of guys available to unload the tank. He said he had a 42' trailer and asked the best route to my house. I told him it was going to be tight with a trailer that big. Apparently, the dispatcher left that detail out too. Regardless, he promised to be there soon. I sent a text to my helpers asking them to get to my house ASAP. Ten minutes later the driver called back to say he wasn't going to make it. The road conditions were bad and getting worse and he didn't think he could get up the hills to my house. Since I had five helpers heading to my house and had already burned a half day of vacation, I REALLY didn't want to put the delivery off until Monday. We agreed to meet in the parking lot of a nearby McDonalds. I grabbed one of my neighbors and we headed out in my truck.
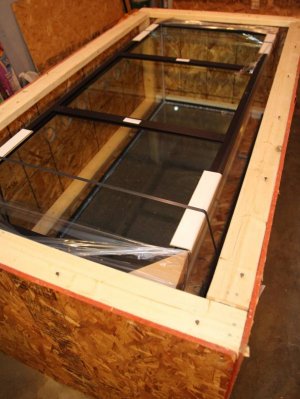
At the McDonalds, I popped the top of the crate off and did the best inspection of the tank that I could. Hopefully, that's the last aquarium I ever inspect in the back of a trailer in a McDonalds parking lot. As we were getting ready to transfer the tank to my truck, the driver informs us that he has a bad back from a recent injury and can't lift anything. I look at my friend and just smile. Somehow, the three of us managed to get the tank into my truck without completely destroying it. I signed the bill of lading and we were on our way. I pulled into my snow-covered driveway and around to the garage. At least with the tank in the truck we would have to carry it far. I backed up to the garage door and six of us transferred it to the ground. At that point I could finally breathe again. We ended up getting 9-10 inches of snow that night, but I didn't care - I had my dream tank sitting in the garage.

Wow, didn't expect this post to be this long. That's enough for tonight. I'll get into plans for this setup tomorrow.
-Ivan
As the title suggests, this is going to be a very, very slow build (painfully slow). Much of that is driven by my schedule. My kids are involved in a lot of activities from spring through early fall, and I try to get in some of my other hobbies while the weather is nice. That leave late fall and winter to get all of the lingering home improvement/repair jobs done and to work on the tank. That being the case, I probably won't put water in it until this time next year.
A little background - growing up we always had a fish tank in our house. They were freshwater setups of increasing size and it was my job to take care of them. Those poor fish. I had no idea what I was doing, and neither did anyone in my family. At one point, I decided it would be good to take everything out of the tank and "thoroughly clean" it once a year. A thorough cleaning consisted of dragging everything to the back yard and spraying it with the hose. Essentially, I cycled my tank (and the poor fish) every year. The tank was surprisingly successful and most of my fish lived many years until I was in high school and we gave the tank away (7+ years). I always wanted to have a big, saltwater fish tank and vowed that it would happen when I had a home of my own. Fast forward many years, and I'm finally getting around to putting the big tank in place. For the past year I've been keeping a 20 gallon nano. The nano is great and has taught me a lot. It's also allowed me to play with different equipment, learn which features were important to me, and refine my plans.
This tank will be installed in my basement, which I finished about 10 years ago. Because I'm adding a small fish room, that is going to complicate this build somewhat. When everything is complete, it should look something like this.

The plan has changed some since I made that figure, but I'm too lazy to update the sketch. The tank was made by customaquariums.com. The price was great, but communications not so much. The tank dimensions are 72"x30"x24" (LxDxH). The front is 5/8" low iron glass. The bottom and back are both regular 5/8" glass and both sides are 1/2" glass. I had them drill the back for the overflow, and plan to run a beananimal setup. Communications with them started out rough. For some reason I wasn't getting the emails they were sending. They quickly got everything sorted out and we were up and running (I thought). They were very helpful and stepped through everything with me. I'm sure I wasn't the perfect customer since I took the time to double check everything and asked what felt like a million questions. I ordered the tank in mid-October and started to get serious about my planning. Tank delivery was promised to occur by January 1st, but I figured it would be a week or two after that. In late December, I emailed them. They were getting hit with a pretty bad storm and promised to get back to me in the new year, which didn't happen. I emailed them a couple of times but didn't get a response. Then one day, the trucking company called and said they had a delivery for me. :eek2: They wanted to know if I wanted it delivered tomorrow or the next day (a Friday). I said Friday, since I didn't have anyone lined up to help unload it yet. I went home and immediately started recruiting, and watching the weather. Unfortunately, the tank wasn't the only thing scheduled to arrive on Friday. Winter Storm Jonas was supposed to hit my area at some point during the weekend.
Friday finally came and I was NERVOUS. The weather forecast was updated and the snow was supposed to start falling around 4:00PM. The tank was scheduled for delivery between 4 and 6. I called the dispatcher for the trucking company on Friday morning and confirmed that the delivery was still going to happen. She confirmed everything was on schedule and asked if a big trailer could get to my house. I said No, and she said it wouldn't be a problem. I asked if the trailer had a lift gate, and she said that it would. I was happy, sent a text to my helpers to let them know it was a go, and left work early so that I could go home and prepare. It started snowing around 2:00, so I shoveled my driveway. The tank was going to be stored in my garage, which is at the rear of my house. There's a slight slope to the driveway so I planned to keep it shoveled to make sure we didn't slip when carrying the tank. The snow hadn't stopped and by 3:30 I (and my helpers) was really nervous. I called the dispatcher and she promised to have the driver call when he was on his way. Around 4:00 I went out to shovel again. This time I also used the Prestone Driveway Heat I had purchased for dosing the nano tank. About 4:30 the driver called. He was only about 10 minutes away and said he would be at my house soon. I asked if he had a lift gate and he said no. Apparently, the dispatcher told him I would have a bunch of guys available to unload the tank. He said he had a 42' trailer and asked the best route to my house. I told him it was going to be tight with a trailer that big. Apparently, the dispatcher left that detail out too. Regardless, he promised to be there soon. I sent a text to my helpers asking them to get to my house ASAP. Ten minutes later the driver called back to say he wasn't going to make it. The road conditions were bad and getting worse and he didn't think he could get up the hills to my house. Since I had five helpers heading to my house and had already burned a half day of vacation, I REALLY didn't want to put the delivery off until Monday. We agreed to meet in the parking lot of a nearby McDonalds. I grabbed one of my neighbors and we headed out in my truck.
At the McDonalds, I popped the top of the crate off and did the best inspection of the tank that I could. Hopefully, that's the last aquarium I ever inspect in the back of a trailer in a McDonalds parking lot. As we were getting ready to transfer the tank to my truck, the driver informs us that he has a bad back from a recent injury and can't lift anything. I look at my friend and just smile. Somehow, the three of us managed to get the tank into my truck without completely destroying it. I signed the bill of lading and we were on our way. I pulled into my snow-covered driveway and around to the garage. At least with the tank in the truck we would have to carry it far. I backed up to the garage door and six of us transferred it to the ground. At that point I could finally breathe again. We ended up getting 9-10 inches of snow that night, but I didn't care - I had my dream tank sitting in the garage.

Wow, didn't expect this post to be this long. That's enough for tonight. I'll get into plans for this setup tomorrow.
-Ivan


