IvanTheTerrible
Fish Nerd
First of all, I would like to start this thread by saying "Thank You" to everyone on Reef Central. I've been researching reef tanks for about a year and learned SO much from this forum. There are many very knowledgeable folks who are willing to share what they know, and plenty of folks like me who have a lot to learn. I've tried to learn from both groups. Without the new folks making mistakes and asking "dumb" questions, this forum would just be a bunch of experts sharing random thoughts with the hope that someone was listening. I don't know about you, but that's not very appealing to me. I love the diversity of opinion on this forum. It lets me consider many options and decide which is best for my situation. If I choose wrong, at least I went into it with a chance for success. Thank you all for making RC what it is.
OK, on to the tank. Initially I was planning to start with a large tank and skip the many upgrades that seem to come with small/medium sized setups. Unfortunately, I haven't found the winning Powerball ticket on the ground yet, so I decided to build a nano while saving for the bigger tank. I figure this will make a very nice quarantine and/or frag tank once the bigger tank project is underway. It took me a long time to decide on a size for this tank. Ultimately, I decided on a 20 long for several reasons.
So, in early January I headed off to Petco and picked up a new tank during their $1/gallon sale. Looking at all of those AIO tanks, made me a little jealous of how clean they look without the heater and wires being visible. To hide mine, I decided to build a small corner overflow. Thanks to some folks in the DIY section, I was able to put together a small lexan overflow on my first try. It's not perfect but it's not the ugliest thing I've ever seen either. I also decided to paint the back of the tank black. I was pretty nervous since I had never painted a tank before. I was also worried because it was the middle of January and the temp has frequently been in the single digits, resulting in a pretty cool garage (probably lower 50s). I figured worst case I would be out $20 and have to start over, so I went for it. Surprisingly, it came out very nice. I left it in the garage for a couple of days. I would have left it longer, but it was on my wife's side of the garage :mad2:.
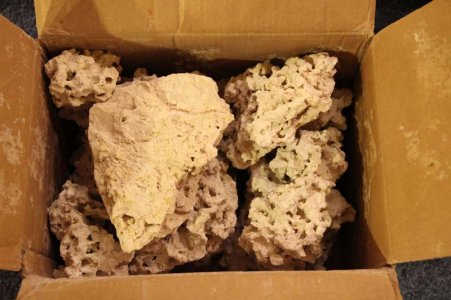
I placed a few orders, and soon had a 50 pound box of rocks from Reef Rocks on my porch.

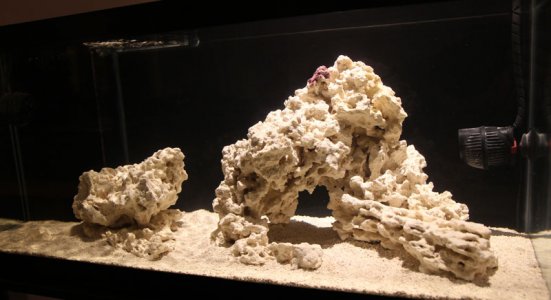
Much to my surprise, the rocks didn't jump into the tank and arrange themselves into a wonderful looking aquascape and I struggled with them for quite a while. I was always amazed at how many people create threads looking for help with their aquascapes. I mean it sounds east. Just pile up rocks until you they look the way you want. I learned that it's much harder than it sounds. Ultimately, I'm happy with how it turned out and that's what really matter. I decided to silicone the rocks together since they were pretty unstable when stacked and I didn't want to start over trying to create a new look. I tried not to overdo it with the silicone knowing that I may need to take things apart of some point. Hopefully it doesn't come to that, but we'll see if that time comes. Rather than use eggcrate, I decided to use some acrylic sheet under the rocks. I think this will serve two purposes. First, if I ever need to remove a rock, I can easily lift an entire structure but leave the other in place. Also, since the bottom rocks are siliconed to the acrylic, I shouldn't have a problem with fish or inverts burrowing under the rock.
That's enough for tonight. Here's a shot of the final aquascape.

OK, on to the tank. Initially I was planning to start with a large tank and skip the many upgrades that seem to come with small/medium sized setups. Unfortunately, I haven't found the winning Powerball ticket on the ground yet, so I decided to build a nano while saving for the bigger tank. I figure this will make a very nice quarantine and/or frag tank once the bigger tank project is underway. It took me a long time to decide on a size for this tank. Ultimately, I decided on a 20 long for several reasons.
- First, it seemed to be the largest tank that had a reasonable chance of success with minimal equipment. Since I'm saving for a larger tank, I didn't want to spend a lot of money on a sump, return pump, etc. that would be overkill for a QT or frag tank. Yes, there are those with larger tanks that don't run a sump but 20 gallons seemed to be the most commonly recommended limit.
- I also really liked the dimensions of the 20 long over other tanks like the 20 high. For some reason the length really appealed to me. Plus, most comments indicate that aquascaping is easier with a deeper tank rather than a taller tank.
- I considered a cube, but everything I could find was an AIO. Nothing wrong with AIOs, I really like the way a lot of them look. There are some beautiful AIO tanks out there, but most people seem to upgrade one thing or another. I didn't want to buy something just to replace it with something else.
So, in early January I headed off to Petco and picked up a new tank during their $1/gallon sale. Looking at all of those AIO tanks, made me a little jealous of how clean they look without the heater and wires being visible. To hide mine, I decided to build a small corner overflow. Thanks to some folks in the DIY section, I was able to put together a small lexan overflow on my first try. It's not perfect but it's not the ugliest thing I've ever seen either. I also decided to paint the back of the tank black. I was pretty nervous since I had never painted a tank before. I was also worried because it was the middle of January and the temp has frequently been in the single digits, resulting in a pretty cool garage (probably lower 50s). I figured worst case I would be out $20 and have to start over, so I went for it. Surprisingly, it came out very nice. I left it in the garage for a couple of days. I would have left it longer, but it was on my wife's side of the garage :mad2:.
I placed a few orders, and soon had a 50 pound box of rocks from Reef Rocks on my porch.

Much to my surprise, the rocks didn't jump into the tank and arrange themselves into a wonderful looking aquascape and I struggled with them for quite a while. I was always amazed at how many people create threads looking for help with their aquascapes. I mean it sounds east. Just pile up rocks until you they look the way you want. I learned that it's much harder than it sounds. Ultimately, I'm happy with how it turned out and that's what really matter. I decided to silicone the rocks together since they were pretty unstable when stacked and I didn't want to start over trying to create a new look. I tried not to overdo it with the silicone knowing that I may need to take things apart of some point. Hopefully it doesn't come to that, but we'll see if that time comes. Rather than use eggcrate, I decided to use some acrylic sheet under the rocks. I think this will serve two purposes. First, if I ever need to remove a rock, I can easily lift an entire structure but leave the other in place. Also, since the bottom rocks are siliconed to the acrylic, I shouldn't have a problem with fish or inverts burrowing under the rock.
That's enough for tonight. Here's a shot of the final aquascape.


