Leak in acrlyic!

NoobReeferdude

New member
Hey all.
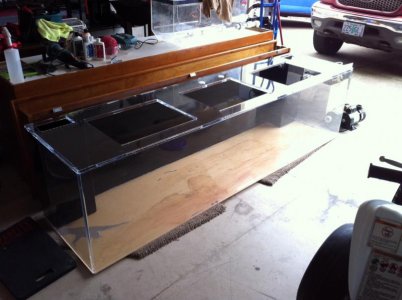
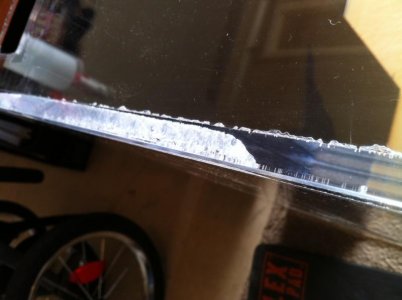
I have been reading through RC's forums for an answer on how to repair a leak in a 240g 8x2x2 Acrylic tank, but im conflicted.
The leak is on bottom right side, it seeps through the seam in 3 small spot in the same area. the overflow is on the other side of it, so it doesn't matter what the repair looks like, long as it holds!
I have come to the conclucsion either Weldon 16 or Weldon 40 with an acrylic rod?
Might anyone be able to make a suggestion for repair?
THANKS!
 
Not an expert, but I think you would use Weldon 4, a watery liquid to weld the seams ( I would re-do all seams since they may not have been done correctly)... I would then weld in 1/4 round or 1/2" square acrylic rods along all the inside seams with the thicker weldon

Do you see any air bubbles in the seams?
 
Hey thanks for getting back to me.
The tank is fairly old im guessing at least 10 years. I don't see any bubbles in the seams, but some of the seams around the top brace are white in areas.
im going to break down the plumbing tomorrow and I will snap a couple pictures of the area where it is leaking, I was hoping to not have to redo all the seams and instead just smother the leaky area with the proper Weldon and see what happens!
Im going to be setting this up in my garage for a month or 2 to cycle, so if I try the repair, ill have good test time.
 
Hi Btucker, thanks for the reply,
I have some Weldon 16, and Weldon 40 2 part, on order. im going to try to pick up some acrylic scraps from a local shop.
Because the area where the leak is, will be hidden in the overflow, im leaning towards your method of a rod plus Weldon 16.
Question, do you know if too much 16 is a bad thing? I want to really get it in there, but I don't want to put so much that it weakens the acrylic.
 
It won't weaken anything but it won't get in there either. You can try some weldon 3 or 4 in the joint. It would use some capilary action but it will be rather difficult to get the seam to fit right. 16 with strips on the inside is the way to go.

You can also route out the white spot and use 40 to make the repair.
 
Thanks for the info guys.
So I was able to purchase some acrylic rods and Weldon 4 and 16 form a local shop today.
I got ahold of a local guy who builds custom acrylic tanks, and he suggested using Weldon 4 with a triangle piece of 1/2 inch rod.
You guys are saying 16, I have both, does it really matter which one I use?

IME ... 4 in the seams, 16 with the rod
 
Hi Btucker, thanks for the reply,
I have some Weldon 16, and Weldon 40 2 part, on order. im going to try to pick up some acrylic scraps from a local shop.
Because the area where the leak is, will be hidden in the overflow, im leaning towards your method of a rod plus Weldon 16.
Question, do you know if too much 16 is a bad thing? I want to really get it in there, but I don't want to put so much that it weakens the acrylic.

The 16 is too thick to "get in". If you want that, clamp the seam, apply Weldon 4, lay down the acrylic strip or acrylic corner support and apply Weldon 16. once dry, it won't go anywhere.
 
While you may have success in repairing the joint, the truth is you should honestly just junk the tank. If it's had a joint failure it's bound to happen again down the line since the tank was obviously not built right from the get go... So I'd seriously consider what you'll do when the tank fails again except think about it full of saltwater in your house and fully stocked.

I know not the answer you're looking for but that's the hard truth. If you're comfortable with it then give it a shot but there's no way in hell that would be going in my home.
 
I have been thinking about a new tank..
This thing will not go into my house unless I am very comfortable with it, and it will be running in my garage for at least a month maybe 2 to cycle, before I goes anywhere on my house.
I bought enough acrylic rod to do all the bottom seams, like you said
H2Ogardon, I wont see the bottom so I don't care what it looks like.
I will also be setting up a warning system with a 24v transformer, a wet switch and an alarm relay so if it detects water it will go off and possible even dial out to a phone, I think this is a good idea with any big tank to be honest.
if its a catastrophic failure.. hey I guess that's what insurance is for lol
 
While you may have success in repairing the joint, the truth is you should honestly just junk the tank. If it's had a joint failure it's bound to happen again down the line since the tank was obviously not built right from the get go... So I'd seriously consider what you'll do when the tank fails again except think about it full of saltwater in your house and fully stocked.

I know not the answer you're looking for but that's the hard truth. If you're comfortable with it then give it a shot but there's no way in hell that would be going in my home.
Based on what? Can you be SURE that a new tank will be 'perfect'?

His 8'x2'x2' has ~48' of seams... Does 1 small problem mean that "the tank was obviously not built right from the get go"
I have been thinking about a new tank..
This thing will not go into my house unless I am very comfortable with it, and it will be running in my garage for at least a month maybe 2 to cycle, before I goes anywhere on my house.
you should inspect and use #4 on all inside seams and add the 1/2" acrylic to the bottom seam
As for water testing...it's a good idea, BUT IMO every time you empty and refill &/or move a tank, there is a new chance for a seam to become a problem... Letting it 'cycle' in the garage is probably a waste of time.
For the record...I have done the exact same repair, that I'm telling you to do, on my 450g and 130g tanks...been fine for past few years.
 
IMO you have two separate but related issues. First is the structural integrity of the seams to withstand the water pressure exerted upon them. Second would be the obvious symptom - the leak.

Now while I feel the rod method will secure the leak, I feel that the underlying problem of a weakened seam is not going to be enforced significantly by the rod repair method. e.g. if it is going to fail at some point, this repair will not stop that...
 
Adova, The seam has already failed, it's leaking. and I think any acrylic tank, especially an 8x2x2, is going to stress the integrity of the seams no matter how well put together.
2 options, Attempt repair, or new tank, I cant lose with option 1. I also have a top brace all the way around the tank with only 1ftx1ft squares cut into it for access. so this helps with some support am I right?
 
Sure - the top brace helps considerably although the width of the rim and crossbraces are obviously the key factor. Curious - do you know how thick the acrylic is? If it is 1/2", I would suggest that would be the source of the problem.

For reference, I just finished my display tank which is 6 x 2 x 21". I used 3/4" for the walls and 1/2" on bottom and top with the eurobraced rim at 4" and two 6" braces in the middle.

Anyways, if option one is viable with cost, I would obviously choose that. I probably would not risk it otherwise - but that is just me. You can also check with Floyd R Turbo (or one of the other gurus) on the acrylics thread http://www.reefcentral.com/forums/showthread.php?t=1056956. They are super fast in response and very reliable information.
 
For reference, I just finished my display tank which is 6 x 2 x 21". I used 3/4" for the walls and 1/2" on bottom and top with the eurobraced rim at 4" and two 6" braces in the middle.

A 21"h acrylic tank, does not need 3/4" side panels... Even at 24"h, 1/2" is fine, especially with a full 1 piece top (with cut outs)
 
All sides and bottom are 1/2" Think, Top piece of 3/4".. is it normal to have a thicker piece as the top brace??
Here are some pictures.
 

Attachments

  • photo 1.jpg
    photo 1.jpg
    60.1 KB · Views: 4
Back
Top