You are using an out of date browser. It may not display this or other websites correctly.
You should upgrade or use an alternative browser.
You should upgrade or use an alternative browser.
Mike's Anemone Tank Build
- Thread starter MikeInToronto
- Start date
MikeInToronto
New member
Thanks everyone!
You may not think I listen to your advice but I do!
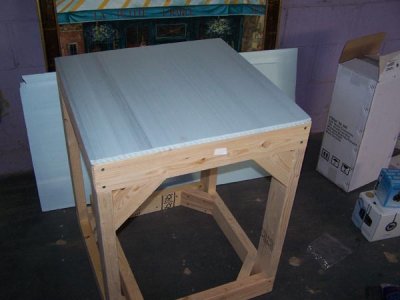
Only did a little bit more work on the stand. I added a piece of rigid foam to the top. I'm not even sure this is necessary or even detrimental for a framed tank but I have always done it.

I decided to add a cross piece on the bottom of the stand and I did this to support the sump. I wanted it to run front to back but the wood is slightly uneven (I can't see it) so rather than using a mallet to pound it into place I ran it left to right. Now that I've done this I like it much better. I also realised the sump will run left to right so this was the proper way, regardless.
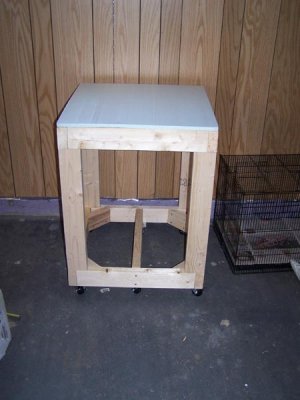
Then I put casters under the stand! I used 4 lockable ones and 2 regular ones. The 4 lockable ones are at each of the corners of the stand. I then added a regular caster to each side where I installed the cross piece. There are so many screws at each corner that I couldn't get them into the corners exactly but they are close. The casters each support 125 lbs so they should hold 900 lbs together. The casters now add 6 points of contact rather than linear support across the entire frame. My floor is not level in every location so when I wheel the stand around I can find level places but the location I originally thought was level, is no longer level. Unfortunately, the place I want to check for level is the place where my current tank is set up so I can't do that until the tank is moved. If I can't get it level with the casters I will remove them.

And this is just a pic of the stand so far (side view).

You may not think I listen to your advice but I do!
Only did a little bit more work on the stand. I added a piece of rigid foam to the top. I'm not even sure this is necessary or even detrimental for a framed tank but I have always done it.
I decided to add a cross piece on the bottom of the stand and I did this to support the sump. I wanted it to run front to back but the wood is slightly uneven (I can't see it) so rather than using a mallet to pound it into place I ran it left to right. Now that I've done this I like it much better. I also realised the sump will run left to right so this was the proper way, regardless.
Then I put casters under the stand! I used 4 lockable ones and 2 regular ones. The 4 lockable ones are at each of the corners of the stand. I then added a regular caster to each side where I installed the cross piece. There are so many screws at each corner that I couldn't get them into the corners exactly but they are close. The casters each support 125 lbs so they should hold 900 lbs together. The casters now add 6 points of contact rather than linear support across the entire frame. My floor is not level in every location so when I wheel the stand around I can find level places but the location I originally thought was level, is no longer level. Unfortunately, the place I want to check for level is the place where my current tank is set up so I can't do that until the tank is moved. If I can't get it level with the casters I will remove them.
And this is just a pic of the stand so far (side view).
Attachments

MikeInToronto
New member
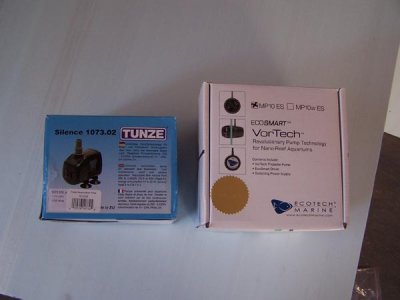
My skimmer, return pump, and one Vortech arrived. I'm still waiting on the second.


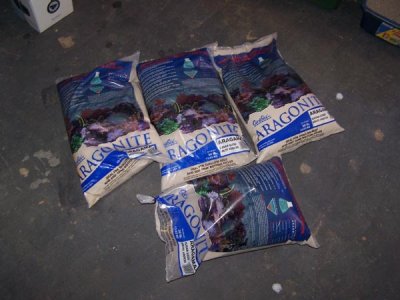
I also got 120 lbs of sugar-grain sand.

I think I will order the tank this next week but I haven't decided yet.
I also got 120 lbs of sugar-grain sand.
I think I will order the tank this next week but I haven't decided yet.
Attachments
Saltwatergurl
New member
This is the anemone I'm adding.

Very pretty anemone!!
") Hope everything goes well!! :spin3:
Hope everything goes well!! :spin3:Awesome build so far, that stand is built like a sherman tank! Thats some serious dedication to a project to have those pumps already sittin at your place in the boxes and not even have the tank yet! GL with the build, look forward to seeing the end result!
Oh, and beautiful Nem, im sure its going to love its new home.
Oh, and beautiful Nem, im sure its going to love its new home.
MikeInToronto
New member
Very pretty anemone!!
Thanks! They aren't the hardest to keep or even very rare but this is probably one of the best anemones I've ever kept.
MikeInToronto
New member
Awesome build so far, that stand is built like a sherman tank! Thats some serious dedication to a project to have those pumps already sittin at your place in the boxes and not even have the tank yet! GL with the build, look forward to seeing the end result!
Oh, and beautiful Nem, im sure its going to love its new home.
Thanks! I've put a lot into keeping the stand sturdy but I still feel like I could do more.
I can't say I haven't used the equipment yet. I put the equipment on my 75 gallon because I sold the equipment from my 75 to pay for this new stuff.
SNAKEMANVET
PREMIUM MEMBER
Nice purple lta,I use to have one just like it,then got to big and sold it. Mine was about 18'' to 20'' across.Looks like you will have a nice set-up for a anemone and clowns.
MikeInToronto
New member
I ordered the tank today and I expect to pick it up on Saturday. I got a little bit of a deal at the store. It wasn't exactly what I had hoped for (about $10 more) but that is darn close so I can't complain. I also got another bag of sand. I think I need one more bag to reach 6" but since I'm at that point where I could be just at the 6" mark, I will wait until the sand is in the tank to be sure. Extra sand is always nice but I don't want to sacrifice too much tank space.
I also got a tank for my sump. I thought I would need a 15 gallon which is 24x12x12 to be sure my hand could fit under the stand but I got a 20H which is 16" high. It fits nicely height-wise and I seem to have room under the stand. It is marginally too long, by a couple of millimetres so I have to see how that will affect the skin of the stand.
I don't think I can pull the skimmer out of the sump when the sump is full though. I'm in the process of figuring out the baffles, but I think I might add a tap to the side of the sump so I can drain it easily.
I can post pics later but there's nothing spectacular to show right now. I'm also poor now and I don't like that feeling of spending more money than I planned.
MikeInToronto
New member
This is a long post but it explains my thought process.
I built most of my sump today. I will get to that in a moment.
I made a decision. I will not skin the stand. I've realised that since this tank is going to sit in an unfinished basement and since I don't intend to finish the basement any time soon, I will just leave the stand as is. There is no point making a piece of furniture when I'll probably build something a little nicer once the basement really is finished. This also means I'm not going to paint the stand to protect it from water or humidity. It was very cheap to make this frame with 2x4s but next time, I will use a better quality wood. Anyway, this is all a conversion for a later date; on to the sump.
I am using a 20 gallon high tank with dimensions of 24x12x16". There isn't any room for much except the skimmer, return pump, heater(s), and maybe some kind of mechanical filtration. Unlike other sumps I've built, I wanted the area when water enters the tank to be separate from the protein skimmer intake. I wanted to eliminate as much gunk from getting into the sump as possible. So these were the compartments I needed and their sizes:
1) Intake (4")
2) Skimmer area (10")
3) Return area (6")
4) Bubble trap (1" per baffle)
I whipped up a drawing that looks kind of like this:

Each gap between baffles was 1" and the glass is 3/16". Doing all the math is comes to 24".
I only needed 8" for the skimmer area but there wasn't much I could do with an extra 2" so I just made the skimmer area the biggest for any other stuff I might put in there.
So, I measured the width of my sump and it was about 12-1/4". Then I measured the width of the glass panes (3/16"). I multiplied this by 2 and subtracted that from the total width. The result: 11-7/8". This was how long my baffles had to be. For the height I picked my old standard of 10". You should choose a baffle height that meets your skimmer's manufacturer's requirement so that your skimmer can dump its clean water into the next compartment without mixing but mine has a requirement that is lower than the return pump can handle and since I can't raise the skimmer (it will no longer fit under the stand) I just picked a nice height that will work well enough.
I hit up the local glass shop and had five panes of glass cut for me. It took them about ½ hour to do so I took off to Lowes to grab some stuff then came back to pick them up.
Then I cut a 2x4 to the following lengths: 6", 4", 1". These were for place holders.
I used the blocks as place holders so that I could maintain the correct spacing. While the pane was held in place, I used a marker to mark where the glass would be. I didn't do this on the bottom of the tank though and you will see why in the "œtaping" paragraph. I do not like to mark the inside of the tank because there is no way to remove it before siliconing the pane in and I don't want those marks to show on the sump for eternity.

To save some time, I decided to place the baffles at both ends of the tank simultaneously and meet in the middle, rather than placing a baffle, waiting, placing another, etc. until I reach the opposite end. My pics will explain it better if that didn't make sense.
For each baffle that needed to attach to the bottom of the sump, I cut a small piece of the silicone away so that it would sit flush.

Then I added painter's tape to either side of the marks (inside the sump) and eyeballed where they would be for the bottom of the sump.

Then I taped the pane of glass I was adding. I taped all around but I didn't need to tape the top of the pane.

That doesn't look so good, so I cleaned it up with a gem blade. Don't use a gem blade to slice this way on your display tank. You could scratch it. I did this on the sump because, well, who cares.

I then placed a bead of silicone between the tape.
![url]](/proxy.php?image=http%3A%2F%2F%5Burl%5Dhttp%3A%2F%2Ffarm6.static.flickr.com%2F5306%2F5583362706_87e1e5e663_o.jpg%5B%2Furl%5D&hash=cfbd9b5655d134a5242fd37d04d7fe0d)
I placed the pane of glass into this spot and used my space blocks to keep the spacing. I made sure it lined up properly with the marks I put on the outside of the tank. I used my finger to move spread the silicone. Once I got the pane in place and was satisfied, I waited about 5 minutes then carefully peeled away the tape to reveal nice clean lines. See? Purdy!

Of course I messed up a few times so it wasn't all so pretty in the end but I'm not showing you that.
I repeated that for the opposite end of the sump and this was the result of stage 1:

Then I let that sit for about an hour. As an FYI, I used a 1" block on the bottom of the sump to hold the raised baffle up other blocks to space the baffles apart.
Then I placed the next set of baffles, waited, then the last set. This was the end result:

What will happen next is I will drill a hole for a ½" bulkhead into the lower area of the intake. I'm just waiting on my glass holesaw from Hong Kong. I will add a ball valve and use this to drain off debris from the sump when it collects.
The intake area will also serve as my mechanical filter area by means of a sponge. My biggest pet peeve is the debris that collects in a sump. I'm convinced this has been a major source of nutrients in all my tanks and I want to eliminate it this time around.
The sump designing is still in progress so I might modify it more but that is all for now.
I built most of my sump today. I will get to that in a moment.
I made a decision. I will not skin the stand. I've realised that since this tank is going to sit in an unfinished basement and since I don't intend to finish the basement any time soon, I will just leave the stand as is. There is no point making a piece of furniture when I'll probably build something a little nicer once the basement really is finished. This also means I'm not going to paint the stand to protect it from water or humidity. It was very cheap to make this frame with 2x4s but next time, I will use a better quality wood. Anyway, this is all a conversion for a later date; on to the sump.
I am using a 20 gallon high tank with dimensions of 24x12x16". There isn't any room for much except the skimmer, return pump, heater(s), and maybe some kind of mechanical filtration. Unlike other sumps I've built, I wanted the area when water enters the tank to be separate from the protein skimmer intake. I wanted to eliminate as much gunk from getting into the sump as possible. So these were the compartments I needed and their sizes:
1) Intake (4")
2) Skimmer area (10")
3) Return area (6")
4) Bubble trap (1" per baffle)
I whipped up a drawing that looks kind of like this:
Each gap between baffles was 1" and the glass is 3/16". Doing all the math is comes to 24".
I only needed 8" for the skimmer area but there wasn't much I could do with an extra 2" so I just made the skimmer area the biggest for any other stuff I might put in there.
So, I measured the width of my sump and it was about 12-1/4". Then I measured the width of the glass panes (3/16"). I multiplied this by 2 and subtracted that from the total width. The result: 11-7/8". This was how long my baffles had to be. For the height I picked my old standard of 10". You should choose a baffle height that meets your skimmer's manufacturer's requirement so that your skimmer can dump its clean water into the next compartment without mixing but mine has a requirement that is lower than the return pump can handle and since I can't raise the skimmer (it will no longer fit under the stand) I just picked a nice height that will work well enough.
I hit up the local glass shop and had five panes of glass cut for me. It took them about ½ hour to do so I took off to Lowes to grab some stuff then came back to pick them up.
Then I cut a 2x4 to the following lengths: 6", 4", 1". These were for place holders.
I used the blocks as place holders so that I could maintain the correct spacing. While the pane was held in place, I used a marker to mark where the glass would be. I didn't do this on the bottom of the tank though and you will see why in the "œtaping" paragraph. I do not like to mark the inside of the tank because there is no way to remove it before siliconing the pane in and I don't want those marks to show on the sump for eternity.
To save some time, I decided to place the baffles at both ends of the tank simultaneously and meet in the middle, rather than placing a baffle, waiting, placing another, etc. until I reach the opposite end. My pics will explain it better if that didn't make sense.
For each baffle that needed to attach to the bottom of the sump, I cut a small piece of the silicone away so that it would sit flush.
Then I added painter's tape to either side of the marks (inside the sump) and eyeballed where they would be for the bottom of the sump.
Then I taped the pane of glass I was adding. I taped all around but I didn't need to tape the top of the pane.
That doesn't look so good, so I cleaned it up with a gem blade. Don't use a gem blade to slice this way on your display tank. You could scratch it. I did this on the sump because, well, who cares.
I then placed a bead of silicone between the tape.
I placed the pane of glass into this spot and used my space blocks to keep the spacing. I made sure it lined up properly with the marks I put on the outside of the tank. I used my finger to move spread the silicone. Once I got the pane in place and was satisfied, I waited about 5 minutes then carefully peeled away the tape to reveal nice clean lines. See? Purdy!
Of course I messed up a few times so it wasn't all so pretty in the end but I'm not showing you that.
I repeated that for the opposite end of the sump and this was the result of stage 1:
Then I let that sit for about an hour. As an FYI, I used a 1" block on the bottom of the sump to hold the raised baffle up other blocks to space the baffles apart.
Then I placed the next set of baffles, waited, then the last set. This was the end result:
What will happen next is I will drill a hole for a ½" bulkhead into the lower area of the intake. I'm just waiting on my glass holesaw from Hong Kong. I will add a ball valve and use this to drain off debris from the sump when it collects.
The intake area will also serve as my mechanical filter area by means of a sponge. My biggest pet peeve is the debris that collects in a sump. I'm convinced this has been a major source of nutrients in all my tanks and I want to eliminate it this time around.
The sump designing is still in progress so I might modify it more but that is all for now.
Ron Popeil
Love them clownfish.
why did you decide on doing baffles 1" apart? i tend to see them usually 2". does it really matter?
im planning on putting some baffles in my sump myself.
im planning on putting some baffles in my sump myself.
MikeInToronto
New member
why did you decide on doing baffles 1" apart? i tend to see them usually 2". does it really matter?
im planning on putting some baffles in my sump myself.
I guess it depends on how fast water is flowing through the sump. On my current setup (not the one in this thread) I used a very large return pump and space between the baffles was the thickness of a piece of dowel I had lying around (approx. 1/2 - 3/4"). The flow was so large it pulled the bubbles right through the trap. Then I swapped out that pump for the Tunze (slated for the tank in this thread) and the flow is slow so no bubble reach the display tank. The thinner the space between the baffles, the faster the water moves through them, and since the current bubble trap works, I think 1" gaps will be perfect.
Some people don't even use a bubble trap anymore. Maybe it's a throw back to the large return pumps we used to use.
Ron Popeil
Love them clownfish.
i have a dart as my return pump, and i move alot of water through the sump. so larger gaps between the baffles would be better for me?
MikeInToronto
New member
i have a dart as my return pump, and i move alot of water through the sump. so larger gaps between the baffles would be better for me?
The pump I had was also a Dart but I sold it. It was really much too big for my 75 gallon and definitely too big for my planned 60g. I found love with a smaller pump. I posted about it not long ago.
Yes, I would make the space between baffles larger if you want a "more effective" bubble trap but it also depends on how large the sump is. My source of bubbles was the skimmer. I was using a Beananimal overflow so that made no bubbles. The 36" sump I used has a similar setup to the one in this thread but the Intake portion was larger and housed the skimmer; it also didn't have the raised baffle. The centre area was a sort of refugium with nothing in it. This acted as a long area that escaped bubbles would need to travel and hopefully dissipate before reaching the trap. The Dart pump was so strong it pulled all the bubbles along anyway. I don't know if the larger gaps would have helped but physically, a larger trap would have been "more effective".
MikeInToronto
New member
Let me continue by saying setting up an aquarium is hard work. Thankfully I've done is a few times so I have a lot of the tools needed to make it easier.
Also, this aquarium isn't turning out as "œmagical" as I had hoped. I'm not disappointed but it looked a lot different in my head during planning.
So back to the build.
I ended up putting a 2x2 square of ¼" plywood on the top of the stand. I intended to put the tank directly on the stand without foam but I changed my mind (see below).

I picked up the Marineland 24x24x24 Cube last night. I was making all kinds of plans to have someone take me there on Sunday with their truck for fear that the tank would be too big but on the way to work I looked at my front seat and it looked big enough so I just went by myself. The tank is HEAVY so it would have been nice to have a helper but I managed. I put the tank on the stand and checked the edges to see if there were any gaps. I saw a gap on two sides of the stand so I decided I would use the foam under the tank. I know the frame on the tank is meant to add support but I didn't want to depend on it.
Having those wheels on the tank is very, very handy! I wheeled the tank into the lundry room and filled it with tap water to check for leaks. I knew I wouldn't find any but I checked anyway. Anyway, here is the tank filling with water:

And here is the tank full:

After a couple of hours I knew the tank was leak-free so I decided to start painting the back. I emptied half of the water and wheeled the tank away from the sink so I could start taping up the back. The overflow is on the centre back so I only needed to paint two relatively narrow strips on the left and right sides. I used Krylon Fusion:

You can see the tape job I did. I used Saran Wrap, paper towels, and painters tape; a lot of tape. I started by spraying a very light first coat on the tank, just to provide a base.

I came back about 5 minutes later and added a second light coat. After four coats (I have pics if you really want to see each coat) I knew the paint was good so I added one last heavy coat.

After that was just dried, I carefully peeled away the tape and paper towel. It looks good and no light gets through.

Also, this aquarium isn't turning out as "œmagical" as I had hoped. I'm not disappointed but it looked a lot different in my head during planning.
So back to the build.
I ended up putting a 2x2 square of ¼" plywood on the top of the stand. I intended to put the tank directly on the stand without foam but I changed my mind (see below).
I picked up the Marineland 24x24x24 Cube last night. I was making all kinds of plans to have someone take me there on Sunday with their truck for fear that the tank would be too big but on the way to work I looked at my front seat and it looked big enough so I just went by myself. The tank is HEAVY so it would have been nice to have a helper but I managed. I put the tank on the stand and checked the edges to see if there were any gaps. I saw a gap on two sides of the stand so I decided I would use the foam under the tank. I know the frame on the tank is meant to add support but I didn't want to depend on it.
Having those wheels on the tank is very, very handy! I wheeled the tank into the lundry room and filled it with tap water to check for leaks. I knew I wouldn't find any but I checked anyway. Anyway, here is the tank filling with water:
And here is the tank full:
After a couple of hours I knew the tank was leak-free so I decided to start painting the back. I emptied half of the water and wheeled the tank away from the sink so I could start taping up the back. The overflow is on the centre back so I only needed to paint two relatively narrow strips on the left and right sides. I used Krylon Fusion:
You can see the tape job I did. I used Saran Wrap, paper towels, and painters tape; a lot of tape. I started by spraying a very light first coat on the tank, just to provide a base.
I came back about 5 minutes later and added a second light coat. After four coats (I have pics if you really want to see each coat) I knew the paint was good so I added one last heavy coat.
After that was just dried, I carefully peeled away the tape and paper towel. It looks good and no light gets through.
MikeInToronto
New member
Now between paint coats I was prepping my RO unit. Previously, the unit was giving me higher than 0 TDS. My resin was tan but I couldn't remember what colour it was supposed to be so since it was 3 months since I last changed the floss and carbon, I changed the DI resin as well. Well, now the TDS is 0-1 going into the DI and 0 coming out. That might have explained my super-duper algae.
I allowed my storage barrel to fill high enough to cover a couple of heaters lying flat. I also added a powerhead and let that go over night. The barrel is really big so the 8 hours of night didn't even make a dent. I added the heaters because I didn't want to deal with condensation on my tank while it warmed up and I wanted to be able to add live rock immediately. I took the powerhead out before I took this pic but it was in there.

This morning I worked on the plumbing. I followed the standard plumbing build for this tank. For the return flow I debated whether I wanted PVC or vinyl hose. Because of the inability to change the bulkheads on this tank it's sort of a one shot deal. I went with the vinyl tubing. I don't like took many sharp angles when it comes to flow and the vinyl tube allows for a very smooth line. I used clear vinyl but I can swap it out for another colour if need by. I have a clothes steamer so I used that to push steam through the vinyl tube and make it flexible and break its memory. I laid it out flat and allowed it cool to this new shape.
I'll show the "œfinal" picture after assembly of the "œdifficult" parts and explain the step by step after.

Air needs to get into the overflow and the little air tube Marineland provides won't do so I wanted to add a ¼" John Guest fitting.

First I had to put a hole in the cap.

I had to use two taps to get the right hole size for the cap on top of the overflow setup. I drilled a hole large enough to fit the smaller tap because I don't have one big enough for the larger tap.

Then I used the smaller tap to make the threads.

But this wasn't big enough for the John Guest fitting I was using but it was big enough for the second tap, which is the right size for the fitting. So I then used the bigger tap to make the threads. I had to use my pliers to hold the cap for this.

And here is the finished cap. Now I can stick a piece of tubing in there and not worry about sucking noise.

I cut all the PVC tubing I would need and laid out the entire overflow "¦

"¦ and return.

That is the basic plumbing. The rest of the pics will follow later. For now, the plumbing won't be running because the pump and skimmer are currently on my 75. When I've cycled this tank I will move the equipment over.
I allowed my storage barrel to fill high enough to cover a couple of heaters lying flat. I also added a powerhead and let that go over night. The barrel is really big so the 8 hours of night didn't even make a dent. I added the heaters because I didn't want to deal with condensation on my tank while it warmed up and I wanted to be able to add live rock immediately. I took the powerhead out before I took this pic but it was in there.
This morning I worked on the plumbing. I followed the standard plumbing build for this tank. For the return flow I debated whether I wanted PVC or vinyl hose. Because of the inability to change the bulkheads on this tank it's sort of a one shot deal. I went with the vinyl tubing. I don't like took many sharp angles when it comes to flow and the vinyl tube allows for a very smooth line. I used clear vinyl but I can swap it out for another colour if need by. I have a clothes steamer so I used that to push steam through the vinyl tube and make it flexible and break its memory. I laid it out flat and allowed it cool to this new shape.
I'll show the "œfinal" picture after assembly of the "œdifficult" parts and explain the step by step after.
Air needs to get into the overflow and the little air tube Marineland provides won't do so I wanted to add a ¼" John Guest fitting.
First I had to put a hole in the cap.
I had to use two taps to get the right hole size for the cap on top of the overflow setup. I drilled a hole large enough to fit the smaller tap because I don't have one big enough for the larger tap.
Then I used the smaller tap to make the threads.
But this wasn't big enough for the John Guest fitting I was using but it was big enough for the second tap, which is the right size for the fitting. So I then used the bigger tap to make the threads. I had to use my pliers to hold the cap for this.
And here is the finished cap. Now I can stick a piece of tubing in there and not worry about sucking noise.
I cut all the PVC tubing I would need and laid out the entire overflow "¦
"¦ and return.
That is the basic plumbing. The rest of the pics will follow later. For now, the plumbing won't be running because the pump and skimmer are currently on my 75. When I've cycled this tank I will move the equipment over.
MikeInToronto
New member
I added a floor to the stand. I cut out "œ2x4 sized" pieces from the corners of the wood and fit it in. It fits nicely. I didn't wear safety glasses and I paid the price for that with wood bits in my eye.

I wanted to avoid pockets of dry sand and pockets of freshwater in my DSB. So while all of the above was going on I prepared about 20 gallons of salt water. I added 5 gallons of water.

Then added a bag of sand. I didn't rinse the sand first because I wanted to avoid getting unpurifed water in the tank from the rinsing. I added 3 bags before I needed to add more water. So I added another 5 gallons then added the last 2 bags. Then I added the remaining 20 gallons. This is the result.

It doesn't look as nice as I had hoped. But in the end I placated myself by reminding myself that this was what I needed if I wanted a sand dwelling anemone and if I'm going to go with a DSB, I better do it right.
So that's all for now. I'll probably only add small updates in the next few weeks while the cycle continues. Tonight I might clean some live rock and add it to the tank with a cup of "œused" sand.
I wanted to avoid pockets of dry sand and pockets of freshwater in my DSB. So while all of the above was going on I prepared about 20 gallons of salt water. I added 5 gallons of water.
Then added a bag of sand. I didn't rinse the sand first because I wanted to avoid getting unpurifed water in the tank from the rinsing. I added 3 bags before I needed to add more water. So I added another 5 gallons then added the last 2 bags. Then I added the remaining 20 gallons. This is the result.
It doesn't look as nice as I had hoped. But in the end I placated myself by reminding myself that this was what I needed if I wanted a sand dwelling anemone and if I'm going to go with a DSB, I better do it right.
So that's all for now. I'll probably only add small updates in the next few weeks while the cycle continues. Tonight I might clean some live rock and add it to the tank with a cup of "œused" sand.
shabreeson
New member
when i had my LTA the sand kept getting pushed away by my allardi. as time went on the LTA was content in a bare bottom tank. it's base was attached to the bottom of a large rock. just a thought for the future if you grow to dislike the DSB
MikeInToronto
New member
when i had my LTA the sand kept getting pushed away by my allardi. as time went on the LTA was content in a bare bottom tank. it's base was attached to the bottom of a large rock. just a thought for the future if you grow to dislike the DSB
In the short term a LTA would probably be okay with no sand but it doesn't last long. Eventually the anemone will lift up and look for sand again.
MikeInToronto
New member
So this is pretty much the end product. I could have waited another month and I probably should have but impulse got me. The tests all come up zero but if they didn't, it wouldn't matter because there isn't much I can do about it. I guess that isn't exactly true because I did leave the old tank running even though it doesn't have a skimmer and only has a shop light over it.
Anyway, I arranged the rock-work to form a sort of horseshoe shape whereby the anemone sits in the middle and I can place polyps and mushrooms around the edges at varying depths, depending on the tolerance. I'm not exactly sure what sorts of polyps will survive at the top under direct 250W MH light. That's to decide later.
I only added one fish to the tank: the A. nigripes. Since it has been in the sump for months I didn't pay it much mind except to feed it every few days. The clowns and damsel in the display were very well fed but when I pulled the nigripes out of the sump it was all boney. I fed it lots and I will continue to do this until it looks better. It sure is a mean little bugger, though. I debated whether I wanted to add the damsel to this new tank. Despite being a damsel I like it. The one thing that really kept me from adding it on impulse was that the stress from the move and constant disruption caused the damsel to get ick. It acts normally but it has little white spots all over it. I was going to move it (along with the saddlebacks) to a hospital tank but I'm going to let it relax for a little longer in the old tank and about a month prior to selling the remaining fishes, I will hospitalize them. It will be sad to lose the saddlebacks. I might find a way to keep them but I'm not sure.
Here are some pictures. My camera is really bad at taking pics under the blue 20K lamps so everything is washed out. I'm sorry I couldn't get any better pics.
This is the full tank.

This is a closer shot of the tank.

This is the clown with the anemone.

The second Vortech will arrive this week. The current one is wireless so in a couple of months I will convert the new one and synchronize them. The new Vortech is a warranty replacement so I couldn't make it a wireless yet. I have an ATO so I have to find a way to implement that. The reservoir definitely won't fit in the stand but I have lots and lots of room behind the tank to add stuff.
If I think of anything else to mention I'll do that as I think of it.
Anyway, I arranged the rock-work to form a sort of horseshoe shape whereby the anemone sits in the middle and I can place polyps and mushrooms around the edges at varying depths, depending on the tolerance. I'm not exactly sure what sorts of polyps will survive at the top under direct 250W MH light. That's to decide later.
I only added one fish to the tank: the A. nigripes. Since it has been in the sump for months I didn't pay it much mind except to feed it every few days. The clowns and damsel in the display were very well fed but when I pulled the nigripes out of the sump it was all boney. I fed it lots and I will continue to do this until it looks better. It sure is a mean little bugger, though. I debated whether I wanted to add the damsel to this new tank. Despite being a damsel I like it. The one thing that really kept me from adding it on impulse was that the stress from the move and constant disruption caused the damsel to get ick. It acts normally but it has little white spots all over it. I was going to move it (along with the saddlebacks) to a hospital tank but I'm going to let it relax for a little longer in the old tank and about a month prior to selling the remaining fishes, I will hospitalize them. It will be sad to lose the saddlebacks. I might find a way to keep them but I'm not sure.
Here are some pictures. My camera is really bad at taking pics under the blue 20K lamps so everything is washed out. I'm sorry I couldn't get any better pics.
This is the full tank.
This is a closer shot of the tank.
This is the clown with the anemone.
The second Vortech will arrive this week. The current one is wireless so in a couple of months I will convert the new one and synchronize them. The new Vortech is a warranty replacement so I couldn't make it a wireless yet. I have an ATO so I have to find a way to implement that. The reservoir definitely won't fit in the stand but I have lots and lots of room behind the tank to add stuff.
If I think of anything else to mention I'll do that as I think of it.
Similar threads
- Replies
- 1
- Views
- 327