My Ultimate Multi Mantis System(s)

Metal stand + bubbles = maybe not such a good thing. I was just trying to trouble shoot before a possible problem. But I know your more then up to the challenge.

You know every time I see you posted something new to this thread I get existed thinking yea here comes a video of the a lasso. Now I am aware its hard to post a video missing a hand.

Metal Stand + Bubbles = ???

Are you referring to possible rust on the stand ? (If so please remember that the stand is well painted with multiple coats and a primer undercoat).

Beyond that I am not sure by what you mean....
 
I know you know what your doing. I in the past had an issue with bubbles in my sump popping and splashing creep on a metal stand I was using this did not appear to be a problem till I took down the stand after a couple years and noted holes that had been rusted away into the stand. I thought I painted it well enough but found out this was not the case.

The FX5 runs in the 925 gph when running ideally. Your running this to the top of the tank then allowing it to drop from one tear to the next I was thinking if I build something of this nature I would build small overflow boxes in the top corner of the tank with 3 drain pipes each. One would serve as an emergency the second would have a valve to set a siphon feed to the next tear and the third would have a dorso to feed any excess off the siphon to the next tear. This would be the bean animal method. People are always terrified by using a valve but the fact is this is safer than a normal overflow when built correctly. I have used a few of them now for years and can say no drain is as silent as these, they also produce zero micro bubbles when dialed in, the drain can be aimed for flow in the next tank, and the overflow box can be made smaller then you think as long as you can fit the two (dorso and the valve drain) elbows and only the elbows the rest of the plumbing is exturnal. The emergency can be placed outside the box for it serves only the purpose of allowing drainage in the event of the other two failing. This has yet to happen to me. Having the ability to actively use your drain to create the flow for lower tanks may put you in a position of using less power heads i.e. less power heads equals less power draw and equipment to clean and less plugs to deal with.

I have a feeling what you’re going to run into using your current design is a constant water gargle sound from each drain and micro bubbles from each drain into the lower tank. Now micro bubbles are not a big deal only minor affecting the clarity of the water below. My fear however is on a system using no protein skimmer if a snail is killed by one of your smashers this increase in hydrophobic molecules released by the dying animal will move through the water to a place where air and water are churning i.e. your drains. This may be an extreme over thinking on my part but what I hypothesis is post drains your going to get a foam fractionation affect causing a buildup of nasty nog. This nog will of cores end up in the lowest level tanks due to your having up turned elbows. This may be a minor issue that I have way over thought but I figured I would share with you my thoughts.

I am so jealous that you get to build this in your home. One day my friend I will be able to follow in your footsteps. By then I am hoping you stumble on the tricks to make breeding mantis a piece of cake.
 
Last edited:
http://www.youtube.com/watch?v=Ufq3VnRCXK8
Turn up the volume watch the entire video.
Note the sound your hearing is the house being out of the water in the sump once he moves it under water there is no noise. Also note the huge volume of water coming from the drain with the valve. Also note you can see no micro bubbles in the sump or the main tank. I have no idea what his flow is but it’s high. I know in the past the max flow I used was 3800 gph out of a 1” pipe. I know your almost to the point of having this thing plumbed up and running so your energy is getting low but your excitement must be growing. I just see you running into the wall with the bubble thing and saying “I’ll live with it.” But trust me you do not have to. Now the reality is this will coast more money out of your pocket and more time out of your day to get started but in the long run you’ll save yourself a lot of time money get a better overall viewing experience.
 
FX5 DIY Difusers are now IN

Here is an example of how it will look, still needs the 32mm threaded end to have holes drilled in it to allow the water to exit.


More to come as I hook them up and test them.
 
I think thats going to be cool

Although I am confident in its design (holding together etc) I am NOT confident that it will do its purpose, which is to slow the incoming water from the FX5 to the first chamber in the top tank of STAND A & B going to test it out this weekend.

If all goes well it should disappear into the backdrops of the sides and rear of the tanks being black.
 
you can always try adding a second return and teeing them off and have them return to different sections. this way the flow will be split and you will still be getting the full use of the 925 gph from the fx5.
 
you can always try adding a second return and teeing them off and have them return to different sections. this way the flow will be split and you will still be getting the full use of the 925 gph from the fx5.

well basically the back plan is similar to that. But I do hope the current way is enough to slow the water enough.

In this pic I detail my current FX5 difuser which is the one on the left, the one on the right has a 2nd spray bar and is what the backup plan is like, to hopefully further reduce the powerful flow from the FX5.

 
I have come with an idea to potentially increase the overall accommodation available in my overall setup from what is at current 12 to possibly 17-22 overall. (Unless for some extremely odd and rare circumstance that I get another "happy" smasher pair like Maximus & Minnie).

I am starting to come to the terms that although it may be a bad idea I want to keep Minnie & Maximus "together" basically in the same setup there in now only separated via an egg crate sheet so Minnie can pass through. They will still have more room then they currently have in my sump....which I am ashamed of. None the less, there happy now and will be more happy soon enough.

Obviously this opens up another 'compartment' which in a sense can also be divided off via egg crate into 2 'compartments' if the given species doesn't get too big but not too small to pass through the egg crate. Unless I can get another breeding pair (HIGHLY unlikely) which would render it the same setup as Maximus and Minnie.

Also by coming to terms with the minimal space required for some of the largest stomatopods (Lysiosquillades) I have also decided to split STAND C tanks in half with egg crate. I am more then confident both Morgoth and Leviathan will be more then fine in the shorter spaces considering the lack of space they currently use in my much larger current tank.

Again this opens up 2 more 'compartments' however being in STAND C they are obviously setup specifically for large spearers so they will be targeted to fill the void on that stand, I'd love female L.sulcata & L .maculata =).

If there are any tanks that I am deciding to keep a bit more spacious it will be the bottom tank of STAND B (900Lx300Wx450H mm) currently it has no divider at all but I am willing to put up a SOLID divider (perhaps a few sheets of egg crate neatly lined up) to split the tank into 2 compartments for at least a pair of decent sized smashers.

Note: STAND A remains untouched with the tanks being small as is (2ft ea), the "ladder" type sketch in the pics represents the egg crate adjustments, whilst the solid black single lines (mostly in STAND A) represent the already made solid dividers that I had done with the tanks.

Again Zuzu is "counted" in this setup as he will occupy a space initially, also I have "counted" 2 other stomatopods that I don't exactly "HAVE" yet but I need to ensure they DO have a compartment for when they arrive as I am starting to get a bit of an army going here....the 2 others are the O.scyllarus & what I believe to be a G.falcatus.

Here is the generalized idea.
 
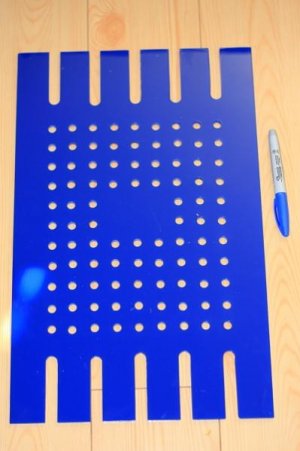
I know you love your egg crate but why not just get sheets of acrylic and drill it and cut slots in the top?

Egg crate is for frags and light fixtures. Imo

I think your going to be the envy of many a mantis keeping reefaholic. One day I am going to show up at your door just to see this Mantis Mecca.

I see what your doing as a good plan.
 

Attachments

  • Dividers.jpg
    Dividers.jpg
    28.5 KB · Views: 6
I know you love your egg crate but why not just get sheets of acrylic and drill it and cut slots in the top?

Egg crate is for frags and light fixtures. Imo

I think your going to be the envy of many a mantis keeping reefaholic. One day I am going to show up at your door just to see this Mantis Mecca.

I see what your doing as a good plan.

One reason I don't have holes in the dividers I have already on the tanks is because of what I saw happening to the walls on the plastic containers they ONLY attacked around the holes that allowed water in and out chipping away slowly there is NO damage on the completely clear and solid walls.

I am undecided on what to use for dividers really but egg crate is the back up plan, I do plan on making it a LOT neater then my current "fugly" egg crate because the egg crate in my current tank was put it AFTER it was all setup....this will go in before hand.

Also for the case of Maximus & Minnie the only reason that they can "hook up" is because she can fit through the egg crate easily whilst its more then impossible for him to try (he pokes his eyes through I'm trying to capture it on camera xD). I'd like to retain that sort of thing if in the VARY RARE circumstances that I happen to get another "pair" of smashers that mate/live like them.
 
That’s cool but what happens when she grows to big to fit through the holes? How about using the acrylic sheet and drilling a hole for her to pass through. I think the thickness of the sheet could be chosen to stand up to some abuse. I wonder also if it’s the female or the male that become more aggressive in time or is it a size/space issue with them. Well you’ll collect that info for us I bet.

But I can see it now this new set up will only serve as your prototype for your bigger mantis holding facility in the future.
 
I would doubt very much if it's the female's instinct to make an unprovoked attack on a male twice her size. A species with that kind of instinct wouldn't survive very long :lmao:
 
That's cool but what happens when she grows to big to fit through the holes? How about using the acrylic sheet and drilling a hole for her to pass through. I think the thickness of the sheet could be chosen to stand up to some abuse. I wonder also if it's the female or the male that become more aggressive in time or is it a size/space issue with them. Well you'll collect that info for us I bet.

But I can see it now this new set up will only serve as your prototype for your bigger mantis holding facility in the future.

I already thought about when she gets to big I plan on cutting out a square in the eggcrate, then creating out of eggcrate 2 slightly larger then the square cut out, I will zip tie these 2 "egg crate squares" to either side of the main egg crate wall and covering the slightly small egg crate square I cut out to act as sort of small square doors on hinges (the zip ties) that I can lift and lower at will.

Hard to describe without drawing or making it.

So I drew it in paint just then to hopefully give an idea....to note the CLOSED/OPEN image is what you would see looking directly at the wall into the tank from the front pane of glass so although it appears that I have NOT cut the larger square out in the OPEN/CLOSED images, I will have its just that from this angle your looking at the very outter rim of the egg crate wall, where the hole is in its center. The larger black dots/circles represents the Zip ties however I do plan on using small clear ones rather then the bright green heavy duty ones I currently use xD...

 
I plan on moving all my live stock to the temporary tank tomorrow along with hopefully removing as much of the old stuff from the current tank that I can...need to dig out a LOT of substrate....
 
Dude i would go about 10mm marine ply dont take a chance on the bottom of the glass bowing you could end up with a huge mess. An dead mantis.
 
G'day all

The Temp Tank Setup is complete! :rollface:

Wasn't easy and there bumps along the way but I managed to capture both spearers without harming either of them, having said that I also did NOT capture any of the "capturing" on camera...however I have managed to capture plenty of pics of this new TEMPORARY setup.

All the water that was in my old setup housing the spearers is in this temp one, since there is NO SAND in this temp tank I gave the spearers some PVC pipes to live in for the time being.

Here is the outcome of the new tank, water is still a bit cloudy so can't provide "clear" pics but I did get some shots I haven't been able to before due to the nature of spearers in general, this is just a taste of whats to come in my new large system I'm building since its primary purpose besides keeping stomatopods happy is to give me the photographer the best pic opportunities possible.

The overall setup (same as before minus sand and minus 1 foot for display sump is same).


The Temp Display tank (Morgoth Left/Leviathan Right).


Morgoths Compartment.


Leviathans Compartment.


Morgoth on some Live Rock, probably still coming to terms with where all that wonderful sand went ='[...


Leviathan in his burrow staring at the camera.


Fingers crossed that they all survive and live happily in this new system for a little bit.

More to come.
 
Back
Top