You are using an out of date browser. It may not display this or other websites correctly.
You should upgrade or use an alternative browser.
You should upgrade or use an alternative browser.
NEW 210 build!!
- Thread starter Sn8kbyt
- Start date

Toddrtrex
Premium Member
The rooms are very close in size. The basement is slightly larger but also has more wall space as there is only one window. My upstairs is a family room only and divided from the dining room and kitchen. My hang up is that my job has me working away from home 2-3 days a week and the rest of the time I work from home in my basement/office/man cave. My bedroom and bathroom are also in the basement. I literally spend maybe 15 minutes most days in the upper portion of the house unless I am cooking or eating neither of which would be in view of the tank.
From a designer standpoint it should go upstairs as a "show piece" as an "enjoy piece" it should go in the basement. That is my predicament. My GF wants it upstairs so everyone can see it when they enter the house as a show piece, I think more as I continue the build I want it where I spend the most time.
Toddrtrex, if the size of your rooms were reversed are you saying it would be in the basement without a doubt?
Lets say that the basement was equal in size....
That would be a tough one, but I would still keep the tank in the family/dinning room. Had a late dinner tonight (( just the 2 of us )), and really enjoyed having the tank right there. Moved 2 clowns in there yesterday, and it was really nice having them swimming around while we ate.
Plus, I like having it be a focal point when we have people over -- like sharing this with others. Figure for the amount of money spent on my build I want people to see it.
Really like your APEX set up -- a bit jealous.
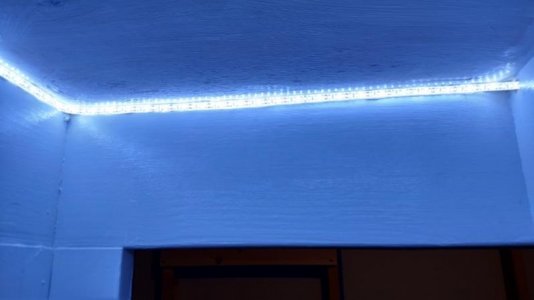
You are going to love those LED lights in your stand, makes working on the sump so much easier.
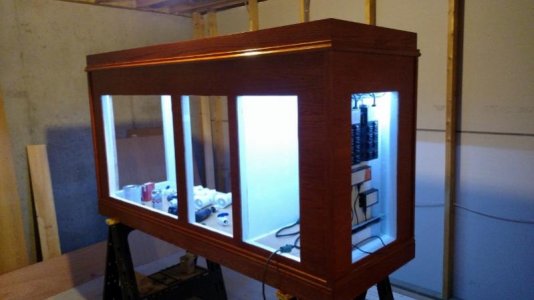
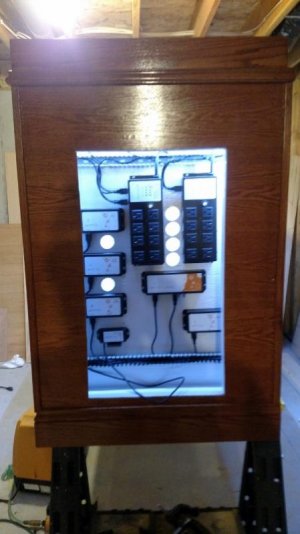
I love your cable management so far. The apex area looks so clean. Keep it up
Clean and managed is my goal on this build. In all honesty I rushed my last build and was not satisfied with the results. I know very little in this hobby compared to the veterans so my newest build will be less than perfect but will in the end be better than my last.
I want all electronics separate from the wet side in this build, something I learned the hard way along the way and not a mistake I want to repeat.
Lets say that the basement was equal in size....
That would be a tough one, but I would still keep the tank in the family/dinning room. Had a late dinner tonight (( just the 2 of us )), and really enjoyed having the tank right there. Moved 2 clowns in there yesterday, and it was really nice having them swimming around while we ate.
Plus, I like having it be a focal point when we have people over -- like sharing this with others. Figure for the amount of money spent on my build I want people to see it.
Really like your APEX set up -- a bit jealous.
You are going to love those LED lights in your stand, makes working on the sump so much easier.
Still on the fence for placement, I see and understand your point though. That is how the GF feels. I spend 30 hours on the road and at least 30 hours at home per week for work. Like I said I maybe spend 1% of my time upstairs to cook a meal for the family one day a week. Most visitors we have go directly downstairs to the man cave where there is a small bar and the only place in the house we allow smoking.
Loving my APEX setup so far as well, but looking good only goes so far. I can have the neatest setup with all the modules in the world but until it is doing something I really cant brag about it. There is a steep learning curve for me once the system goes live.
The stand lights were the cheapest thing for this build but one that I was most happy to engineer into the build. My last tank stand sucked! Not only to small to do any maintenance in the sump but I needed to have a flashlight in my mouth to have my hands free. When finished those lights will be connected to a magnetic switch on the doors to come on whenever one is removed.
79chopperdr
I killed ALL that Coral!
Good start, I'm partial to the 210 size also ") . Following along
. Following along
. Following alongToddrtrex
Premium Member
Still on the fence for placement, I see and understand your point though. That is how the GF feels. I spend 30 hours on the road and at least 30 hours at home per week for work. Like I said I maybe spend 1% of my time upstairs to cook a meal for the family one day a week. Most visitors we have go directly downstairs to the man cave where there is a small bar and the only place in the house we allow smoking.
Loving my APEX setup so far as well, but looking good only goes so far. I can have the neatest setup with all the modules in the world but until it is doing something I really cant brag about it. There is a steep learning curve for me once the system goes live.
The stand lights were the cheapest thing for this build but one that I was most happy to engineer into the build. My last tank stand sucked! Not only to small to do any maintenance in the sump but I needed to have a flashlight in my mouth to have my hands free. When finished those lights will be connected to a magnetic switch on the doors to come on whenever one is removed.
One thing that helped us decide, was making a quick stand out of 2*3s, and some cardboard boxes. Plus helped decide on what size 6 footer to go with, wasn't sure at first.
Like this,

One thing that helped us decide, was making a quick stand out of 2*3s, and some cardboard boxes. Plus helped decide on what size 6 footer to go with, wasn't sure at first.
Like this,
That is funny you posted that we actually did something similar this weekend with just boxes for the same reason. We did not come up with where we are going to set it up after all that for sure yet but did come to an unexpected conclusion.
I have everything from my 90 gallon reef left over except the tank which became the sump for the 210, and we have decided that when this is done I would purchase a new 90 gallon and do a FOWLR setup in the spot that doesn't house the 210. My GF is great and although she doesn't understand all the technical aspects of reefs and fish compatibility she is into it and likes to be involved. That being said when I had the 90 setup going and we would go to the LFS for fish and corals she would always say lets get a lionfish, puffer, or insert something you would never put into a reef tank. Looks like a win/win for us both in the end we will be able to pick what we like and have 2 options for proper placement.
I just got done looking at your build thread Toddrtrex and looks awesome and coming along nicely. I can't wait to get some water in my build!
Chris
Nothing big happening or to add today but I received the door pulls for my stand doors. Probably not the most frugal money I spent on this build as they were not cheap, but a little touch to make it unique goes a long way. I have some starfish pulls ordered as well for the canopy but they have not shipped yet.
Attachments

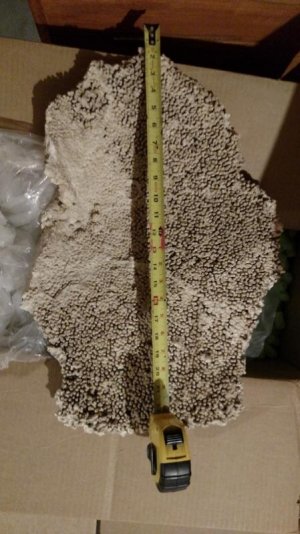
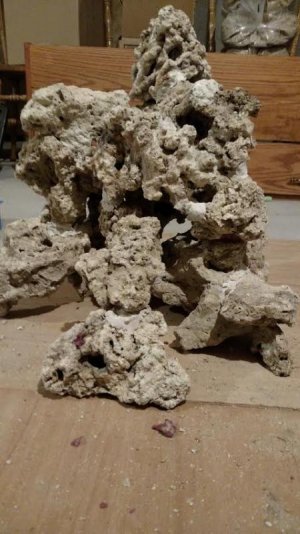
I have about 200+ pounds of live rock to use in this build but since I decided with a new tank for the equipment I have left from my 90 gallon setup to be eventually a FOWLR setup I decided to purchase some dry rock for the 210.
I haven't opened all the boxes yet but this is a picture of the large piece of BRS Tonga shelf rock I ordered that was at the top of the first box that arrived this morning. Absolutely stunning and will be the center piece I build my aqua scape off of. As you can see almost 24" long and almost 16" wide. There is also 100# of BRS Fijii I have not gotten to inspect yet, but sure I will not be disappointed!
I haven't opened all the boxes yet but this is a picture of the large piece of BRS Tonga shelf rock I ordered that was at the top of the first box that arrived this morning. Absolutely stunning and will be the center piece I build my aqua scape off of. As you can see almost 24" long and almost 16" wide. There is also 100# of BRS Fijii I have not gotten to inspect yet, but sure I will not be disappointed!
Attachments
Work has been crazy busy the last few weeks and I just have not had the time to really push forward on this build. I have piles of new stuff laying around to get it to the next level for over a month and it has not happened. I think that ends this weekend and Saturday is going to be a full out dedicated tank day.
Sunday is reserved for the Packers beating the Seahawks
Hope to have a big update and lots of pictures soon!!
Sunday is reserved for the Packers beating the Seahawks
Hope to have a big update and lots of pictures soon!!
It has been a long day but progress has been made. We got the stand finished up inside and out and I am very happy how it turned out. I posted a few weeks back that I had not decided where I wanted to to set this tank up and that has been decided as well. Although the GF initially preferred it to be upstairs it will be going in the basement rec/office/bar room. After scoring a great deal on a small bar to place in front of it and helping her visualize the finished layout I think she was sold.
Next weekend I will be organizing some muscle to get the tank in the basement and on the stand then the plumbing will commence!
Next weekend I will be organizing some muscle to get the tank in the basement and on the stand then the plumbing will commence!
Preparing to put the tank on the stand this weekend and start the plumbing and wiring.
I need advice on setting up the standpipe lengths on a dual overflow herbie setup.
What length is ideal for both the siphon's and how close to the top of the overflows is recommended for the emergency drains?
Hoping all your experience on here will not make this trial and error.
Appreciate all your input!!
Toddrtrex
Premium Member
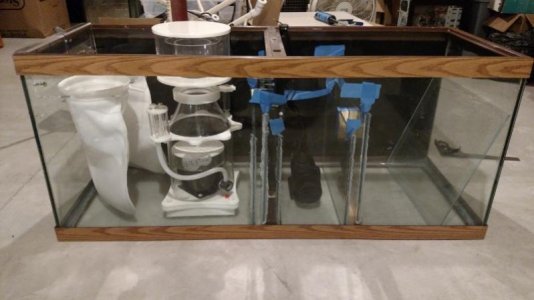
Mine are 6" from the top of the weir --- not counting the strainer. The E-drains are about an 1 below it. Make sure they are the exact same height. I am pretty sure my left one is slightly higher, so that one has been harder to dial in -- but really not that hard. Plus, I am running slower flow though the sump, so I have less room to in which to play.
Remember to factor in bulkheads and the coupler (( or however you are connecting the stand-pipe to the bulkhead. Also, factor in the coupler to the strainer --- the first time I didn't -- at least it was easy to make the shorter.
Overall I am very pleased with this set up. Last weekend I pulled the original filter socks and did some fine adjustments. It was time to change them, and being able to see the bubbles (( or lack there of )) made the adjustments easier.
Toddrtrex
Premium Member
The length of the standpipes will determine how much water drains back into the sump so is the higher they are the better when the return pump is shut off?
In one aspect, the one you mentioned, higher would be better. However, if they are too high the full siphon won't work properly. If the main drain is much higher than 6", it will take longer for the siphon to start. More importantly, it might never start if a vortex forms and air is sucked into the pipe.
Can always run a controlled test by shutting off the main pump and seeing how much back flow you get, but it really shouldn't be that much with 2 6" standpipes. I would guess less than a pitchers worth from when I was messing around with mine during set up.
Progress on Saturday:
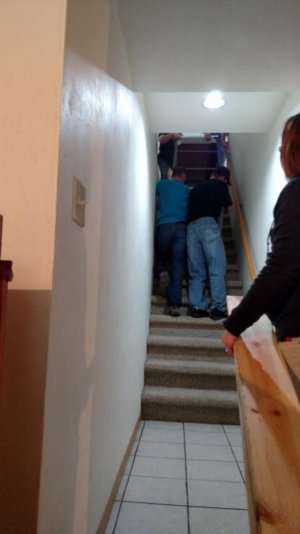
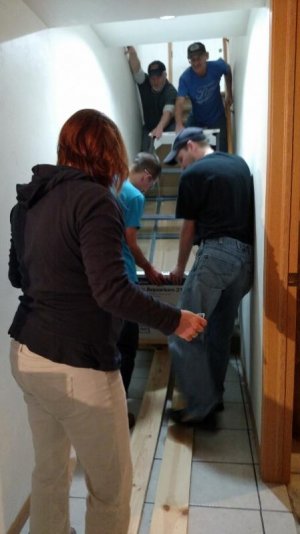
Here are some pictures of us moving the tank down the stairs into the basement and putting the sump in.
The stairway is quite narrow so suction cups and carrying it down was not an option so we got creative. Hard to see in the pictures but we made a plywood "sled" to place under the tank with a 2x4 lip on the front to keep the tank on the plywood. With two of us in front and two in the back we basically just slid it down the stairs in a controlled fashion. It actually went pretty smooth and in no time the tank was on top of its new stand.
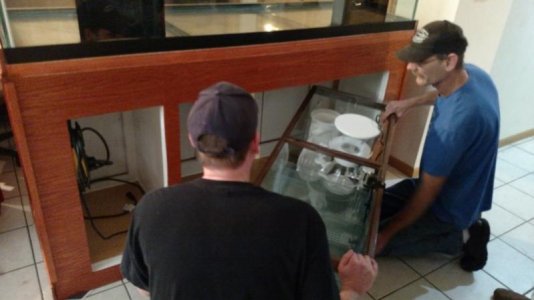
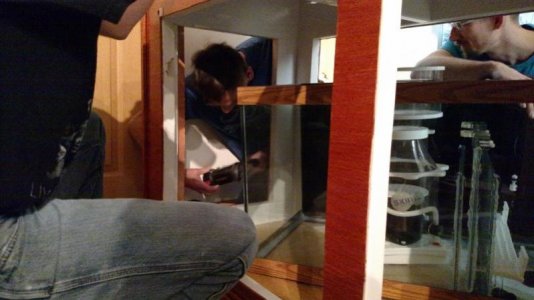
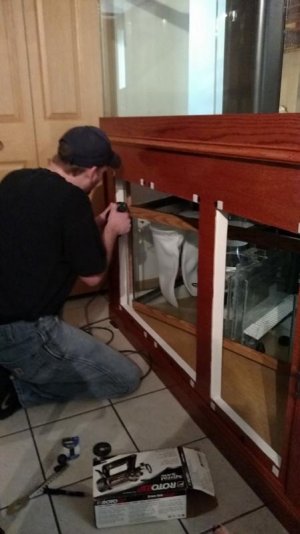
Putting the sump in the stand didn't go not so smoothly We didn't take into account the extra 3/8" that the sump tank trim added to the length and couldn't slide it right in as planned. After a few choice words and head scratching it was decided that the rotozip was the answer. We shaved off 1/4" in two spots and with a slight push it went into place.
Finished off the day laying out the plumbing parts and the game plan for Sunday.
Chris
Here are some pictures of us moving the tank down the stairs into the basement and putting the sump in.
The stairway is quite narrow so suction cups and carrying it down was not an option so we got creative. Hard to see in the pictures but we made a plywood "sled" to place under the tank with a 2x4 lip on the front to keep the tank on the plywood. With two of us in front and two in the back we basically just slid it down the stairs in a controlled fashion. It actually went pretty smooth and in no time the tank was on top of its new stand.
Putting the sump in the stand didn't go not so smoothly
We didn't take into account the extra 3/8" that the sump tank trim added to the length and couldn't slide it right in as planned. After a few choice words and head scratching it was decided that the rotozip was the answer. We shaved off 1/4" in two spots and with a slight push it went into place.Finished off the day laying out the plumbing parts and the game plan for Sunday.
Chris