New 300 gallon tank project

Be sure to check the outflow of the floor drain. Many of them simply lead to the back yard. You will not want to put large quantities of salt water in the yard/woods since the salt can kill various plantlife. If your drain leads outside, the better bet would be to go to the (future) sink on the other side of the basement.
 
Thanks to everyone for all of the offers to help. Trust me, I will be calling when the time comes ;)

Matt,
Thanks for the offer, but if I were to go with a Beckett I would definitely want it out of sump.

Adrian,
Basement install all the way, but I can see Melanie already addressed that... It looks like there is going to be tons of open space under the stand up stairs.

Paul,
The floor drain pictured goes out back to a drainage ditch. It will only be used as an emergency water spillage plan. The water changes will be handled with the plumbing rough ins. I am hoping to have the 3 bay stainless sink over here this weekend and start plumbing then.
 
Does anyone know of a plumber that would like to make some extra money on the side doing weekend or evening work? I want to get my sink installed in the basement and would prefer to dedicate my free time to other parts of this project...

Basement is fully roughed in, and will only need plumbing to and from sink, and will need to have an ejector pump installed in existing drainage sump tank.
 
Plumbing Decisions

Plumbing Decisions

I would like to get all of my plumbing parts ordered this week. All four holes drilled in the tank are drilled at 1.75" for 1" bulkheads. Each drain durso pipe is 1.5" adapted down to 1" at bulkhead, and each return is 1" all the way.

My plan is to combine both drains and both returns so I only have one single pipe going to the basement for each function. Assuming each overflow will be ~600-650 gph. I am thinking about plumbing 2", but I am not sure if that is overkill, would 1.5" be more appropriate?

Return pump will be a ReeFlo Barracuda which is 1.5" in/out if I remember correctly.
 
So who thinks High School Geometry would never come into use??? Below is the calculation (pi*radius*radius) for the area of a circle. The crossection (area) of a 1" line is about 3/4". The area (flow capacity?) of a 1.5" line is 2.25 times greater while the area of a 2" line is 4 times greater.

line size 1" 1.5" 2"

pi 3.1416 3.1416 3.1416
radius 0.5 0.75 1

area 0.7854 1.76715 3.1416

Seem like a 1.5" line would be plenty.
 
Thanks Paul.. I was thinking 2" seemed like overkill, just never sat down and did the math.

Had some time off today and got this plumbing diagram done. Hopefully it shows up okay. Keep in mind this is only a flow diagram, not an elevation diagram, so placement of items aren't necessarily how it will be done elevation wise only approximations.

I labeled all of the unions, ball valves, etc. so you can tell what they are. Taking a screen capture just doesn't allow enough detail to come through on the valves.


Plumbing.gif


The only thing this does not illustrate is auxiliary devices such as calcium reactor, Kalk stirrer, and ATO, didn't see the need for that level of detail at this point. Take a look and see if anybody has other suggestions, or sees something they would change.
 
Nice work Landen. One question and one suggestion...Is there a chance that the chiller output temperature is low enough to negatively impact the UV efficiency or lower the fuge temp to an unacceptable level? Fuge will probably be relatively low flow so the temp difference may be magnified.

The suggestion...I used several union ball valves. I bought single union rather than double to save money. Bad choice. The "ball" part of the valve would come apart letting loose a flood when the union was disconnected, rendering it useless as a union. I have switched out a couple of these to double union when I needed to do some maintenance.
 
I think that the only thing I would look was on the same line as Paul, chiller and UV. Flow rate on the UV and chiller? Also additional flow gowing through the fuge I guess all depend what type of macro you are going to use IMO depends on flow rate. I think that I would place the chiller in line direct to the tank and UV to the fuge. Or if I had an open canvas I would do a large enough funge so that all my water drained through the fuge before it got to the sump. I would like to know the ratio of fuge to tank size to make it benefiticial.
 
Paul,
I don't think the chiller temp would negatively impact the UV efficiency, however I didn't think about the fuge flow rate, and you are probably spot on there. In regards to the double union, you can't tell from the drawing but all ball valves that have unions will be double.

Ade,
I think I will change the flow to UV then Fuge... The only way I could run the chiller return back to the display would be to split the return and run two return's back up to the first floor. The chiller wouldn't be capable of handling the entire flow from one single return.

If I re-use my existing sump for the fuge it is approximately 45G
 
Here's a bit of an update. Last weekend my dad came down so we didn't accomplish too much on the tank, but we made up for it today.
The rock came in a day early (yesterday), but luckily we already had water made to cover the rock and then this morning Landen did a water change on the 150 to get some tank water for the rock. He also spent a good part of the morning scrubbing the rock.
102_2242-1.jpg

Because we put the sliders under the tank the two of us were able to pull it out easily so we could paint the back of the tank. (There was another option that I am not aloud to talk about :( that we tried, but when it comes right down to it painting is the easiest and nicer way to cover the back of the tank).
102_2236-1.jpg
102_2237-1.jpg

102_2239-1.jpg
102_2240-1.jpg
102_2241-1.jpg
 
as requested

as requested

Just a few updates. I think we possibly have a plumber. Two people came out yesterday and looked at everything, so hopefully one of them will work out.

For the past two days the Fed Ex man has been BUSY...I am pretty sure he hates us now, but hey its Christmas time for us. :rollface:
This is what arrived yesterday...all the sand and some salt.
102_2243.jpg
102_2244.jpg

This is what arrived today. The Fed Ex man tried to prevent me from getting into the house.
cid__0501091123-00.jpg
cid__0501091121-00.jpg

Landen will be working on the tank tomorrow. I have to work or else I would be helping too. But really that is all the updates for now. I wish I had more. With all this stuff all readily available I think progress will start to move a bit quicker. :bounce1:
 
Two Steps Forward, One Step Back

Two Steps Forward, One Step Back

Well there is good progress, but there is also one monumental set back...

While working under the tank yesterday thinking about how I was going to do my plumbing, I looked up and noticed part of the glass that was refracting differently than the rest from underneath. After further inspection, I found a half moon shaped piece of glass that is missing from the outside of the glass near the lower trim piece on one side. It's one of those things that your eye just isn't drawn to, so I guess that is why we haven't found it until now.

It is definitely a manufacturing issue, and it looks like the side glass was chipped and then still assembled. If I take a flashlight and shine it behind the trim piece I can see what looks like a starburst chip that is beneath this half moon.

All the damage looks to be on the outside of the pane, but I am not going to risk it... I have spoken to my dealer, and a new tank should be ordered tomorrow, but it may take several weeks before schedules allow for the tank to be swapped out.

102_2283.jpg


102_2291.jpg
 
On To the Progress

On To the Progress

After placing orders for tons of stuff over that past couple of weeks, just about everything has come in. Big tickets items that I am still waiting for are 2 more Tunze 6101's that I found a deal on, and a skimmer.

This is what our front room of the house looks like right now.
102_2326.jpg


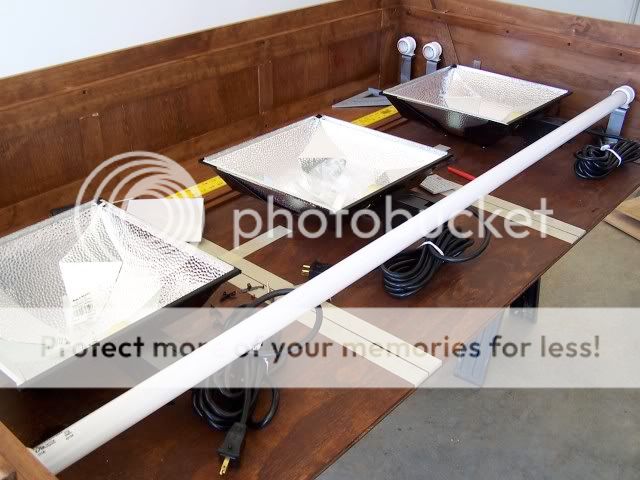
Started laying out the new reflectors. The tape lines illustrate where the two braces are over the tank.
102_2324.jpg


One mounted, two to go...
102_2329.jpg


Laying out the last bracket, and yes the engineer came out in me.. Everything is square and straight.
102_2330.jpg


All Mounted. I am having some offset brackets made this week that will be used to mount 3 Actinic VHO's. I am planning on putting two in front where the canopy hinges up and allowing the cable to hinge with the canopy, and mounting one of them in the rear.

102_2333.jpg


Installed a new 48" T8 shop light in the fish room. More light is always good.
102_2335.jpg


In the process of installing two separate 20 Amp runs for equipment. One of them will power up my controller and accessories, and the other will run to a DJ power strip for other equipment.
102_2336.jpg


Also picked up a nice 70 pint dehumidifier with auto emptying pump yesterday. It has only been running for a day, but so far I am impressed. The moisture is non-existent at this point.
102_2337.jpg


And finally, a boring picture of my rock curing vat.
102_2339.jpg
 
well i see you are a very busy boy and girl .now lets see a picture of the proud Mommy and Daddy of the tank on each side.. you know that one has to be taken.....:smokin:
 
Haven't gotten a whole lot done recently, I just got back from the UK so I was tired and lazy most of Saturday. I did manage to get my VHO bulbs laid out, and the custom brackets installed. I think it turned out pretty well.

102_2357.jpg


102_2356.jpg


I only installed one of the bulbs for a test fit, and left the others safely in the packaging. All bulbs will be URI Super Actinic for supplementation of the XM 10K's.

Unfortunately, I couldn't wire up the IceCap ballasts, as I unpackaged one and I was accidentally shipped the 220V version...
 
Very nice setup. Don't you just hate the setbacks though? You get all excited and then oops, gotta wait. Ok, I gotta go order my last Tunze and deco rock. Then I can put salt and live rock in my tank. Look forward to watching yours get moving.
 
Back
Top