All,
We built our tank about 6 months ago, and despite my own misgivings about my lack of plumbing skill, we plumbed the thing ourselves with good results so far. However, there's one exception and I was hoping for some advice. For the record, I will acknowledge again my utter lack of plumbing skills, so apologies in advance for misnaming any parts.
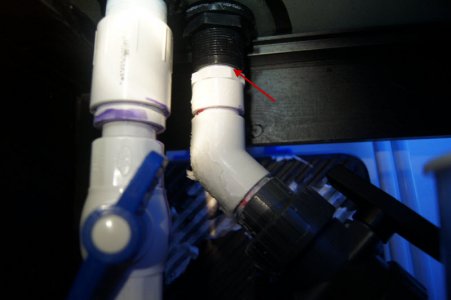
On the return section, we have a leak where the sump portion connects back up to the tank. It doesn't appear to be the piece that actually connects to the tank (the washer seems to keep that area dry) but rather the little male adapter just below it. We've disconnected it several times and taped the hell out of the thing, but it always leaks.
This is not a substantial leak at all, but we end up having a lot of salt find its way out of this location. Once a week we have a salt stalactite that we need to knock off, and there's a solid amount sitting behind the tank as well.
I was hoping that the salt creep would eventually plug the thing itself, but no such luck. Again, this isn't causing severe pain, but I worry about the salinity staying constant and eventual damage to the stand and carpet with the salt dropping out.
Any ideas how I can solve this? If I put a bead of silicon there, would I be able to cut it well enough to remove the pipe for a move?
Thanks for any thoughts,
Clint
We built our tank about 6 months ago, and despite my own misgivings about my lack of plumbing skill, we plumbed the thing ourselves with good results so far. However, there's one exception and I was hoping for some advice. For the record, I will acknowledge again my utter lack of plumbing skills, so apologies in advance for misnaming any parts.
On the return section, we have a leak where the sump portion connects back up to the tank. It doesn't appear to be the piece that actually connects to the tank (the washer seems to keep that area dry) but rather the little male adapter just below it. We've disconnected it several times and taped the hell out of the thing, but it always leaks.
This is not a substantial leak at all, but we end up having a lot of salt find its way out of this location. Once a week we have a salt stalactite that we need to knock off, and there's a solid amount sitting behind the tank as well.
I was hoping that the salt creep would eventually plug the thing itself, but no such luck. Again, this isn't causing severe pain, but I worry about the salinity staying constant and eventual damage to the stand and carpet with the salt dropping out.
Any ideas how I can solve this? If I put a bead of silicon there, would I be able to cut it well enough to remove the pipe for a move?
Thanks for any thoughts,
Clint