Rotifer Tower

I wish that someone had laid out all that information for me when I started my project. I read a lot of those tutorials. I used a Mega 2560 and some other shields but those look great as well.

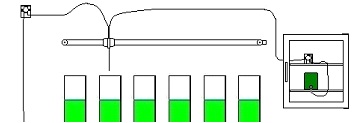
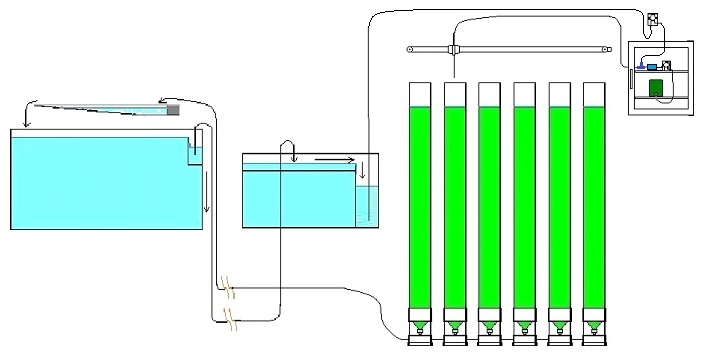
I have been doing some photo realistic rendering for Andrew Oke on the other parts of tank automation but have not had time to start doing anything but the robot project yet.

That is the next thing that I need to evaluate, acquire and implement. I think that there still is a lot of untapped potential for controller based projects related to the aquarium hobby and or businesses.
 
yeah i came across all the tutorials etc after i had spent months head scratching through all that stuff.

As for automation... the more the better i say! Especially if its DIY!!!


VR
 
You're going to make me get out the magnifying glass to see what's in Reed Mariculture's, Reef Nutrution, Phyto-Feast, Rotifer Diet. Long title "œA"?

It's Nannochloropsis. I changed to the concentrated version which may be a little different. I don't have the old bottle but you could look it up. The regular stuff is safer. The concentrate should be better for metered/automated/constraint feeding but if you aren't good at being methodical in practice, then stick with the Rotifer Diet.
 
I need a brake!

I need a brake!

Thinks have slowed down because I have been very busy.

A new problem that I have is that when I turn of the power to the motor, the extender falls down into the tube because there is very little friction on the slide. Without power, the motor offers very little resistance. The aluminum slide is about 16 inches long and has a plastic gear rack attached to it. The bracket and clips for the ¼ inch feeding tube(s) weigh almost nothing.

SecondAxis.jpg

(This rack and pinion extender is mounted vertically.
Please look at earlier post for assembly picture to see location.)

Should I add some Teflon with a spring behind it for a friction stop or something else? I could get some of it (perhaps in a dowel shape) and put it in a tube with the spring and attach that to the carriage.

Another thing that I could do is to try to find a solenoid type brake. Since I have an Arduino controller, it would just require a few extra lines of code. The down side is that I would have to add a couple more wires that go to the carriage. I was hoping to limit it to two wires. That makes it easier to run without e-chain.

Can you think of anything that would work better?
 
Just an update:
Please forgive the rambling nature of this response. I wrote as I brain stormed (while watching TV).

I had problems with heat build up so I put in a motor cut offs right after use. I guess that I can change up the timing.

Maybe I can turn it off when the slide is in the down position. The time between tubes should be short so I can turn it on long enough to lift up, move to the next station, extend back down and then turn off again. I can dispense the food and water while the motor is off and then wait several minutes before retracting and moving to the next station.

I would have to add a stop at the bottom of travel. I guess that I can just turn off the motor to let the carriage fall to the stop. I have an optical limit switch to insure that it is up when the carriage moves to the next station. Instead, I could program in an over travel distance and use the limit switch to stop the motor at the top so I don't have to worry about calibration. I could leave it on while going home and let it fall between cycles.

I want to start a cycle every hour so I want to lengthen the cycle to close to an hour, pausing 5-8 minute at each station.

Well, I guess that's it. what do you guys thing?

This is some pseudo code:

Wake up of the hour
After running calibration routine
Main and extender motors on
Raise slide
Move to station
Motors off (slide falls)
Dispense food
Dispense water
Wait
Motor on
Raise slide
Turn off motor when sensor is blocked
If blocked, move to next station
Repeat until finishing last station
Go home
Motors off (just under an hour)
Wait for next clock cycle
 
Last edited:
This made me think that I need to change the tube layout for my robot feeding system on a little garage plankton farm that I am building. If I plumb the replacement water through a solenoid much closer to the food, I can use a single tube to inject all liquids into each station.

I have a solenoid on my auto top off system but I haven't given them nearly enough thought. I understand them on a basic level but I need to know them at an intuitive level so that I can made my designs a simple and as cheaply as possible.

I was originally going to feed my towers with solenoids only but with different liquids and powders, there were a few things that made me feel that I needed to build a 2 axis robot.

I have a thread running http://www.reefcentral.com/forums/showthread.php?p=18841420#post18841420 where you can get more details but I was hoping that you guys and gals could give me your ideas for using solenoids to there fullest advantage. The robot is run with an inexpensive micro controller so I can accurately turn them on and off when I want to.

PlanktonTowerFlowOld.jpg
In my old design, I have two tubes going to the moving carriage. This idea allows me to just use one.
In the second picture, I show the solenoid in blue, right next to the pump in the refrigerator.

CritterTowersFlow6.jpg

Again, how can I improve my design.
 
Wow. I haven't looked at this thread in a while..
Improvement...

I've spent that last two weeks looking for valves to run my project. I can't find what I'm looking for at a useable price. You may not be able to either.

Have you considered just using a truck load of peristaltic pumps? You can get one channel for about $30 on epay. That might be way easier than trying to use a bunch of $25 solenoids. The pumps also wash-out everything whereas valves have nooks and crannies.

An alternative, if you have machine shop chops, you could design a spool-valve that has one inlet and six outlets. Then just index the spool one step at a time.
 
Hmmm Another good idea from the Kressmeister Thanks I can always depend on you to get me past a case of designer's block.
I'm not familiar with a spool valve but it sounds good. I just looked on the net. So would you have a dowel shaft of Teflon in a press fit hole that goes through ...say Delran, with about 3 inches extra collar area to prevent leaking?
One part of the shaft would have a reduced cross section for the fluid to go around and a linier actuating stepper to push it in and out to the 6 positions? ...or is there a better way?
 
That sounds like you have it. Often they have an O-ring here or there to prevent leaks.

Or.. You know the 4-way valves Oceans Motions makes? You could make one like that that has six ports and is a lot smaller..

You would essentially take a thick disk. Like a can of tuna. Delrin.
Drill a blind hole into the center. Concentric to that hole put a groove that will take 80% of an O-ring. Drill a single circumferential hole that reaches the axis hole.

Drill another blind hole on the opposite side. Thread it and insert a plastic shaft. Alternatively just use a lathe and machine a shaft on one end by reducing the 'tuna can' down to a useable shaft.

Take a large block of whatever. The whole thing could be Delrin or even PVC. Boris out a snug fitting hole for the tuna can to fit into. Drill it circumferentially with 6 holes 60 degrees apart that align with the single side hole of the 'can' . Thread those holes 1/8" NPT and screw in plastic barbed fittings. Drill a center hole in this bowl to accept the shaft. Relieve that hole so it will accept an o-ring around the base of the shaft.

Finally. Make a cover plate with about six holes peripheral to provide for screwing this down on the end of the outer housing. Put threaded holes down between the six output ports to receive the screws. Drill and thread the center of this plate to accept the input port barbed fitting.

You should think about O-Rings. You could probably use a few more in there somewhere.

The nice thing about this is that since you're making it you can make sure you're making it to the right sizes for O-rings you can easily buy. You can put the O-rings into square slots.

Then you just index the center hole to all the circumferential holes to select one for output. Turn the shaft and away you go.
 
PlanktonTube.jpg


There isn't much to look at.

I have a lot of other things competing for my time so things are going very slowly. I design for a living but fabrication is slower for me. Everything is still on the bench.

As an update, when my air pump started to slow down, I lost the culture after 4 or 5 months. I switched ports and started another culture and in two weeks, it died as well. I went into the garage and noticed that the second port started to fail much quicker. I am going to buy an bigger pump so that it can consistently blow air 5 feet down in the water column.
fSkp1P7MrDCePdPvL8XlvknY_4ZhFNtt9V0Y-GRr5HucNfCeUhU6CCDTRLgl-bmsB1OIAQpGF39TTu2HDldMOVcvxUt2VKY0D5QkjOZiv0Ml1enYzNFximLukNYC5M1vk9oRBGMqoNniYG5PLBQnXOTrHs1RuAtY4V74Oxww2Sh9FGJIrOiiFoAmVDzCKaXCKUI


I just got the carriage for the second axis working. Here is a video.

http://www.youtube.com/watch?v=dK4hXVRhH2k
 
Last edited:
That picture of the tower really puts the sheer size into perspective of just how big this project is!

Looking forward to see how you put it all together. I've been watching since you made the thread but I was unable to come up with any idea's of how you could things simpler sorta speak so I stayed out of it. Anywho, good luck with it all and I look forward to seeing it all running.
 
thx for the pictures.

I'm planning to use plotter or inkjetprinter parts for a fluid plankton feeder.

Can you elaborate on that?

I've been watching since you made the thread but I was unable to come up with any idea's of how you could make things simpler so to speak so I stayed out of it. Anyhow, good luck with it all and I look forward to seeing it all running.

I believe in quantity not quality! Please chime at any time. Ideas that aren't perfect often spawn ideas that are.

Most of my ideas are pretty bad. I through out 80 percent of them right away. I post a few and then people pick them apart and put them back together again in a better way. To come up with good ideas, I have to have a thick skin, knowing that most of my ideas suck but they can be improved by the group.

So please contribute to the volume of ideas and don't worry about how good they are.
 
Back
Top