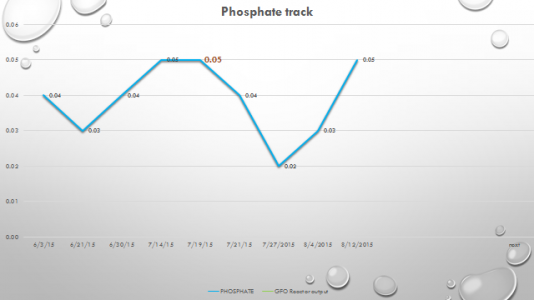
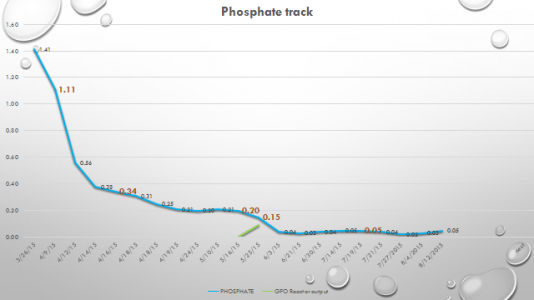
This may well be the most boring post ever posted on RC. But here goes. I’ve gone through dozens of tests (and packets of reagent) with the Hanna 713 PO4 Checker, but still can’t seem to get consistent results. For example, on the last batch of tests (3 tests per tank), I got results ranging from .23 to .03 on one tank and .09 to .0 on the other
Obviously, the problem is my use of the test kit and not the kit itself since so many are using it successfully. Maybe if I describe my methodology, someone can school me on what I’m doing wrong.
1. I open test reagent packet using scissors. I shake/collect the reagent into one corner of the packet, crimp the end of the packet that the reagent has collected into so that I can dump the reagent into the test tube more easily.
2. I clean the outside of test tube with cloth provided with kit.
3. I fill test tube with water from dt, using syringe, shake tube, and discard water.
4. I then fill test tube with 10 ml of water from dt using same syringe.
5. When rinsing and filling test tube I grasp tube with the cloth provided.
6. I press the button on the checker, and when it flashes add/press C1, I place the test tube containing 10 ml of dt water into checker.
7. I again press the button and when I get the add/press C2 message, I remove tube from checker and pour reagent into tube. This can take up to 20-30 seconds. And despite my best efforts to get all the reagent into the tube, I find that after completing the test, and I shake out the reagent packet, there is always some reagent left in the packet.
8. Using test kit cloth to grasp the test tube, I then vigorously shake the tube for 1 minute and 45 seconds, Because it takes so long to add reagent to the tube, I find that if I go beyond 105 seconds, the checker may reset itself and I have to start from scratch. At 90 seconds I slow shaking to allow bubbles in tube to dissipate. From my perspective it sometimes looks like there is some undissolved reagent floating in the tube. And obviously, my calculation of seconds may not be 100% accurate.
9. I then put test tube back into checker, press and hold button and wait for 3 minute countdown.
So what am I doing wrong?
Is there another way of getting reagent into the test tube more efficiently?
Is there some problem with the way I shake the tube to mix the reagent?
OMG, you must stop whatever you’re doing and help me immediately! Or . . . what? My tanks will continue to have the same PO4 levels they’ve always had. Actually, I think you can take a few deep breaths, maybe deal with some pressing personal issues, and then – if you feel like it – shoot me some tips.
Thanks,
Mike