Shallow Reef Build

Joeb1983

Member
I always thought it was pretty cool when I saw people converting frag tanks into reefs.

They looked very sleek; especially those being rimless. The low profile along with length really stood out from your typical standards.

Now they are pretty common and you see many more "shallow reefs".

So with that said, I decided to do one myself.

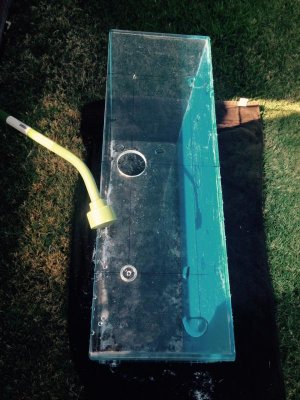
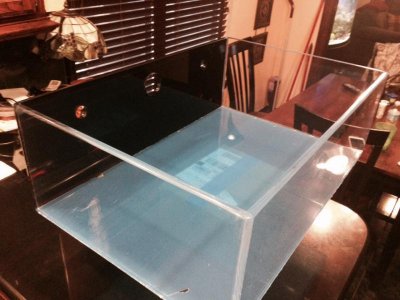
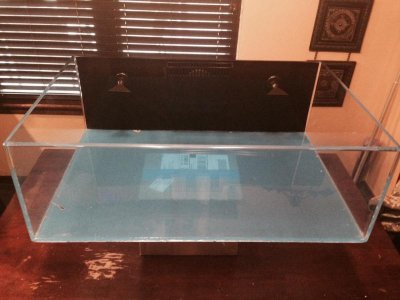
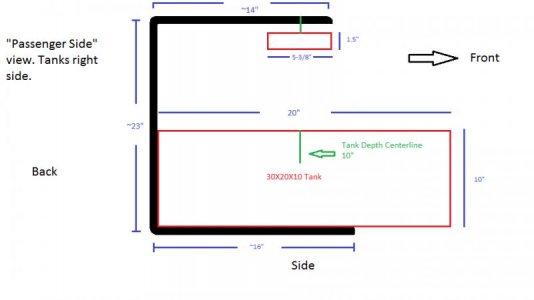
Dimension ideas bounced back and forth for weeks and I finally settled on a very simplistic 30WX20DX10T.

I believe if my math is right that's around 26 gallons give or take.

Anyways, I decided on acrylic over glass and had an idea on how I wanted the tank itself to look.

I went back and forth and back again on whether to do a "all in one" (rear portion of tank being a mini sump much like the nano cubes you see) and made numerous designs to do so.

Realizing I would have to sacrifice at least 4" of depth to do that; I started looking at other options.

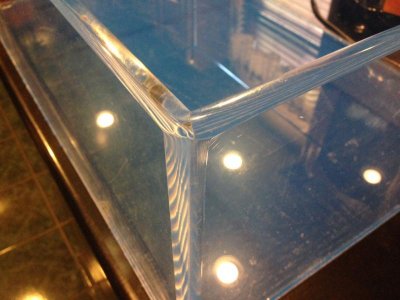
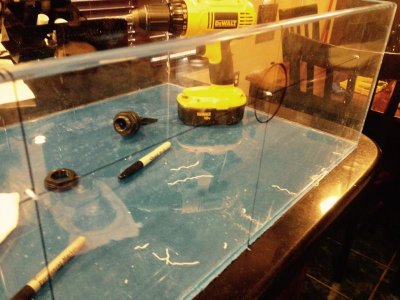
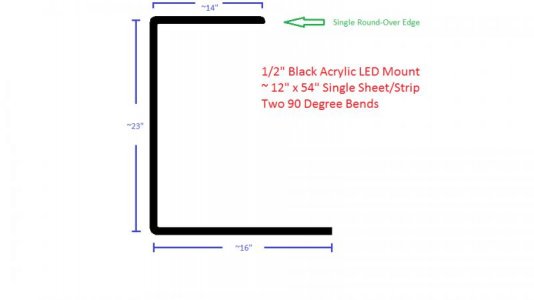
In the meantime I contacted Dave over at Acrylic Creations to start on the base 4 corner tank out of 1/2" to spec.

I knew I needed some sort of surface skim to avoid that oily film layer you get if you don't.

I have a Tunze 9004 skimmer I thought about using when the plan was to do a 12" tall tank, but went with 10" given it would have lost the "look" if I did.

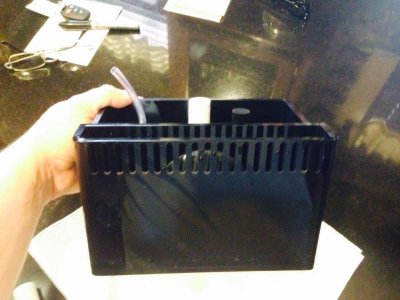
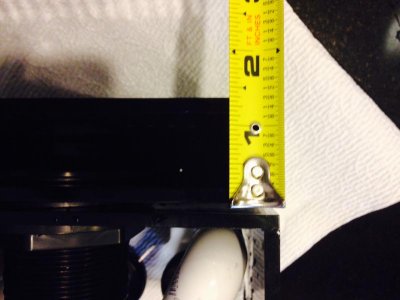
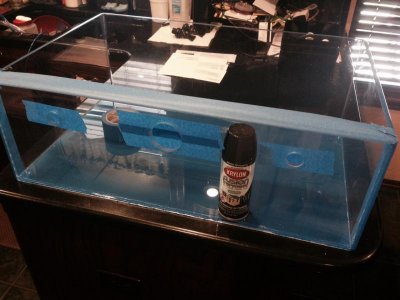
So... It looked like a overflow box was next on the list. Standard bulky boxes where not all that appealing for this tank and I didn't want to take up much real estate.

I knew Reef Saavy had a "ghost" overflow they displayed at MACNA, but it was too rich for my blood.

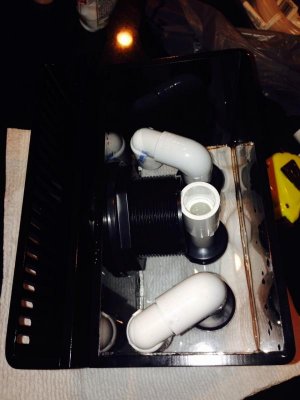
I often use a business in Texas (Modular Marine) for ideas or if I need something custom. (Yes they have an eBay store)

They have there own version of a ghost/low profile overflow for much cheaper, so I put that order in as well.

The tank, overflow, bulkheads and Loc-Line fittings all came in throughout this week. I will be working some on the tank today and will post pictures and updates as this "build" progresses for those interested...
 
Last edited:
Here is the tank as it came from Acrylic Creations. 1/2" with rounded corners and beveled lip. Again, its 30X20X10.
 

Attachments

  • Shallow 1.jpg
    Shallow 1.jpg
    69.2 KB · Views: 8
  • Shallow 2.jpg
    Shallow 2.jpg
    54.4 KB · Views: 7
Here is the ghost/low profile overflow. Less than 1.5" of in-tank depth.
 

Attachments

  • Box 1.jpg
    Box 1.jpg
    57.1 KB · Views: 8
  • Box 2.jpg
    Box 2.jpg
    39.2 KB · Views: 6
  • Box 3.jpg
    Box 3.jpg
    45.7 KB · Views: 7
Measured, marked, and pilot holes drilled for the hole saw.

Already killed a fresh 18v Dewalt battery and not even 2 holes drilled...

2- 3/8" hole for the 1.5" bulkhead (Overflow box)
1 - 1/8" for the 1/2's (Dual returns)
 

Attachments

  • Shallow 3.jpg
    Shallow 3.jpg
    68.6 KB · Views: 5
  • Shallow 4.jpg
    Shallow 4.jpg
    82.6 KB · Views: 6
Prepped, painted and mocked up. Krylon Fusion is the bee's knees!
 

Attachments

  • Paint prep.jpg
    Paint prep.jpg
    54.3 KB · Views: 5
  • Painted.jpg
    Painted.jpg
    48.4 KB · Views: 7
  • Painted 2.jpg
    Painted 2.jpg
    60.4 KB · Views: 8
  • Mock.jpg
    Mock.jpg
    54.9 KB · Views: 6
Tomorrow I will install the return bulkheads along with the overflow box.

O-rings will get a thin coat of Magic Lube. (Silicone)

Already has a few scratches just from handling it. Downfall of acrylic, but I'll just buff them out.
 
I plan on having the tank sit on a 1/2" riser just a tad smaller than the base footprint to give then illusion the tank is resting on a cushion of air. (Saw it before; loved it)

I have designed a light mount utilizing 1/2" black acrylic for my single AI Vega fixture. (pic attached of design)

Think it will hold the 3.28 pound light without distortion?.. Let me know what you think.
 

Attachments

  • AI LED mount.jpg
    AI LED mount.jpg
    18.4 KB · Views: 6
Plans sent over to Acrylic creations. Black acrylic was way too much money, so I settled on clear and I will give it the Krylon touch.

After speaking with Dave we decided on 3/4" rather than the 1/2" to be safe.

Should be here in a couple weeks.

Anyways, here is a not to scale rendering; again on paint.
 

Attachments

  • Side view.jpg
    Side view.jpg
    23.8 KB · Views: 8
Looking good so far, can't wait to see updates. I have always liked the shallow reefs. Just wondering though, why did you decide to go with such thick acrylic?
 
Thanks! I went with 1/2" for looks, durability and cost.

Looks - Thick rimless acrylic tanks looks sweet when lit from above. Gives it that "VIP" look. I couldn't get the rounded lip look I wanted with 1/4".

Durability - I could have easily went with 1/4" given its only 10" tall, but some longer and higher tanks will bow with thin acrylic as acrylic over time absorbs moister. I'm sure I would have had like a 1/8" bow with the 30" span over time.

I have a 20x20x15 sump out of 1/4" extruded clear acrylic and it has a slight bow to it with the water pressure and it will get a little worse as time goes on, but it's a sump in a cabinet.

Cost - I saved money with the 1/2" both in fabrication and material cost in the long run as the fronts and sides are not a continuos piece bent and welded to the back. It's actually 4 separate pieces, that were welded and rounded to give it the bent look.

The tank builder uses Weldon 40 to weld/glue the acrylic. Pretty good stuff. A little pricey, but when done right it actually gives a seemless look.

I thought about using 3/4" acrylic cut slightly smaller than the bottom dimensions of the tank as the riser and lighting it with a few LEDs to have a nice glow as if the tank was floating on a "cushion" of light.

We will see...
 
Last edited:
The only downfall I see to going with the 1/2" is me being a huge EcoTech MP fan. A MP10 is only rated for a max thickness of 3/8" thick tanks. However some have luck with them on 1/2", however some don't at all...

A MP40 would be to big for this tank in my opinion, both in looks and flow. With the tank only being 10" tall I worry about the sand bed. They move some water and create a nice undertow.

I also personally don't like the look of a cord wrapping over the lip with other PH's. That's just me though. Hopefully my dual returns will be enough. That as the idea anyway... Fingers crossed.
 
Yeah, my buddy sells them and has been pushing me to give one a go. I might try one.

I'll try the returns first, if that's not enough see if a MP10 will hold, if that fails I'll throw a gyre 130 in. Appreciate the reply/suggestion.
 
The custom acrylic light mount shipped and will be here next week. I'll post pics and pics of the prep and mounting of the light fixture when the time comes.
 
Picked up a used regular AI Hydra to try out given the Vega doesn't have violet or UV LED's.

I want to see if there is any difference in growth along with color.

Plus it's black (Vega is white) so it should look cleaner. Fixture should be here this week as well hopefully.
 
Looking forward to seeing some more updates. Especially that light mount. Everything looks good so far, keep it up.
 
Looking forward to seeing some more updates. Especially that light mount. Everything looks good so far, keep it up.

Thanks! According to UPS tracking the acrylic light mount will be here tomorrow. (Friday)

They took about a month to get the tank to me after letting them know exactly what I wanted. This time around; 10 days! Obviously a smaller project, but they are awesome and have some really reasonable prices.

I will definitely keep going back to them for future acrylic needs that's for sure as other places want 3-5 times as much.

I have a bunch of saltwater projects. I cant stop. lol! My wife says I have a problem.

*** Reflection time - lol! ***

I started blind with a 36 bow-front and stand combo from Petsmart a few years ago. Was sold everything under the sun from a LFS. Some things I kick myself for today. Keep in mind this is starting a brand new tank from square one:

Live water - most likely their water change water... :rolleye1:
Almost every Seachem product out there, JK, but it was a lot:

Iodide
Strotnium
Complete
Stabilty
Carbonate
Buffer

They wrote down a schedule for me that was something like:

M - 6 capfuls of Stabilty, 3 complete
T - 2 carbonate
W - 6 stability, 3 strontium, 2 buffer
T - 5 iodide
F - 6 stability, 2 carbonate
S - 3 complete
S - 3 strontium, 2 buffer

No corals, livestock or anything. Just sand, rock and water. :facepalm:

Obviously every time my water was tested at said LFS it was off and I needed more of this and more of that.

I got sick of it, felt like I was getting ripped off, thought of leaving the hobby as it was WAY too much $ than I thought/budgeted for. (Not too many options where I am stationed in OK.)

Then I started getting on/joining forums, researching, researching and researching some more.

Stopped dosing all that garbage for the time being, kept up with water changes, bought a test kit and then it all began. :fish1: Hooked ever since.

I have the 36 bow in my living room, a 45 standard I've been working on for over a year :facepalm: sitting in the middle of my gym to replace the 36, a 60 cube to stay in the gym, a 15 standard in the kitchen to be replaced by this shallow tank and lastly a 18" cube (cycling now) in my office to house the original clowns I started with years ago. Oh, and lets not forget my 20 long QT. haha!

I know there are people that have a lot more than me. Most likely they have a lot more $ as well. ;)

I now use all products per instructions. I rarely have to dose anything other than buffer in my RODI top off and stability on new tanks. Since I started making my own salt; regular water changes keep everything in check.

Now my biggest issue is the recent move I made from T5's to LED's... So far its been an uphill battle.

*** End reflection - boring day at work, sorry. lol! ***

Ill throw up pics of the mount like I said and it looks like the hydra is shipping late, so I wont be able to drill and mount unless its exactly like a vega... Ill research that.
 
*** Reflection time - lol! ***

I started blind with a 36 bow-front and stand combo from Petsmart a few years ago. Was sold everything under the sun from a LFS. Some things I kick myself for today. Keep in mind this is starting a brand new tank from square one:

Live water - most likely their water change water... :rolleye1:
Almost every Seachem product out there, JK, but it was a lot:

Iodide
Strotnium
Complete
Stabilty
Carbonate
Buffer

They wrote down a schedule for me that was something like:

M - 6 capfuls of Stabilty, 3 complete
T - 2 carbonate
W - 6 stability, 3 strontium, 2 buffer
T - 5 iodide
F - 6 stability, 2 carbonate
S - 3 complete
S - 3 strontium, 2 buffer

No corals, livestock or anything. Just sand, rock and water. :facepalm:

Obviously every time my water was tested at said LFS it was off and I needed more of this and more of that.

I got sick of it, felt like I was getting ripped off, thought of leaving the hobby as it was WAY too much $ than I thought/budgeted for. (Not too many options where I am stationed in OK.)

Then I started getting on/joining forums, researching, researching and researching some more.

Stopped dosing all that garbage for the time being, kept up with water changes, bought a test kit and then it all began. :fish1: Hooked ever since.

That really ticks me off about LFS:mad2: Sorry you had to experience that. 6 capfulls of stability??? Insane. Cycling a tank doesn't require all that nonsense. But live and learn I suppose...

Getting started with this hobby is the toughest part. Particularly when you don't have community support or a friend who's also in the hobby.

Hopefully its smoother sailing from here!
 
Getting started with this hobby is the toughest part. Particularly when you don't have community support or a friend who's also in the hobby.

Hopefully its smoother sailing from here!

I think all hobbies are that way, if there's not a local community or someone experienced who can help, you're flying blind. This makes the second hobby I have had this same issue in; the first being running Linux on my computers at home... pretty much same thing.

Joeb:
Congrats on making it through the toughest parts of learning, and sticking with it. I can't wait to see the finished result!
 
^ Appreciate the kind words!

Yeah, I'm good to go now, just took a lil bit. lol!

Its getting to the point where I am the advice guy with family, friends and co-workers. (I'm still no expert by any means)

The only thing that is kicking my butt are these AI Vega color led lights... (came from T5 HO's) Been a few months on my 45 and to be honest... Things are very hit or miss.

Red monti cap fading and the growth has slowed drastically if not stopped.
Lost a Hollywood stunner chalice frag. Faded then receded. (I placed it in several different spots w/ different light/intensities.)
Acans are fine.
Birdsnest are fine
Torches are "existing", growth again has drastically reduced if not stopped.
Zoa growth/spread has halted.
Orange monti digi is fine.

They only thing that was changed was lighting and salt mix (Red Sea Coral Pro) around the time.

Params are good so I have to contribute it to the lighting... I hope I didn't make a bad decision. :sad2: I have one over my 60, but its a FOWLR.

I had some fading when I switched to quality T5 bulbs, but things still looked great, color came back and I never lost growth. I know fading is common, but this just doesn't feel right.

I'm not sure if I should let it ride any longer or bite the bullet and make the switch back. Like I said its only been a few months. I am now up to a 60% reduction now via the coral acclimation mode. Started at 40%.

40% reduction on these %'s :

Cool white - 25%
red - 15%
green - 15%
Deep blue - 60%
Royal blue - 60%
Blue - 60%


60% reduction (now):

Cool white - 20%
red - 10%
green - 10%
Deep blue - 60%
Royal blue - 60%
Blue - 60%


We will see... Anyways, mount will be here today (on the truck), but the light was shipped late and will be here Tuesday.
 
Last edited:
Back
Top