So it begins...

alexkharden

New member
Well, I'm getting ready to start setting up my build. Once completed, my vision is that it will be a 190g DT with a 75 fuge and a 55 gallon sump. I am literally teaching myself this stuff as I go along (the fish aspect of it anyway), so I hope everyone bears with me. This setup will require not only tank setup, but load wall reconstruction, basement bracing and room building, to include electrical and plumbing. So I guess this'll be a full monty, lol. The pics will be boring at first, I'm sure, but I want to document the process as thoroughly as I can.

Here are the before pics:
20151215_075910small.jpg

20151215_075934small.jpg

One is from the living room into the dining room, one is from dining into living. The side of the doorway that I focused the pictures on will become the corner of the fish room. The tank will become that corner, with 4' of exposed tank in the living room and 3' of exposed tank in the dining room. Which means that I will have to tear out that little section of wall (about 4.5'). Luckily for me, that wall is load bearing, so I will have to provide additional support for the wider opening. That's where this baby comes in:

20151215_131540small.jpg

That's a 3.5"x16"x10' LVL 1.9e beam that I will be using to support the new opening (after I glue and lag the two halves together, that is.) Yes, I know it is likely overkill, but better safe than sorry and I honestly didn't feel like waiting for a structural engineer to come out and spec the opening, or having to pay for him to do it.

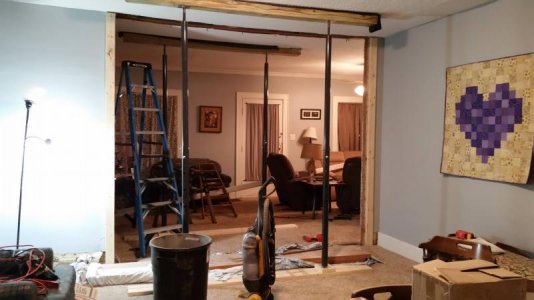
Here's me preparing the area to remove the necessary sections of wall:

20151215_154757small.jpg
20151215_154819small.jpg

My wife and son don't know it yet, but when they get home they'll be helping me set those 4x6's up on top of the lally columns to support the top half of the house while I do the necessary work on the wall. I'm sure they'll be thrilled.

Well, that's about all I've got for now, but please stay tuned as developments will be happening quickly. Hopefully I didn't bore everyone to tears, lol. One day soon I'll actually get to the reef portion of this reef build!
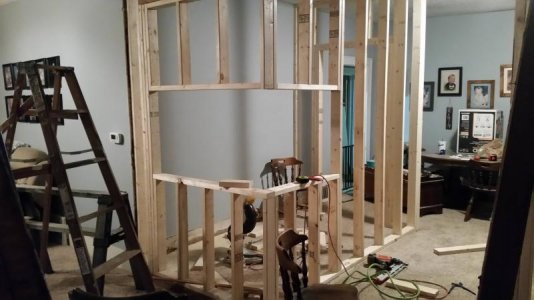
 
Oh, I'm sure she'd love that. She's already peeved because we JUST painted both rooms like 3 weeks ago, lol.


Yeah.. definitely make a hole and make sure you're past the point of return before she gets home. I'd leave some wires dangling from the wall for good measure.
 
I've installed the lally columns and glued and lagged the header, now I'm sitting here procrastinating and thinking about trim. Demolition begins as soon as I get my lazy butt up.

Thinking of trim gave me cause to realize something though, that being that my finished construction will allow for no front access to the two exposed display sides of the tank. I'll end up with about 20" of access on the left side, and full access to the back, but that's it. I really don't see a way to fix that either, but I'm sure that's something I will come to lament.

Also, some input please. I was thinking of running two separate 20A circuits to the room, one GFCI and one not. Would that be enough? Too much? Thoughts please from more experienced reefers.
 
So I'm done for the day. I tore out the wall section that needed it, and cleaned up, for the most part, my mess. Tomorrow I will look at getting the header installed and getting the framing done for the room and the new doorway. Hopefully I can get most, if not all of it done, but tomorrow will have to be a short day because me and my son are heading to Louisville for the Star Wars: The Force Returns premiere. So that's pretty awesome:) Here are some progress pics from throughout the day:

20151216_110714small.jpg

20151216_110732small.jpg

20151216_123114small.jpg

20151216_133317small.jpg

20151216_173122small.jpg

oops, it capped me at five images. I'll post the last couple in the next posting.
 
20151216_173726small.jpg


20151216_194529small.jpg


There, that's all I have for you guys today. Stay tuned for more developments:)
 

Attachments

  • 20151216_205349small.jpg
    20151216_205349small.jpg
    48.4 KB · Views: 8
Well, yesterday I wasn't as productive as I could've been, but I got a little done. I framed up the opening for the header and I cut the header to size. Like I said, a little. Here was where the day ended up:

20151217_123922small.jpg

This morning when I got up I realized that I was the only one here. Which meant that if I wanted the header hung, I'd have to hang it myself. So I did. First I built tracks around the header frame to create tracks for it to follow:

20151218_084309small.jpg

20151218_084317small.jpg

Then I removed two of the lally columns and used them to step up the
header bit by bit:

20151218_085507small.jpg

20151218_090036small.jpg
 
And continued inching it up:

20151218_090300small.jpg

20151218_091002small.jpg

Until finally I was all of the way.

20151218_092744small.jpg

Anyone paying attention to the demolition pics may have noticed how poorly that original doorway was supported, and I'm pretty sure it was visible in the pics how much it had sagged. Well, using the lally columns as jack posts, I jacked that top plate back up as high as I could without destroying the plaster ceiling, and then I put in the support posts.

And viola!

20151218_133615small.jpg


I ended the day by building the corner that the tank will sit on. I started here because this section needs to be as close to perfect as I can make it, so everything else will be built around it. In this hundred year old house there's nothing that's square, plumb, or level so to make this corner correctly required a lot of shims, different length cuts to compensate for poorly leveled areas, and plenty of areas that'll need to be covered/prettied up with trim. Here's what I got:

20151218_230506small.jpg

Additionally, today was an awesome fish-mail day because I got both my Reef Breeders Photon 24" lights, my Filter Guys RO/DI setup, and my Apex Gold with extras. So exciting!

I also ordered an ultra quiet bathroom fan to go into my fish room, and a dehumidistat to control it. Trying to beat mold before it happens!

I called GC.com to see when my tank might be ready, and was told they'd find out and call me back, but of course that call never came. Ah well, I've heard about their customer service issues. Hopefully I'll call Monday morning and they tell me it's ready and I can take a ride to Dixon!
 
Last edited:
It's magic time again folks!

As much progress as I'm making, it just makes me a little sad that I don't have a tank yet. I always tend to make things more complicated than they need be. Oh well, I get a vision and I have to see it through!

So here's where the vision made it to today:

20151219_165808small.jpg

20151219_204937small.jpg

20151219_213950small.jpg

As you can see, quite a bit of progress. I finished all the framing. The door is only temporarily hung, as I don't want to permanently hang it until the sheetrock is hung and mudded. I ripped up the carpet, but when I saw how much they'd stapled the padding down I decided to call it a day. Just too tedious to deal with tonight.

Tomorrow I plan on tearing that padding up, ripping out the ceiling inside the fish room, drilling for a floor drain, and maybe take a ride out to Menard's to see if they have any pond liners to cover the floor with. I also plan on building the tank stand and mounting it, if I get the pond liner in. If I'm feeling especially sprightly I might start running some electrical.

Alright folks, have a nice night!
 

Attachments

  • 20151219_204929small.jpg
    20151219_204929small.jpg
    50.9 KB · Views: 9
Wow! And I felt like we were doing a lot of work to get this tank up here... I feel like an underachiever, lol! I'd love to have a fish room, but I'd have to give up my baby grand, and I'm not ready for that yet. Can't wait to see this all finished!
 
Well, I was beat at the end of yesterday, so no post. What I accomplished was I ripped out the ceiling and ripped up the padding and tack strips, and then cleaned up the mess from both. I also ran most of the electrical to include wiring up 6 GFCI protected plugs in the fish room, 3 non-gfci plugs out in the living area, ran the lines and switch for the overhead light, and ran the lines for the humidistat and ceiling fan. I also hung a single piece of sheetrock, but decided that was enough and called it a day.

20151220_131724small.jpg

20151220_192044small.jpg

Today I finished running the electrical and fished all the lines through the joists in the basement. I also drilled the holes for the plumbing. I decided not to go with the pond-liner/poly-wall/floor-drain combination. I thought about it and realized that if there were ANY part of the pond liner that was compromised, at any point, that water WOULD find a way into it. It's been my experience that water will always find a way to get where you don't want it to be. I figured that once water got underneath the liner it would be a perfect breeding environment for mold and rot, so I decided to leave it all exposed so that I might be able to keep an eye on things over the years. Instead, I'm installing a washing machine hookup assembly into the wall. That will provide the necessary water and drain connections, without having to cover everything up.

Most importantly today, I played Santa to myself! I drove my excited little butt to Dickson, TN and picked up:

20151221_200209small.jpg

View attachment 337009

Whoopee! I, personally, think it looks magnificent. This was made by Glass Cages. I looked for the things I read in the reviews. The edges look beautifully polished, but I do notice some areas of silicone that made need to be cleaned up. I expected that, from what I read, and it's a small price to pay to save over a thousand bucks! Overall, I think it's a beautifully manufactured tank that's built like a tank, of the sherman variety. It's solid as a rock and looks like it might do better in a bomb blast that most of the other things in my house. It weighs about 450 pounds, so when it comes time to move in into the house and onto the stand I will definitely need to recruit 4-5 other strong men to get that job done, not to mention buying some glass suction cup handles. On the phone the CSR's at GC's were borderline rude, but helpful. In person everyone, including those same ladies from the phone, were friendly and polite and helpful. They have a huge warehouse with nothing but fish aquariums and one of the guys took us on a tour. Overall, my experience so far with them was an excellent one. I'll update that later, if need be, when I put water in the tank in a few weeks.

All-in-all, I'm pretty happy with the productivity the last couple days. The next two I'll be working 12 hour shifts, so I won't really be able to hit it hard again until christmas eve.

Until next time!
 
Wow! And I felt like we were doing a lot of work to get this tank up here... I feel like an underachiever, lol! I'd love to have a fish room, but I'd have to give up my baby grand, and I'm not ready for that yet. Can't wait to see this all finished!

That's a great looking tank stand you built! I haven't drilled any holes yet myself, but I need one in the back of my 75g fuge, so I guess I'll be learning something new here soon. Thanks for your reply!
 
Well, as I said last night, I had to work a 12 hour shift today. I didn't get much done, but I did do a little bit.

20151222_215440small.jpg

It's not completed yet, but I get a significant portion of the tank stand done. Since the floor in not the most level, I'm building the stand in place and measuring each leg to my level point. That way it stays level all the way through, without the need for a bunch of shims. I'll still have to shim here and there, because even doing it this way is not perfect, but I think I'll be saving myself a bunch of work in the long run.

Until next time!
 
Back
Top