Spcaeheater's 30 gallon parallel fuge build

Space heater

New member
I've been keeping fish on and off for many years now, mostly freshwater though. About 4 months ago I started a Fluval Spec V nano mixed reef. So far it's been a success, so I decided to convert my FW Spec to a reef as well. Right now it's just got a few ricordia and LPS. The problem is I'm doing double the maintenance and hate the dimensions. I am space limited but I want an upgrade.

Here's what I've ordered so far
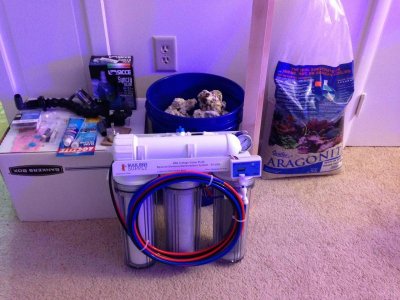
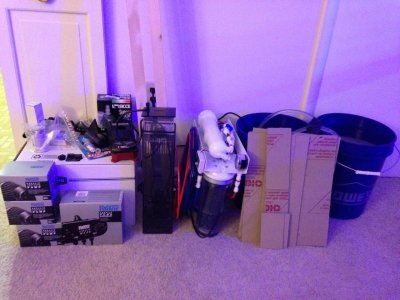
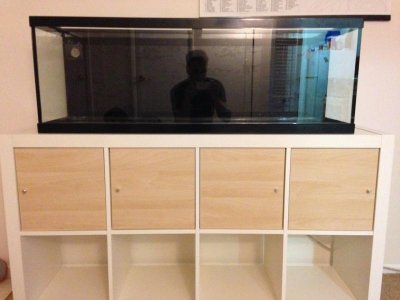
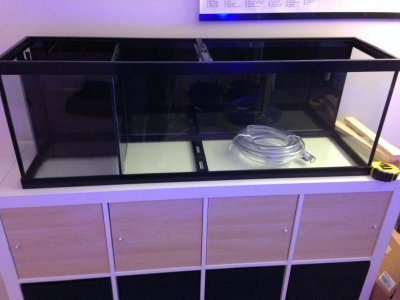
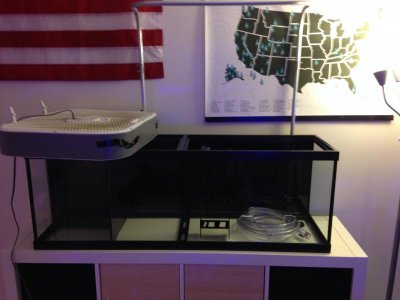
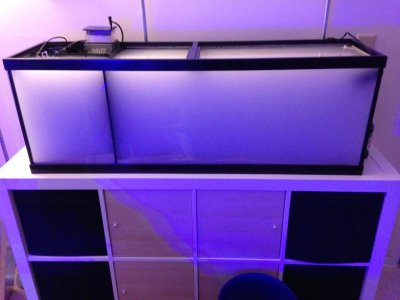
-40 gallon long tank (48 x 12 x 16)
-Syncra Silent 1.5 return pump (357 GPH)
-Hydor Slim Skim
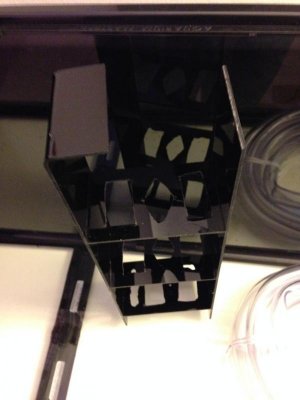
-DIY media rack with floss/Purigen/ChemiPure Elite
-Hydor Koralia Smartwave w/ 2x 425 GPH powerheads (display)
-Hydor Koralia 240 GPH powerhead (fuge)

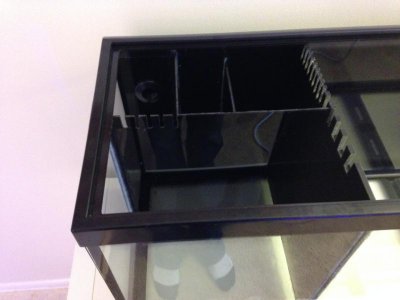
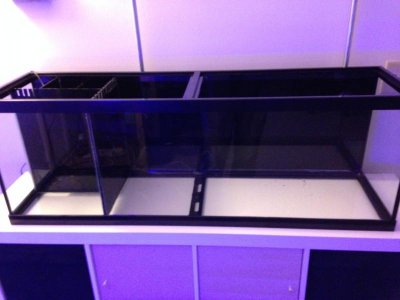
My plan is to build an AIO parallel display/fuge tank with the sump component behind the fuge like the diagram below.

I've got the acrylic on order (black 1/8 in. for the sump dividers, 1/4 in for the display/fuge divider). The plan is to cut teeth for the overflows into the fuge and skimmer to equal depth so that the fuge, skimmer, and display are all at the same depth. I'm also building a Arduino based controller for the lights, ato, dosing, temp, etc.

I've been looking for a RODI, since I'm currently paying $0.95 a gallon for RO water at the supermarket. With the larger tank I need to get my own RODI unit. I've almost pulled the trigger on the BRS value plus 4 stage system:
http://www.bulkreefsupply.com/brs-4-stage-value-plus-ro-di-system-75gpd.html

Does anyone have any other recommendations? I'm apartment bound for the next several years, so it has to be fairly compact and I'll be using a sink adaptor to feed it.

Other than that I'm open to as much advice as I can get. I'll try to keep this updated as the parts roll in and things start to take shape.
 

Attachments

  • tank layout.png
    tank layout.png
    3.1 KB · Views: 5
Ok, so I've been doing some thinking about waterflow. Before I was planning on running the two 425's at opposite ends of the tank to create a surge effect. When I do the math I have about 25x turnover. This seems a bit small to me. Now I'm thinking of adding a third 425 to be placed on the sump end of the display pushing back toward the return. I would put the two connected to the Smartwave at the far end and have them run synchronously. This would bump up my flow considerably and hopefully create an even better surge effect in the display. The one thing I worry about is surface waves limiting the amount of water I can fill the tank with. At only 15.5" deep I want to be able to fill close to the top frame.
 
I got a couple packages in the mail this week. My return kit, pump and an extra bulkhead from glass-holes, a few extra LEDs to beef up the lighting from RapidLED. I also made a trip to Lowe's and got a couple 1x2's to beef up my Ikea cabinet that will be the tank stand as well as some hardware and silicon.

This evening I picked up my new 40L from my LFS. While I was there I also got a BRS value plus RODI unit, about 20 lbs of reef saver dry rock and a 40 lb bag of "live" sand.

Right now I'm waiting on my carpets. The apartment manager is replacing them for me any day now, since they were horrible when I moved in. It's been in the works for about a month, so hopefully it happens this week. In the meantime I'm waiting on the acrylic (should get here Monday) from TAP plastics. While I'm waiting on the carpets I'm going to drill the tank and silicon in the sump/fuge compartments. I'm also starting the dry rock cycling in a 5 gallon bucket with about a pound of cured live rock.

Sorry for the lack of tank shots, it's in my storage unit until the carpets are done.

Question: I was planning on cycling the rock with instant ocean salt, since I have about half a box lying around. Is there any reason to use reef salt? I couldn't think of one and I'd rather use up this box to be rid of it.
 

Attachments

  • IMG_0629.jpg
    IMG_0629.jpg
    74.2 KB · Views: 3
Yea, I started out using IO, but switched to reef crystals because I'm lazy and didn't want to figure out dosing. With my 5 G's it's a lot easier just to do 1gal wc every week and that kept everything in line. With the larger setup though I'm planning on doing mostly SPS so I guess I'll have to figure out the dosing once it's up and established.
 
i prefer the seachem salinity salt…i used to use IO and then switched to reef crystals, absolutely hated it…the smell i got after a couple hours of mixing and the film in my bucket afterward made me feel not so good about the RC…so i switched to the Seachem salinity…only thing i dose is a cup of kalkwasser a day...
 
Today I drilled the tank. Maybe the most stressful thing I've done in this hobby so far. All went well, though. I only had a little chip out on the first hole, and the second had none. Since it's still in my storage unit I once again failed to get pictures. I promise they're coming as soon as the carpets are done. Next step is painting the back and sump area black, then gluing in the acrylic. Assuming the carpets happen this week, I hope to be water testing next weekend.

I also hooked up the RODI and made about 10 gallons for a wc on the specs and cycling the rock. I found out that my apartment has horrendously low water pressure. It's about 28 PSI! At this rate it took almost about 4 hours to make 10 gallons. I guess that means that I'll be diverting the coral funds to a booster pump.

I haven't had any complaints about reef crystals yet, they dissolve fast and the couple of SPS I have do great on them. I wouldn't be opposed to switching salts though. I have noticed that my Ca is pretty low most of the time, like right around 400. Alk is fine, and I do have dry Ca that I add to my top off water. I need to do a bit more research on Kalk dosing. My favorite corals are rics and SPSs, so I know that I'll need to start dosing (for the SPS). It's not a problem (as an undergrad I did 2+ years of research in a physical biochemistry lab), just not something I would call enjoyable.
 
Ok, on to lighting. I have a black lid for the sump/fuge which I will mount a single WW 3W LED in to gro macro on reverse schedule. Right now I have 2x 14" heatsinks with (each):
4x XT-E Royal blue
1X XP-E Blue
1x XP-E Green
1x True Violet (405 nm)
2x XP-G2 Neutral White
2x XP-G2 Warm White

I have also ordered an additional 4x RB, 2x TV, 2x B, and 2x G.

My plan is to bolt the two heatsinks together to make a single ~30" fixture, build a stand, then hang it about 10" above the tank, which puts it about 22-23" above the sand bed. I am also going to re-wire the drivers so that each color is independently adjustable.

I know I have a lot more white, green and blue than I need, but I like to be able to color balance so I get good fluorescence without the "windex" look.

The one thing I don't know is if I need optics. If anything they'd be 80 deg lenses, and I've run through the numbers a few times. The LEDs are basically staggered across the center line, but my concern is I'm on the low end of the recommended numbers for SPS. I have 2 1W channels for the the RB and NW, then 700 mW for the rest. Also I have really good airflow across the heatsinks, so they run very cool.

I think for now I'm going to just see how things go with what I've got, however I plan on adding an acrylic cover to the fixture with forced air cooling for aesthetic reasons. When I do I may add more LEDs or the optics.
 
Plastic showed up today! I dropped by the tank to take some final measurements. I need to cut 3/8 in off the dividers so that they'll come up to bottom of the rim.

I also got a DIY screen kit from Lowe's to make a top for the display. I'll start on reinforcing the stand after I get back from a conference this weekend, then get stuck into the tank build. Hopefully Sunday I'll get a chance to paint and put in the dividers.

In other news the carpets are scheduled to be done this weekend while I"m away, so hopefully I'll be able to move the tank in soon.
 
More goodies showed up today. Got the powerheads, smartwave and slim skim. I love it when a plan comes together.

Unfortunately I'll be out of town tomorrow and Friday, then working all day Saturday. Hopefully Sunday I'll get the stand reinforcement done and possibly the tank assembled. I'm still cycling the rocks in those buckets, it's only been a few days and I have sky high ammonia (3.5 ppm). If I get enough done this coming week I'll just set the tank up once the carpets are done and cycle the whole tank all at once. I figured the extra time in the buckets could only help to shorten the tank cycling time, though.

In the meantime the two Specs are getting move to the kitchen to keep them out of the way for the carpet guys. They'll live there until I'm ready to transfer livestock over to the new setup. I'll probably condense the corals into one spec with just a small CUC for a couple weeks until I get through the inevitable diatom/algae bloom, then move those over too. I'm planning on only putting dry rock into the new tank to avoid the small aptasia and bristleworm issues I've had. I'll probably also add more dry rock to the new setup once it's wet and just rely on the seeding while in buckets.
 

Attachments

  • IMG_0635.jpg
    IMG_0635.jpg
    60 KB · Views: 3
Carpets in the living room got done today. I set up the Specs on a table so that I could get going on the new tank. Now that I'm done putting everything back together I'm going to take tomorrow off work, sleep in then get started building out the tank! I painted the back of the tank after work, so I'm ready to get the dividers in and the plumbing done. I also placed what I hope will be the final equipment order for this build (mesh for the tank cover, hanging kit for the lighting and a new 125 W heater). Hopefully tomorrow night I'll have a big update.
 

Attachments

  • image (3).jpg
    image (3).jpg
    46.3 KB · Views: 3
I added 1x2 supports to each of the dividers (front and back) today. I also put corner braces in the upper corners of the shelving unit. This should (hopefully) be more than enough support for the full weight of the tank. I'm sure it can more than handle the compressive load, I'm more worried about lateral loads if someone bumps into it hard. I might add some heavy duty shelf brackets to the bottom corners, but that will block the cube type inserts. If I do I'll have to get some more doors for the outer shelves.

I also bent and installed an emt light hanger. Pretty standard, I just followed the many DIY threads on hanging lights. I also ordered a new 28x4" heatsink. It was going to be too much of a pain to re-use my current heatsinks.

I cut and installed the dividers for the fuge and sump compartments, as well as built a media rack. I had to freehand the cuts, so they aren't the prettiest, but they'll work and they will be mostly hidden by the fuge cover, which is also black acrylic.

I'm really excited to water test it in a couple days once the silicon has cured. I just need to install the plumbing first, but that will only take a couple minutes.

I have also started storing up RODI for the water test. I'm planning on filling it with RODI, and if everything is leak free I'll mix up the salt in the tank then get going on the scaping.
 

Attachments

  • IMG_0637.jpg
    IMG_0637.jpg
    42.9 KB · Views: 3
  • IMG_0638.jpg
    IMG_0638.jpg
    35.8 KB · Views: 3
  • IMG_0639.jpg
    IMG_0639.jpg
    40.9 KB · Views: 3
  • IMG_0640.jpg
    IMG_0640.jpg
    37.3 KB · Views: 3
I came home, no hint of vinegar from the tank so I made a rash decision and decided to start filling. I moved the tank into it's final resting place, which was a bit of a compromise. I wanted it against the wall next to my desk, but unfortunately that would have been parallel to the floor joists. This apartment was poorly built back when it was new about 40 years ago, so I decided to move it to the adjoining wall. Unfortunately it'll be behind the couch, but at least I don't have to worry about the stand tipping if the subfloor sags.

Water production is in full swing. With the rate that my RODI produces it's going to take about 3 days (since I'm only running it for the few hours that I'm home each night) to fill. Hope fully no leaks!
 

Attachments

  • IMG_0641.jpg
    IMG_0641.jpg
    41.1 KB · Views: 3
Ok, so I need some advice here. I've heard and been told to put eggcrate on the bottom of the tank to protect the glass from the rocks. I have about half a sheet of it now, which is more than enough to cover the bottom of the tank. My only concern is I have a orange spotted goby/pistol shrimp pair and hector's goby, and want them to be able to burrow while not having a deep sand bed (<1.5"). I suppose a deeper sand bed wouldn't be the worst thing ever, I was trying to keep it around 1.5" max though. Partly because I'd rather not have the shrimp making 6" high sand mountains every night.

So should I use the egg crate? I also really really really don't want the glass to crack.
 
Stuck at home writing a grant most of today, so the RODI's been running. I turn it off when I have to leave. Right now I'm about 2/3 full. Depending on how long it takes me to write this thing I might just finish tonight. I haven't been keeping track of time too well, but I estimate I'm only getting about 2 gal/hr.
 
A 90gpd rodi should put out about 3.75 gallons per hour. You can potentially put egg crate only under the bottoms of the rocks, strategically, so that they can still burrow in places.
 
yea, so I actually measured the flow and I'm getting about 30 gpd. The unit is rated at 75 gpd, but my water pressure is abysmal. It's currently showing 26 psi. I need to get a booster pump badly
 
I finished filling today. I dumped in reef crystals with the powerheads and return pump on, adjusted to 1.024, then started placing my semi-cycled base rock. I have about half as much as I'd like, since I'm only planning on keeping 1 or 2 of my current live rocks. I didn't get a picture of the base rock in place, but I did get one right after I added 40 lbs of "live" sand. Looks like a milkshake. Anyway, I hope that it's cleared tomorrow so I can get a decent photo.

In other news my new 28" heatsink arrived today. Right now I'm planning on transferring the LEDs on the Specs to the new tank, however that's become negotiable. I'm going to list the 5 gals for sale and see what happens. If someone really wants them with the current lighting I'd be willing to sell with the LEDs and just order more. Either way there's going to be a couple days of blackout for my fish and corals while I build the new fixture.

Also, BRS might just be my new favorite thing. My order was supposed to arrive today but because of local politics involving changing my address without any notice the package got returned to sender. I emailed them an within 30 minutes they had re-pulled my order and it should be shipping tomorrow. That's what I call customer service! They didn't even wait for the original package to get back to them. From now on they'll be my go-to.

Last thing, I have several stomatella snails in one of my current tanks. They tend to hang out on one of the rocks that I really don't want to keep. Does anyone have a trick for collecting these guys to transfer over to the new tank? Should I just put their rock in there for a bit then pull it out? They are amazing algae cleaners, but are harder than hell to catch.
 

Attachments

  • filled.jpg
    filled.jpg
    46.1 KB · Views: 3
  • cloudy.jpg
    cloudy.jpg
    45 KB · Views: 3
The dust has been settling, but I keep blowing off the rocks and kicking it back up. I took a shot before blowing the rocks off this morning.


I also put my heater in the pump compartment. The temp was 72, and I'm going to bring it up to 76.

Also, it's not obvious but the skimmer is in backwards. I unfortunately can't get it in forward because the suction cups interfere with the media rack. This evening I'm going to make a small eggcrate stand to put it at the proper height in the first chamber so I can turn it around. The filtering capacity is awesome though. The flow is split about 1/3 through the fuge, 2/3 through the filter chambers.
 
Back
Top